I’m working on an application that uses Android’s WiFi P2P functionality so that two phones can communicate directly with each other. Because of the nature of this application, I need to have two instances of this program running at once. The only problem is that Android Studio only let’s me have one debug target at a time. I thought of a few potential solutions.
* Deploy to one phone, start the application, then start debugging on the second
* Use a second computer and have each phone connected to a computer
Both of these solutions have shortcomings. They are both rather cumbersome. While this isn’t a supported scenario yet, there’s a better solution. We can use two instances of Android Studio on the same computer to open the project. We need a little bit of support from the operating system to pull this off. Android will otherwise see that we are opening a project that is already open otherwise. Before doing this, we need to make a symbolic link to our project.
A symbolic link is an entry in the file system that has its own unique path but points to existing data on the file system. Using symbolic links, a single file could be accessed through multiple paths. To Android Studio, these are two separate projects. But since it is the same data streams on the file system, the two “instances” will always be in sync. There are some files are are going to be unique to one instance or the other, but we will cover that in a
Symbolic links are supported on Windows, macOS, and on Linux. To make a symbolic link on macOS, use the ln command.
ln -s /original/path /new/linked/path
On Windows, use the mklink command.
mklink /j c:\original\path c:\linked\path
Make sure that Android Studio is closed. Make a copy of your project’s folder. In the new copy that you just made, you are going to erase most of the files. Delete the folder app/src in the copy. Open a terminal and navigate to the root of the copied project. In my case the original project is called P2PTest and the other is called P2PCopy. To make the symbolic link for the src file I use the following command.
ln -s ../P2PTest/app/src app/src
Some other resources that I’ve looked at suggest doing the same thing for the the project’s build.gradle and the build.gradle for each module. For simple projects, the only module is the app. I tried this and while it worked fine for the project’s build.gradle, I would always get errors about a broken symbolic link when I tried with the build.gradle at the module level. In the end, I only did this for the project level.
## ln -s ../P2PTest/app/build.gradle app/build.gradle ## this line had failed results
ln -s ../P2PTest/build.gradle build.gradle
Because I could not make changes to the module’s build.gradle, if there are changes made to it then it will need to be copied between the instances of the project. Thankfully, most changes to a project will be in the source files. While it is possible to edit the source files from eithe project, I encourage only editing from the primary project. This will help avoid situations where you have unsaved changes to the same file in different editors and have to manually merge them.
When you are ready to debug, you can set one instance of Android Studio to one of your phones, and the other instance to the other phone. Here, I have two instances set to deploy to a Galaxy Note 5 and a Galaxy Note 8.
I’m back from a recent trip out of the country. While the facility I was staying at would have an Internet connection, the price for Internet access for about a week was a little over 100 USD. I’d rather go without a connection. While I didn’t have access to the Internet, I did have access to a local network. I considered options on how to bring media with me. Rather than bring a few movies and songs here and there I wanted to indiscriminately copy what I could to a drive. In addition to myself, there were three other people with me that might also want to view the media. It made since to host the media on a pocket-sized web server. I setup a Raspberry Pi to do just this and took it with me on the trip.
After the trip was over, I thought to myself that there should be a way to do the same thing in a more compact package. I started to look at what the smallest Raspberry Pi Computer Module based setup would look like, and as I mentally constructed a solution in my mind, I realized it was converging to the same form factor as a phone. I’ve got plenty of old phones lying about. While I wouldn’t suggest this as a general solution (phones are a lot more expensive than a Pi) it is what I decided to have fun with.
Extra, unused Android devices.
There are various ways to run NodeJS on a phone and some other apps in the app store that let you host a web server on your phone. I didn’t use any of these. I am reinventing the wheel simply because I find enjoyment in creating. It was a Sunday night, I was watching my TV lineup, and decided to make a simple proof of concept. I only wanted the PoC to listen for incoming request and send a hard coded HTML page back to the client. I had that working in no time! I’ll build upon this to give it the ability to host static files and media files when I do a future update on this. I’m taking a moment to talk about how I build this first.
I created a new Android project. Before writing code, I declared a few permissions. I like to do this first so that later on I don’t have to wonder why a specific call failed. The permissions I added are for Internet access, accessing the WiFi state, and access to the Wake Lock to keep the device from completely suspending. For what I show here, only Internet capabilities are going to be used. You can choose to omit the other two permissions for this version of the program.
With the permissions in place, I started writing the code. There are only three classes used in the web server (counting an interface as a class).
WebServer – Listens for incoming request and passes them off to be handled as they com in
ClientSocketHandler – Processes an incoming class and gives the response
IStatusUpdater – used for passing status information back to the UI
The WebServer class accepts in its constructor the port on which it should run and a Context object, which is needed for some other calls. A WebServer instance does not begin to listen for connections until the start() method is called. Once it is started, the device retrieves the address of the WiFi adapter and creates a socket that is bound to this address. A status message is also sent to the UI so that it can show the device’s IP address. The class then creates the thread that will listen for incoming connections.
In the function listenerThread(), the class waits for an incoming connection. As soon as it receives one, it creates a new ClientSocketHandler with the socket and lets the ClientSocketHandler process the request and immediately goes back to listening for another connection. It doesn’t wait for the ClientSocketHandler to finish before waiting for the next connection.
package net.j2i.webserver.Service
import android.content.Context
import android.net.wifi.WifiManager
import android.text.format.Formatter
import java.net.InetSocketAddress
import java.net.ServerSocket
import java.net.Socket
import kotlin.concurrent.thread
class WebServer {
    companion object {
    }
    val port:Int;
    lateinit var receiveThread:Thread
    lateinit var  listenerSocket:ServerSocket;
    var keepRunning = true;
    val context:Context;
    var statusReceiver:IStatusUpdateReceiver
    constructor(port:Int, context: Context) {
        this.port = port;
        this.context = context;
        this.statusReceiver = object : IStatusUpdateReceiver {
            override fun updateStatus(ipAddress: String, clientCount: Int) {
                fun updateStatus(ipAddress: String, clientCount: Int) {
                }
            }
        }
    }
    fun start() {
        keepRunning = true;
        val wifiManager:WifiManager =
            this.context.getSystemService(Context.WIFI_SERVICE) as WifiManager;
        val wifiIpAddress:String = Formatter.formatIpAddress(wifiManager.connectionInfo.ipAddress);
        this.statusReceiver.updateStatus(wifiIpAddress, 0)
        this.listenerSocket = ServerSocket();
        this.listenerSocket.reuseAddress = true;
        this.listenerSocket.bind(InetSocketAddress(wifiIpAddress, this.port))
        this.receiveThread = thread(start = true) {
                this.listenerThread()
        }
        //this.receiveThread.start()
    }
    fun listenerThread() {
        while(keepRunning) {
            var clientSocket: Socket = this.listenerSocket.accept()
            val clientSocketHandler = ClientSocketHandler(clientSocket)
            clientSocketHandler.respondAsync()
        }
    }
}
In ClientSocketHandler, the class grabs the input stream (to read the request from the remote client) and the OutputStream (to send data back to the client). Now I haven’t implemented the HTTP protocol. But in HTTP, the client will send a one or more lines that make up the request followed by a blank line. For now, my client handler reads from input stream until that blank line is encountered. Once received, it composes a response.
I’ve got the HTML string that the client is going to return hardcoded into the application. In the response string is converted to a byte array. The size of this array is needed for one of the response headers. The client will receive the size of the response in the header Content-Length. The header for the response is constructed as a string and converted to a byte array. Then the two arrays are sent back to the client (first the header, then the content). After the response is sent, the client has done its work.
package net.j2i.webserver.Service
import android.util.Log
import java.lang.StringBuilder
import java.net.Socket
import kotlin.concurrent.thread
class ClientSocketHandler {
    companion object {
        val TAG = "ClientSocketHandler"
    }
    private val clientSocket: Socket;
    private val responseThread:Thread
    constructor(sourceClientSocket:Socket) {
        this.clientSocket = sourceClientSocket;
        this.responseThread = thread( start = false) {
                this.respond()
        }
    }
    public fun respondAsync() {
        this.responseThread.run()
    }
    private fun respond() {
        val inputStream = this.clientSocket.getInputStream()
        val outputStream = this.clientSocket.getOutputStream()
        var requestReceived = false;
        while(inputStream.available()>0 &&  !requestReceived) {
            val requestLine = inputStream.bufferedReader().readLine()
            Log.i(ClientSocketHandler.TAG, requestLine)
            if(processRequestLine(requestLine)) {
            requestReceived = true;}
        }
        val sb:StringBuilder = StringBuilder()
        val sbHeader = StringBuilder()
        sb.appendLine(
            "<html>"+
                    "<head><title>Test</title></head>" +
                    "<body>Test Response;lkj;ljkojiojioijoij</body>"+
                   "</html>")
        sb.appendLine()
        val responseString = sb.toString()
        val responseBytes = responseString.toByteArray(Charsets.UTF_8)
        val responseSize = responseBytes.size
        sbHeader.appendLine("HTTP/1.1 200 OK");
        sbHeader.appendLine("Content-Type: text/html");
        sbHeader.append("Content-Length: ")
        sbHeader.appendLine(responseSize)
        sbHeader.appendLine()
        val responseHeaderString = sbHeader.toString()
        val responseHeaderBytes = responseHeaderString.toByteArray(Charsets.UTF_8)
        outputStream.write(responseHeaderBytes)
        outputStream.write(responseBytes)
        outputStream.flush()
        outputStream.close()
    }
    fun processRequestLine(requestLine:String): Boolean {
        if(requestLine == "") {
            return true;
        }
        return false;
    }
}
The interface that I mentioned, IStatusUpdateReceiver, is currently only being used to communicate the IP address on which the server is listening back to the UI.
package net.j2i.webserver.Service
interface IStatusUpdateReceiver {
    fun updateStatus(ipAddress:String, clientCount:Int);
}
Since the server runs on a different thread, before updating the UI I must make sure that UI related calls are being performed on the main thread. If you look in the class for MainActivity you will see that I created the WebServer instance in the activity. I’m only doing this because it is a PoF. If you make your own application, implement this as a service. I set the statusReceiver member of the WebServer to an annonymous class instance that does nothing more than update the IP address displayed in the UI. The call to set the text in the UI is wrapped in a runOnUiThread block. After this is setup, I call start() on the webserver to get things going.
I was happy that my proof of concept worked. I haven’t yet decided if I am going to throw this away or continue working from this. In either case, there are a few things that I want to have in whatever my next version is. I do absolutely no exception handling or cleanup in this code. It needs to be able to timeout a connection and refuse connections if it gets inundated. I also want my next version to do actual processing of the incoming HTTP request and serve up content that has been saved to the device’s memory, such as a folder on the device’s memory card. While I am making this to serve up static content, I might add a few services to the server/device side, such as a socket server. That will require a lot more thought.
On 25 December 2021, the James Webb Telescope (JWT) launched. This last month up to the launch had a couple of delays due to weather and an incident for which they had to ensure there was no damage. At the time that I am writing this, the JWT has not yet been brought up to full operation. But thus far, things have been going well. The JWT is often thought of as the successor to the Hubble telescope. Some call it a replacement, but its capabilities are not identical to that of Hubble. It was designed based on some of the findings of Hubble. I’ve got some readers whose living memory does not go back as far as the Hubble telescope. Let’s take a brief walk-through history.
Rendering of the James Webb Telescope
Edwin Hubble (the person, not the telescope) is most well-known for his astronomical observations and discoveries. Some of his discovers included that there were galaxies beyond the Milky Way, found methods to gauge cosmic distances, and discovered that the further aware from earth that an observed galaxy is, the faster that it is moving away from other galaxies (this is known as “Hubble’s Law”). Edwin Hubble performed many of his observations using what was then the world’s largest telescope, named after James D. Hooker. Naming large telescopes after people was a bit off a tradition.
The Hubble Telescope
Space telescopes were proposed in the early 1920s. As is the case with many high investment scientific endeavors, Hubble’s planning was a joint venture that crossed international borders. The USA’s NASA and the European Space Agency both made contributions to Hubble. The project was started in the 1970s with plans to launch in 1983. There were delays that prevented this. But it finally launched in 1990. Much to the disappointment of many, after launch it was discovered that the Hubble’s main mirror was incorrectly manufactured; the telescope was taking distorted images. It was possible to use software to make some corrections in the image, but servicing was needed to correct the problem. Hubble, being positioned in low earth orbit, was accessible to astronauts by way of the space shuttle. A few years after its launch in 1993 a servicing mission corrected the optical problems. Through several other missions Hubble was maintained and upgraded until 2009. The telescope had been used for over 30 years. The telescope is still partially operational now. Some of the gyroscopes have failed as has one of the high-resolution cameras. But some other cameras and instruments are still operational. A near-Infared telescope is functional but remains offline for the time being. It is expected to be able to maintain functionality until 2040.
The Plane Uranus as seen in Near Infared
While Hubble was operating in its earlier years, plans for its successor had begone. Planning for the James Web Telescope began about 1996. The year prior, in 1995, was the Hubble Deep Field photograph. The Hubble telescope was aimed at a dark patch of sky and took a long exposure photograph. For 10 days the telescope collected whatever bits of light that it could. The result was an image that was full of galaxies! Around 10,000 galaxies were observed through the deep field imaging. Visible, infrared, and ultraviolet wavelengths were used in the imaging.
Hubble Deep Field Image
Earlier I mentioned Edwin Hubble’s discovery of how galaxies further aware are recessing from earth at a faster rate than ones that are closer. The faster the galaxy is moving away, the more red-shifted the light from it is. Red shifting is a form of the doppler effect observed on light. Just as the pitch of a sound will be higher in pitch if it is moving toward and observer and lower in pitch when it is moving away, visible light shifts to become red if the source is moving away from an observer and blue if it is moving closer. Part of the purpose of the JWT is to make observations of astronomical bodies much more distant than the Hubble could. Since these bodies will be more red shifted, the JWT was designed to be sensitive to light that is red shifted. While both the Hubble Telescope and JWT have infrared capabilities, the JWT is designed to see light that is much more red. Because of this goal, the JWT has some rather unusual elements of design and constraints.
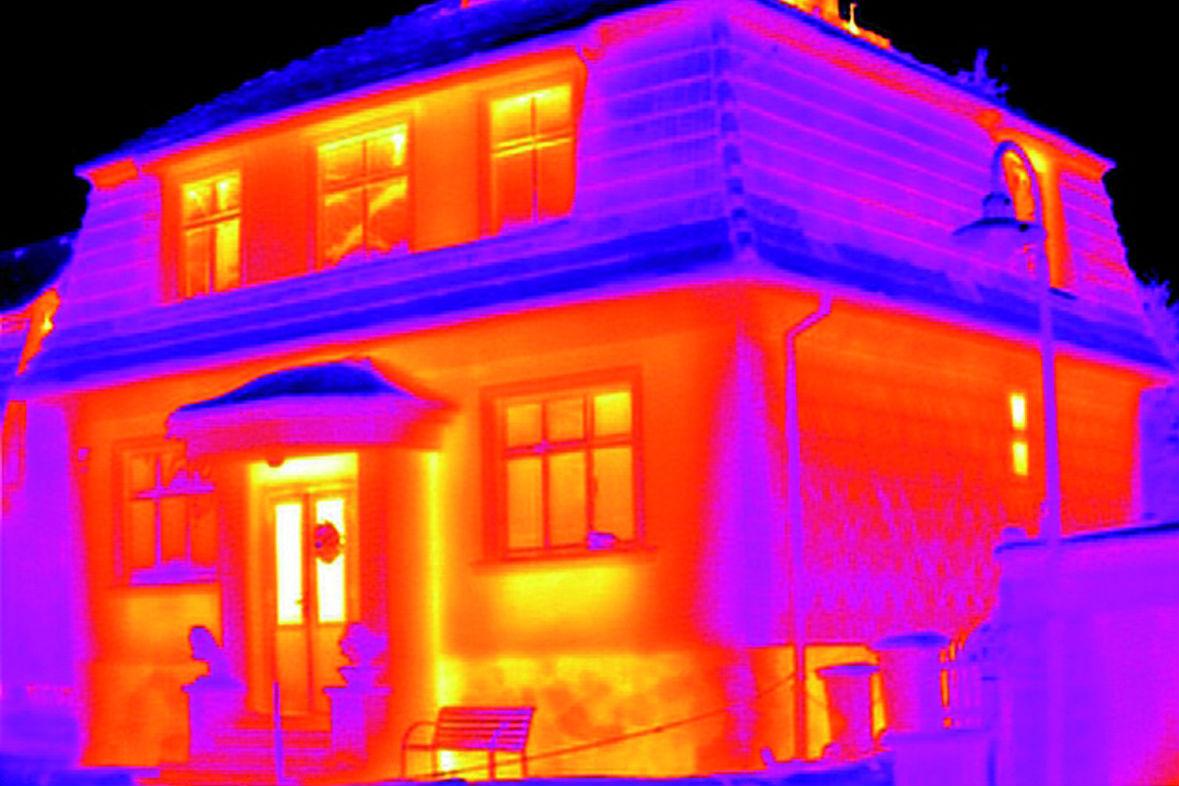
Objects radiate their heat out as electromagnetic waves. For objects that are hot enough, we are able to see this radiation as light; a hot piece of metal may glow red or orange. Objects with no glow in visible light may still give off light in the Infared spectrum. Such objects include the earth and the moon, which reflect infrared from the sun and emits heat.
Infrared Photo showing heat leakage from a house
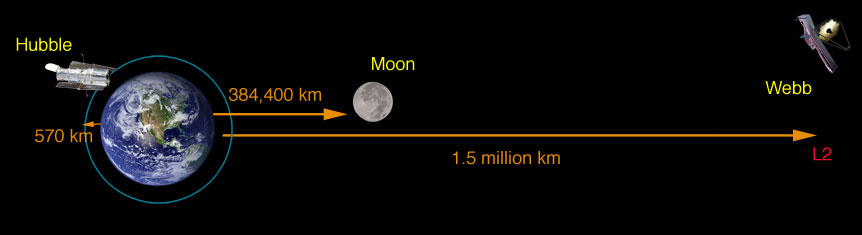
The Hubble was positioned in low earth orbit, about 570km above earth. The moon is about 385,000 km from earth. To avoid the glow of the earth and moon, the JWT is much further aware at 1,500,000 km. The Hubble was in orbit around the earth, but the JWT isn’t really in orbit. It is in a Lagrange point. Objects positioned in a Lagrange point tend to stay in position with very little active adjustments needed.
Relative distances from earth. Image from NASA.gov.
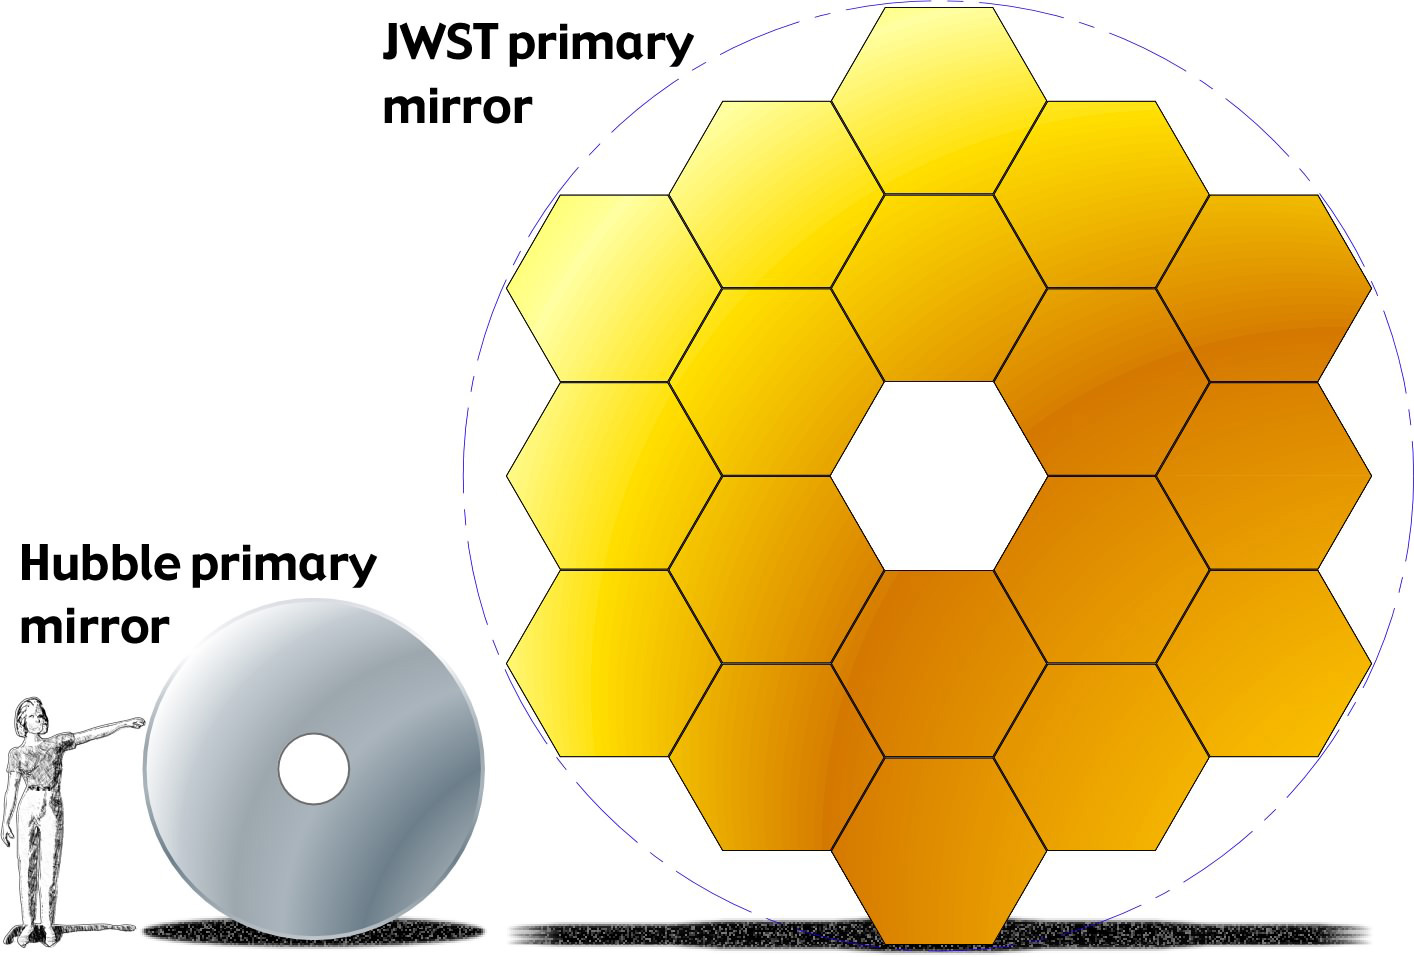
The telescope is still exposed to the sun, which would potentially heat the telescope up and cause the telescope to have its own glow that would interfere with imaging. To prevent the sun from being a problem, the telescope has a multilayered shield on the portion that is facing the sun. The shield is designed to reflect light away and to dissipate heat before it reaches the imaging elements of the telescope. Another unique element of the telescope is the exposed reflector. The reflector is composed of several hexagon-shaped mirrors coated in gold. Gold reflects infrared light very well. Using hexagon segments for the mirror simplifies manufacturing and allows the elements to be more easily folded; the telescope was launched in a fairing with the mirror folded and the sunshield sandwiched over the mirror.
Folded James Webb Telescope.
The JWT’s field of vision is much wider than that of Hubble. It collects about 15 times more light than the Hubble and has a wider field of view. The telescope’s look stands out in that there is no tube wrapped around the optical elements. Optical tubes on terrestrial telescopes protect the elements from debris and stray light. Because of the telescope’s sun shield and its position, it won’t be exposed to stray light from the sun. I’ve not been able to find references on any concern for the mirror being exposed to debris in space (despite being a hard vacuum, it isn’t without debris) but unlike on earth, there are not concerns with it collecting dust. With these differences in design and capabilities and design, what are the plans on how this telescope will be used?
Comparison of Hubble and JWT mirror size, from NASA.gov
While I’m not a fan of this description, I often see its purposed summarized as “looking back in time.” Despite my dislike of this description, it isn’t inaccurate. Light takes time to travel. If you look toward the moon, the light reflected from the moon took 3 seconds to travel to your eyes. You are seeing how the moon looked three seconds ago. For the sun, it’s eight minutes ago. These bodies to change dramatically enough for the delay to make a significant difference. But as we look at bodies that are further away, the time it takes to travel becomes more significant. From Mars to earth is about 22 minutes. Jupiter to earth is about 48 minutes. It takes a few hours for light to travel between Pluto and earth. For other galaxies, light takes years. While light-years is a unit of distance, it also tells you how long it takes for light to travel from a body. The JWT’s light collection capabilities make it capable of seeing light far enough aware to collect information on the earlier universe. The Hubble telescope was able to collect information on the universe from about ~13.4 billion years ago while the James Webb Telescope is expected to collect data from about 13.7 billion years ago. That 300,000,000 difference
As of yet, the James Webb Telescope hasn’t taken its first image. This is about 4 days after launch. It has deployed the sun shield. It will take about another 25 days for the telescope to reach its intended position. Before then, the mirror segments must be unfolded into place. If you are waiting to see images from the JWT, it will be a while. There’s calibration and preparation needed. Other than test images, we might not start seeing full images for another six months.
If you want to keep track of where the telescope is and its status, NASA has a site available showing the tracking data.
James Webb Telescope Tracking Site
Developments on the James Webb Telescope will be slow to come at first, but it should be interesting.