Introduction to SASS

SASS, or Syntactically Awesome Style Sheets, are a style sheet language that compile to CSS. I have mentioned languages that compile to another language before. TypeScript is an example. If you have used a system that compiles one language to another you may be able to guess why someone might want to make a new style sheet language that compiles to another.

SASS retains some amount of familiarity with CSS. This alternative syntax is more expressive; a developer can write less code to express the same design as the equivalent CSS. It also is not necessary to wait on browsers to have some feature to start using SASS; the layer of separation provided by the compiler allows SASS to have less dependencies on a browser supporting a set of features to be useful. In this first of a two part post I wanted o introduce some of the elements of SASS. Here I demonstrate variables, nesting, and replacement. In the second post I will focus on control structures and functions.

There are several GUI and command line solutions for compiling SASS. My preference is for the command line tool. The command line tool is easy enough to use both directly and to integrate into other build tools.  Installation using the Node Package Manager works on Windows, Linux, and macOS (though for me it does not work with the Windows Power Shell while it works fine in the command terminal).

npm install sass -g

If you would like to check if a system has sass installed and the version number type the following.

sass --version

Much like TypeScript, think of SASS as a super set of CSS. This is not 100% the case, but it is a good starting point for understanding. SASS styles might be distributed among several files, but when compiled the output will be in a single files.  SASS files will typically have the extension *.scss.  As an initial test I have created two files in a folder. One is named first.scss and the other is named second.scss. The following is the contents of first.sass:

@import 'second';
first {
font-family: Arial;
}

And of second.sass:

second{
font-family: Arial;
}

Since first.sass is my main file of this set to compile these files I am selecting first.sass as the input to the pre-processor. When the pre-processor encounters the @import keyword it will replace that line with the contents of the files whose name is specified there. Note that I did not need to include the extension to the file name here.  To compile these files I use the following command:

sass first.sass output.css

After running the command there is a new file named output.css.

second {
font-family: Arial;
}

first {
font-family: Arial;
}

Chances are that you are not going to want to issue a command at the command prompt every time you make a change to one of the SASS files.  To avoid this you can add the parameter –watch to the command line and allow it to continue to run. Every time you modify a SASS file the compiler will regenerate output.css.

sass --watch first.scss output.css

Variables

One of the first constructs that you will use in SASS is variables. Variables are recognizable from the $ prefix that they have. A variable can hold a Boolean, color, numeric, or string values. It is easy to undervalue variables at first; CSS already provide variables. Why are SASS variables needed? SASS variables are usable in places and ways in which CSS variables are not.  Some of the ways that variables can be used to create a style sheet will come up in some of the following sections. Let us look at a typical scenario first.

$primaryColor : #FF0000;
$secondaryColor: #FFFFD0;
This creates two variables that hold colors. These colors can be used within the SASS  in place of an actual color code.
body {
   color:$primaryColor;
   background-color: $secondaryColor;
}

.container > div {
   margin:1px;
   color:$secondaryColor;
   background-color: $primaryColor;
}

Variables have a scope. If a variable is declared outside of brackets it is globally accessible. If it is declared within the SASS block enveloped by brackets it is only visible to the SASS code within that block. In the following the second instance of $borderColor will cause an error from a variable not being defined. The variable of the same name declared in the first block is not within scope.

body {
   $borderColor: #0000FF;
   color:$primaryColor;
   background-color: $secondaryColor;
}

.container > div {
   margin:1px;
   color:$secondaryColor;
   background-color: $primaryColor;
   border: 1px solid $borderColor;
}

Default Values for Variables

You may make a SASS and want to allow a user to customize it through defining values for some variables. But you might not want to obligate the user to define values for all of the variables that your SASS uses. For this scenario there are default values.  To assign a variable a default values append the assignment with !default.
$primaryColor: #FF0000 !default;
The assignment occurs only if the variable is undefined or has a null values.  If there are any SASS definitions that use the variable before it is assigned a values other than its default those blocks that occur before the new assignment will not have the new values. The default would need to be overridden before it was used.  This could mean defining a variable before including the library that will be used. But there is another way that I think is cleaner.
With the @use directive a SASS library can be included and the variables to be assigned new values can be specified using the keyword “with” and a list of the variable assignments.
@use  'second' with (
   $primaryColor: #FF00FF
)

Nesting Selectors

The ability to nest selectors is a feature that in my opinion allows for much neater style sheets. It is common within CSS to have selectors based on some parent/child relationship. Here is a simple example.

.demoView {
   width:1080px;
   height:1920px;
}

.demoView .left {
   background-color: red;
}

.demoView .middle {
   background-color: green;
}

.demoView .right {
   background-color: blue;
}
While these style selectors are all related they are each in their own  own declaration independent of each other. Under SASS they could be grouped together. Each selector is referring to elements that are children of an element of the demoView class. A single demoView declaration is made in my SASS file. For selectors that are targeting children of demoView within SASS they are declared within  the demoView class selector.
.demoView {
   width:1080px;
   height:1920px;

   .left {
      background-color: red;
   }
   .middle {
      background-color: green;
   }
   .right {
      background-color: blue;
   }
}
I personally find this pleasing since the SASS’s layout is now closer to the arrangement of the elements within the HTML.

Parent Selector

The ampersand (&) character is used as a parent selector operator.  The & is replaced with what ever the parent selector is.
a {
   text-decoration: none;;
   &:hover {
      color:red;
   }
}
Here the potential use of the operator might not be entirely obvious. Think of it as performing a string replacement.
.icon {
   &-left {
      color:red;
   }
   &-right {
      color:yellow;
   }
}
This expands to the following.
.icon {
   &-left {
      color:red;
   }
   &-right {
      color:yellow;
   }
}
Not that this is the only way that a string substitution can occur. There is also the string interpolation operation.

String Interpolation

String interpolation substitutes the values of a variable into a string. String interpolation operations use #{}  with a variable name inserted between the brackets. String interpolation can be used in a selector, attribute name, or values.
$index:4;
item-#{$index} {
   color:red;
}
expands to
item-4 {
color: red;
}
The potential for this operation becomes more powerful once used within other constructs such as loops. Control structures will be the topic of the second half of this post, but I will show a brief example here.
@for $i from 1 to 4 {
   item-#{$i} {
      animation-delay: #{$i}s;
   }
}
item-1 {
   animation-delay: 1s;
}

item-2 {
   animation-delay: 2s;
}

item-3 {
   animation-delay: 3s;
}

Placeholder Selectors and @extend

Placeholder selectors look like class selectors. But they are proceeded with a % instead of a period. The first thing to note about placeholder selectors is that they do not generate any CSS output. Any selector that contains a place holder selector will not be rendered to the CSS output. At first, placeholders appear useless. The placeholder selectors are made to be used with @extend. Use @extend to import the attributes from a place holder selector into another selector.
%blockElement {
   display:block;
   width:100px;
   height:100px;
}

.redBlock {
   @extend %blockElement;
   background-color: red;
}

.greenBlock {
   @extend %blockElement;
   background-color: green;
}
This is the CSS produced by the above.
.greenBlock, .redBlock {
display: block;
width: 100px;
height: 100px;
}

.redBlock {
background-color: red;
}

.greenBlock {
background-color: green;
}
Nothing in what I have shown thus far is complex and I think it is easy to to understand the individual elements. But for a deeper understanding I think it best to start putting this information to use. Exercise one’s understanding through some simple projects to strengthen that understanding.  When the next portion of this post is published  will dive straight into control structures and functions. With those the potential to generate complex CSS from much simpler SASS increases significantly.
Until the next entry if you would like to see my other posts on HTMLrelated topics click here.
twitterLogofacebookLogo  youtubeLogo


Mastering SASS


SASS and Compass

Apple, Alphabet, Amazon, and Facebook Called to Congress

Monopoly logo

Some of the largest technology companies in the USA have yet again been called to testify at the House of Representatives to testify. They have been called many times before. This time it is on competition. Some have alleged that each of these companies has done something to hinder competition and they are being called to speak on it. In a letter written to these companies the House has asked that the CEOs of these companies be the ones to testify. They are also asking the companies to produce documents that were generated in response to competition. If the companies do not produce documentation they may be subpoenaed and obligated to produce it anyway.

For Apple the only way to publish an application is through the Apple App Store. For applications published thay way Apple earns a portion of the sales and subscriptions. Apps sold through the App store cannot advertise paying for services through means other than the App store.

Alphabet (the parent company of Google) has been accused of anticompetitive behaviours along several fronts. This includes giving preference to Alphabet provided serviced in Google searches and having an extensive advertising vertical.

Amazon is a bit unique. Previous anticompetitive cases have focused on consumer welfare. But Amazon’s practices haven’t met past criteria for poor consumer welfare. Amazon has access to lots of sells data and the computational and AI capabilities for profitably using that information and under pricing those that sell through their service.

Facebook has been accused of cutting developers off from their services to serve their own purposes. They have also purchased other services that might have competed with them otherwise (ex:Instagram). Some competitors have described Facebook as an unlawful monopoly.

Whether or not these companies engage in anticompetitive behaviour is a topic of debate. This hearing is part of an ongoing investigation into competition in technology. At the same time the EU is launching an anti-competitive investigation on Apple’s App Store and on Apple Pay. The investigation is based on a complaint from Spotify from last year and a complaint from an unnamed ebook/audio-book distributor. Their complaints are on the fee that must be payed to Apple for services purchased through the user’s iOS device and the prohibitions on communicating to users how they can upgrade their services through other means. For Apple Pay the investigation is on that being the only contactless payment solution that can be deployed to the iPhone. Especially at a time when there is increased interest in contacless transactions in the wake of COVID-19.

Instagram LogoLinked In

Case Sensitive File System on Windows

readme

As of Windows 10 build 1803 case sensitive files names can be enabled on Windows. This is a feature that I have found useful while working in an environment where some developers run macOS and others run Windows. Occasionally a macOS developer would encounter an error about a missing file that the Windows developers didn’t encounter. The problem was usually because of inconsistent casing being used in a file name and some reference to the file in code.  By enabling the case sensitive file system the Windows developers are able to better check when their casing is inconsistent.

The feature is enabled on a folder and its children. It isn’t something that you would want to try to enable system wide. I use this feature on project folders.

To enable the case sensitive file system open an administrative command prompt. Then use the following command.

fsutil.exe file SetCaseSensitiveInfo c:\PathTo\Target\Folder enable

After the command runs you can test it out by creating a few files in the folder that have the same name with different casing. If you ever want to turn off the case sensitive file system the command to do this is similar.

fsutil.exe file SetCaseSensitiveInfo c:\PathTo\Target\Folder disable


Taking a Look at the Azure Kinect DK

My interest in the Azure Kinect DK has increased since I was able to get my hands on one of the devices. Because of the Azure branding, I expected it to only be a streaming device for getting data into the Azure Cloud for processing. My expectation was wrong. While the device is supported by Azure branded services, it is a fully implemented device with local functionality of its own. In this post I will only give a brief introduction to the Azure Kinect DK. In the future, I will go deeper into the code.

The Azure Kinect DK comes with the camera itself, a USB-C to USB-A cable, and an external power supply. When connected to a computer that supports USB-C Power Delivery, only the USB-C cable is needed. The SDK for the Azure Kinect DK is available from Microsoft for free.

It works on Ubuntu Linux 18.04 in addition to working on Windows! To install the tools on Linux you can do the following.

sudo apt install k4a-tools

Physical Build

The Azure Kinect DK has a solid feel to the build. The body of the Kinect itself is an anodized aluminum. The back end of the Kinect is covered with a plastic sleeve that slides off to show additional mounting options. In addition to the standard quarter-inch screw mount that is commonly found on cameras, removing the sleeve on the underside of the the Azure Kinect DK exposes screw mounts on the side. The distance between the screw holes and the screw size is labeled. (The spacing of these holes can also be found on the Azure Kinect specifications page)

Kinect-sideProfile

Field of View

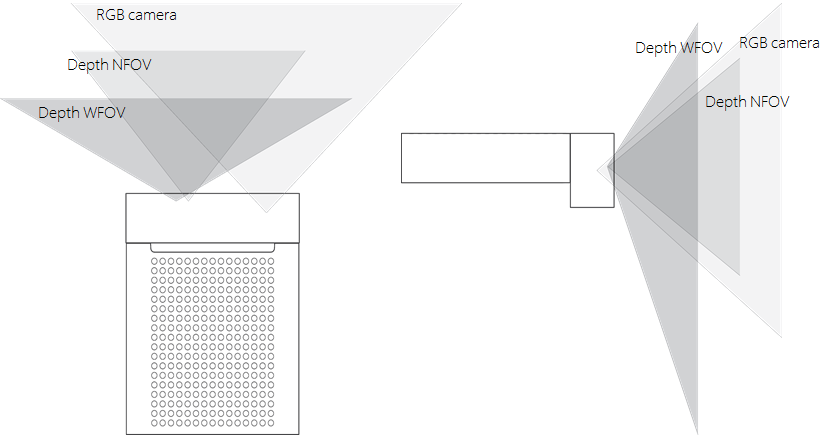
There are three cameras on the device. An item being within the field of view (FoV) of one of the cameras does not indicate that it is within the FoV of all three of them. There are two depth sensing cameras: one with a narrow FoV and another with a wide FoV. There is also a color (RGB) camera. The following diagram is from Microsoft’s site showing the three fields of view of the cameras.

Camera FOV

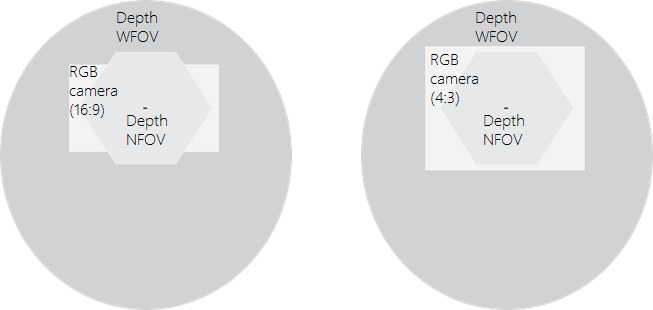
I thought that the following image was especially useful in showing the differences in the FoV. If the unit were facing a wall straight on from 2,000 meters this is the overlapping area of what each camera would be able to see. Note that the RGB camera can work in two aspect ratios 16:9 and 4:3.

Camera FOV Front

Sensors

The Kinect has a number of sensors within it. The most obvious ones are in the cameras (RGB camera and depth camera). There is also a microphone array on the top of the Kinect. It is composed of 7 microphones. The computer sees it as a regular USB audio device.

Another sensor, and one that I did not expect, is the motion sensor. There is a 6-degrees of freedom sensor within it that samples at a rate of 1.6 KHz, though it only reports updates to the host at a rate of 208 Hz. The IMU is based on the LDM6DSMUS. The sensor is mounted within the unit, close to but not quite to the center of the unit.

IMU

Recording Data

Like the previous versions of the Kinect, with this version you can record a data stream from it to be played back later. Recording is done from a command line and allows the frame rate to be specified. The only thing the command line utility will not record is the signals to the microphones. The resulting file is an MKV file where the sensor data is within some of the other streams. I was successful at viewing the RGB stream in some third party video players. The Azure Kinect DK contains a utility that can be used to open these files and play them back.

Body Tracking

For body tracking a developer’s program grabs a sample from the camera and passes it through the Azure Kinect Tracker. The Tracker is a software component that can run either on the CPU or take advantage of the computational capabilities of the system’s GPU. After trying it out myself, I strongly encourage using the GPU. I am currently using a MacBook running Windows. With CPU based body tracking I wasn’t seeing the results that I was looking for. When I connected a NVIDIA GTX 1080 in an eGPU case I started to get body tracking rates of 20-25 FPS with two people in the scene.

GTX 1080 within

Capturing Data

I would describe the Azure Kinect DK as a C++ first kit. Most of the documentation that I have found on it is in C++. Microsoft did release a .NET SDK for the device also. But I have often had to refer to the C++ documentation to get information that I need. The .NET SDK is close enough to the C++ APIs for the C++ documentation to be sufficiently applicable. A lot of the APIs were intuitive.

The SDK is 64-bit only. You may need to take into consideration when using it with other software components that may only be available in 32-bit. I have found it is easiest to add the needed software components to a project using the NuGet package manager. To only grab information from the Azure Kinect’s sensors the only package needed is Microsoft.Azure.Kinect.Sensor ( https://github.com/Microsoft/Azure-Kinect-Sensor-SDK ). If you plan on using the body tracking SDK then use the package Microsoft.Azure.Kinect.BodyTracking.Dependencies.cuDNN. There are other packages that are needed, but by adding this one the other dependencies will also be selected.

A system could be connected to multiple Azure Kinects. To know the number of available Kinects on a system, use the static method Device.GetInstalledCount(). To open a device, use the static method Device.Open(uint index). An open device does not immediately start generating data. To start retrieving data the device must be started with a DeviceConfiguration. The DeviceConfiguration sets the FPS and pixel formats for the camera.

DeviceConfiguration dc = new DeviceConfiguration();
dc.CameraFPS = FPS.FPS30;
dc.ColorResolution = ColorResolution.R1080p;
dc.ColorFormat = ImageFormat.ColorBGRA32;
dc.DepthMode = DepthMode.NFOV_2x2Binned;

With the device configuration a device is opened through the static method Device.Open(DeviceConfiguration). Calling StartCameras(DeviceConfiguration) puts the device in a state for retrieving data. Once the camera is started the device’s IMU can also be started to retrieve orientation data ( use StartImu() ).

The color image, depth image, and IR image are retrieved through a single function call. The GetCapture() method on the opened devices returns a Capture object that contains all of these images along with the device’s temperature. The device’s GetImuSample() returns information from the devices accelerometer and gyrometer. The images are returned in a structure that provides an array of bytes (for the image data) and other values that describe the organization of the image bytes.

Tracking People

To retrieve the information on the position of people within a capture a Tracker is necessary. A capture is added to the tracker’s queue and the queue outputs the positions of people within the scene. For the creation of a tracker a device’s calibration data and a tracker configuration are needed. A TrackerConfiguration object specifies whether to use the GPU or CPU for for processing. When using the GPU a specific GPU can be selected through the tracker configuration. The TrackerConfiguration also holds the orientation of the Kinect. In addition to the default positioning (the position it would be in if it were mounted on top of a tripod) the Kinect could be rotated to portrait mode or be positioned upside down.

TrackerConfiguration tc = new TrackerConfiguration();
tc.ProcessingMode = TrackerProcessingMode.Gpu;
tc.SensorOrientation = SensorOrientation.Default;
Tracker tracker = Tracker.Create(dev.GetCalibration(), tc);

Add a capture from a device into the tracker. Calling the PopResult() method will return the result (if it is ready). If the results are not ready within some length of time this method will throw an exception. The method accepts a TimeSpan object and a boolean value. The TimeSpan sets a new timeout value for waiting. The boolean, if set to true, will cause the method to throw an exception if a result is not available within the timeout period. If this value is set to false, then a null value is returned when a result is not ready, instead of an exception being thrown.

tracker.EnqueueCapture(ku.Capture);
//...
tracker.PopResult()

That provides enough information to collection information from an Azure. But once collected what can be done with it? In the next post on the Azure Kinect DK I will demonstrate how to use it to enhance user experiences and explore other modes of interaction that are made available through it.

Get the Azure Kinect DK on Amazon

twitterLogo

facebookLogo

youtubeLogo


Azure for Developers

Microsoft Azure Fundamentals

https://amzn.to/3ane8M7

8 Gig Pi and New Jetson Board

There have been a couple of SBC updates in the past few weeks that I thought were noteworthy.

undefined


The first is that there is now a 64-bit version of the Raspberry Pi operating system available. Previously if you wanted to run a 64-bit OS on the Pi your primary option was Ubuntu. Raspbian was 32-bit only. That’s not the case any more. The OS has also been rebranded as “Raspberry Pi OS.” Among other things with the updated OS a process can take advantage of more memory.  Speaking of more memory, there is now also an 8 gig version of the Raspberry Pi 4 available for 75.00 USD.

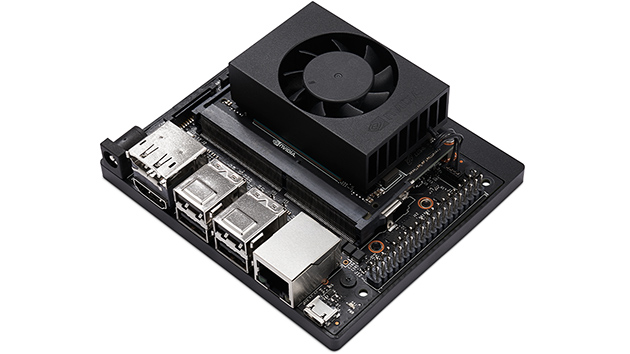
Jetson Xavier NX


Another family of single board computers is seeing an update. The Jetson family of SBCs has a new edition in the form of the Jetson Xavier NX.  At first glance the Xavier NX is easily confused with the Jetson Nano. Unlike the Nano the Xavier NX comes with a WiFi card and a plastic base around the carrier board that houses the antenna. The carrier board is one of the variants that supports 2 Raspberry Pi camera connectors. The underside of the board now has a M.2 Key E connector. While it has a similar formfactor as the Jetson Nano a quick glance at the specs show that it is much more powerful.

FeatureNanoXavier NX
Core Count46
CUDA Core Count128384
Memory4 Gigs8 Gigs

The Jetson Xavier NX is available now for about 400 USD from several suppliers.

Run .NET Core on the Raspberry Pi

Post on the NVIDIA Jetson

Instagram LogoLinked In

Posts may contain products with affiliate links. When you make purchases using these links, we receive a small commission at no extra cost to you. Thank you for your support.


Jetson Xavier NX

Raspberry Pi 4