I have been working with graphic shaders on Chrome. There is a lot that you can do with Shaders alone. If you are running a recent version of Chrome, have a decent GPU in your computer, and want to see what you can do with them take a look at https://shadertoy.com for samples of the type of real time graphics that can be done with them. I will not talk about how shaders work here though. I want to talk about a performance problem I encountered and how I got around it.
I usually use a 27-inch iMac running Windows for day to day work. The computer has a GPU that was made for mobile computers. Having been manufactured back in 2014 as you might guess it is a pretty weak GPU. To address some of the shader performance problems that I encountered I tried using en eGPU (external GPU). But I did not see the performance gains that I had expected. Shader performance was even worst when I tried running shaders with Chrome on the GTX 1080 that was in the external GPU.
What was going on? I decided to look at the Chromium source code to get an idea for this. Chrom(e|ium) uses a library called Angle for its low level graphics calls. Angle abstracts away the underlying graphics API so that someone can use the same source base for more than one type of device. On Windows machines the low level graphics APIs are generically referred to as DirectX. DirectX is a family of APIs with Direct3D being the set of DirectX APIs focused on 3D graphics. Angle supports Direct3D versions 9 and 11. Chrome uses Direct3D 9 though.
Looking in the Angle source code it did not take long to find the source of my problem. The lines of interest are in the constructor and in the initialize() method. In the Constructor the member mAdapter is set to a value that is used to select the graphics adapter to be used. It is set to D3DADAPTER_DEFAULT. This value usually resolves to the adapter that has the desktop that is marked as the primary adapter. In the initialize() method this value was passed to Direct3D9::CreateDevice. In my case this was the built-in AMD Radeon R9 M295X. The shaders were running on this card and the output was being copied over to the GTX 1080 for display. Once I knew this getting the problem resolved was easy. I set the GTX 1080 to the primary display adapter, logged out of my computer, and logged back in. After this performance was great!
It was still possible to get bad performance though. If I moved Chrome back to the built-in display it appears that there were performance penalties from the memory being copied from the GTX 1080 back to the built in adapter. On other machines the penalties might not be as severe.
What does my setup look like? I use the Sonnet eGPU cases (I have got two) and usually have an NVidia GPU in one and an AMD GPU in the other. The Apple computer that I am using does not have the USB-Thunderbolt 3 adapter interface that is used by these cases. I must use a Thunderbolt 3 (USB-C) to Thunderbolt 2 adapter to make this work.
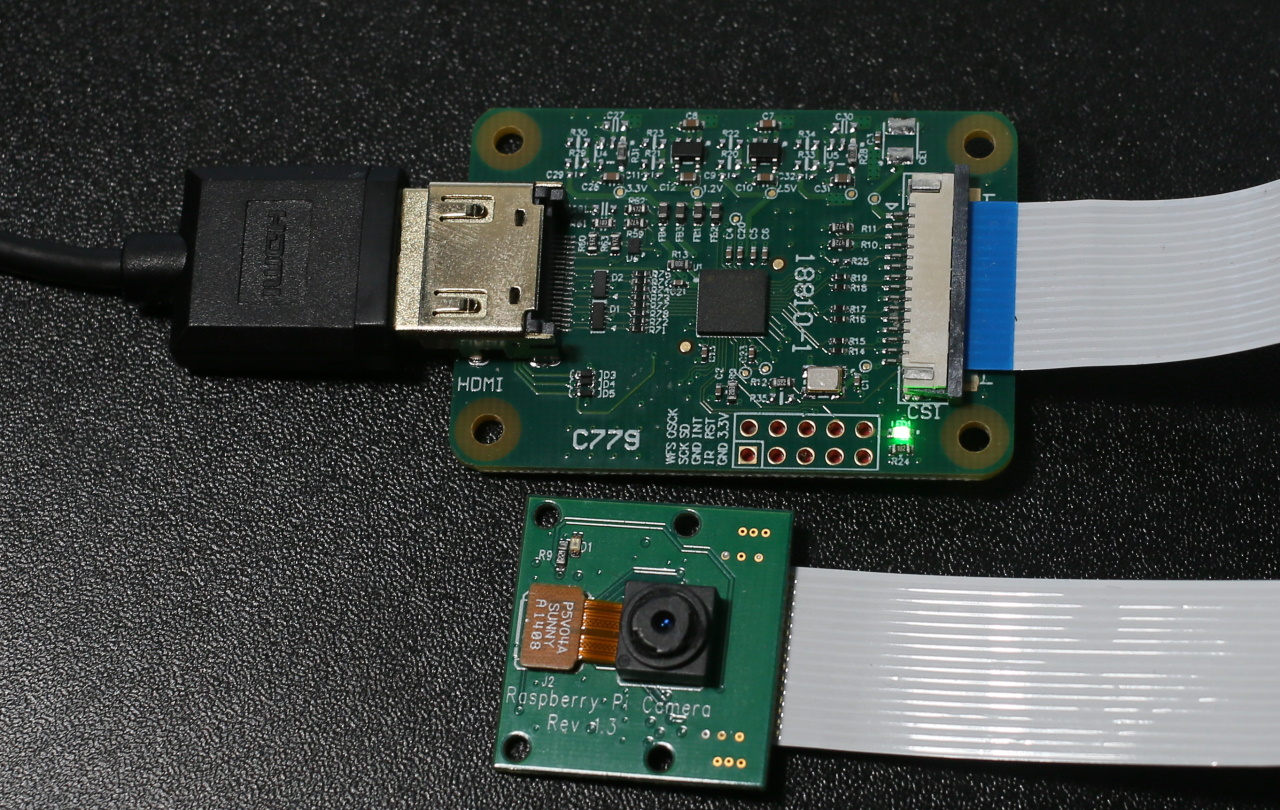
Back in January I tweeted about an HDMI capture device that for the Raspberry Pi. I’ve only recently have gotten a chance to use it. The device, known as the “HDMI to CSI-2 module”, works with the Raspberry Pi. Overall my experience was positive, though I found that this device has limitations that, if not previously known, can result in some frustration. The device connects to the CSI-2 camera interface and presents itself as a camera. The utilities and scripts that you may have used with the Raspberry Pi also work with this device without modifications. Along with the HDMI capture module the package contains the cable needed for connecting it to the full size Raspberry Pi and a second cable for use with a Raspberry Pi Zero.
One of the first uses that came to mind with this device is that I could use camera options beyond the official Pi cameras. The camera that I have about the house produce clean HDMI signals. They already have a range of lenses, ranging from some macro lenses for pictures of small items close-up and a 2132 millimeter Schmidt–Cassegrain for astrophotography.
My smallest lens next to my largest lens. Both of which are not available for use on the Pi through my digital camera.
The first time I tried to use the capture device with one of my cameras, it didn’t work. I received a non-descriptive error that is primarily associated with non-working or improperly installed cameras.
mmal: mmal_vc_component_enabled: failed to enable component: ENOSPC
mmal: camera component couldn't be enabled
mmal: main: Failed to create camera component
mmal: Failed to run camera app. Please check for firmware updates
Thankfully, this isn’t indicative of an actual hardware failure. The capture device works with a limited set of resolutions and refresh rates. For 1080p video signals, the maximum refresh rate is 25 fps.
Resolution
Refresh Rate (fps)
720p
50
720
60
1080i
50
1080p
24
1080p
25
Supported Resolutions
After making adjustments to the output settings of my camera, I was successful in using it with the HDMI capture.
The camera was the first device that came to mind, but it could work with non-camera HDMI sources too. I connected a Nintendo Switch to the device and it captured from the switch just fine. Provided that the signal is within the resolution and FPS range and is not an encrypted (HDCP) signal, it works.
Comparing the HDMI capture device to the Raspberry Pi cameras, there were a few differences to note. While it may be easy to assume that the digital photo camera paired with this device is better than the Raspberry Pi cameras, that isn’t necessarily the case. “Better” is a matter of what satisfies the requirements for a solution. If that solution requires high physical portability, the photo camera’s size could be a disadvantage. Using an external camera also ads to external power needs; the external camera will need to have it’s own battery or power supply. The official Raspberry Pi cameras run off of the Raspberry Pi’s power.
HDMI to CSI-2 Module next to Raspberry Pi Camera
The Pi cameras offer some higher resolutions than one can capture with the HDMI capture device. Resolution is an attribute of quality, but not the only metric for quality. I hesitate to label the higher resolution as higher quality because there are cases where a lower resolution camera may be rated better on other quality metrics, such as clarity or dynamic range, or may have attributes that make it a better fit for a specific application, such as a different shutter angle.
The Raspberry Pi HQ camera (recognizable from it’s C-mount for attaching a lens) can capture still photographs of up to 4056×3040 pixels. The Raspberry Pi Camera v2 captures stills at up to 3280×2464 pixels. For video, all of the cameras have the same resolution. Keep in mind though at these higher resolutions since the device is receiving stills and not video frame the rate of capture will be much lower.
Resolution
Frame Rate (fps)
1080p
30
720p
60
4809
60/90
Raspberry Pi Camera Framerates
How did it work? After trying it on a Raspberry Pi with a Nintendo Switch I would rate the capture device as being okay. It isn’t stellar, but it isn’t bad either. It provides a way to interface with HDMI sources. During the process of recording, it appeared there were frames that were dropped. The playback confirmed this. I was wondering if the dropped frames were due to the speed of the memory card in the Pi or from some computational limits on its ability to encode the video to .H264. The next thought that came to mind was to try it with the Jetson Nano. Sadly, while the Jetson Nano uses the CSI-2 interface, at the time of this writing it is not compatible with the Jetson Nano.
For reasons I’m sure are widely known, Google will be holding its annual I/O conference this year virtually. The conference will be held from 18-20 May, 2021. Registration is free and open to all at https://g.co/io. The schedule of sessions is expected to be posted before the month of April is over.
Registration for Nvidia’s GPU Technology Conference (GTC) is now open at no cost. From April 12 to April 16, Nvidia will be offering online presentations with an emphasis on AI applications. The presentations go into the industries of healthcare, networking, game development, robotics, and more. Over 1,600 sessions are listed in the session catalog. Much like last years conference, this conference will be going around the clock. Don’t be surprised if you see a session scheduled for 3:00AM or 10:00PM. If you don’t manage to catch a presentation live you can watch a presentation later once the recording is posted.
Posts may contain products with affiliate links. When you make purchases using these links, we receive a small commission at no extra cost to you. Thank you for your support.
Android Instant Apps offer a way for users to try out your application without fully installing them. An instant app can be launched from a link. A link on a website could launch your Instant App without the user needing to check to ensure that they have the application installed first. This allows someone to experience the intended experience in only a few moments. I’m very much a proponent of Instant Apps since they potentially make it less necessary to review what apps have not been used in a while as candidates for removal to manage the storage on a device; if a system becomes low on resources, the device will removed the cached instant apps as needed. If an application is Instant App enabled, the Play Store will present both a “Try Now” and “Install” button
If an application is made of several modules, only the modules needed for the instant app to run are downloaded. This is enabled through AABs(Android Application Bundle). Later this year, in August 2021, Android apps published through Google Play must be packaged as AAB instead of an APK. A key difference in the AAB and APK is that the AAB contains the binaries and files for all variants of your application (ARM, ARM64, x86) and the layouts. Google Play will then use dynamic delivery to ensure that the components that a specific device needs are delivered to that device.
Since only the components that are needed are downloaded, the user does not have to wait on the entire application package to download for the application to open. This process is faster than downloading and installing regular applications; it is perceivably instant in some cases. Instant applications must be limited to 15 MB in size.
To use the Instant App feature, your application must support Android 5.0 at minimum. Though after November 2021 developers will be required to target Android 11. No, this doesn’t mean that support is dropped for people with older phones. An Android application’s build.gradle has both a targetSdkVersion attribute and a minimumSdkVersion attribute. The minimum version can be lower than the target version. Android 8.0 (API target 26) and higher provides some advantages when a user moves from using the Instant app to installing the application. If the user decides to install the application, this is considered an upgrade. The data that the application has stored on the user’s device will migrate to the full application. For API 25 and before the data transfer is not automatic. The Storage API will need to be used to transfer the data manually.
For much of the documentation that is available today it is suggested that when creating your Instant App that you ensure a check box is checked at the time of the application creation. Looking in Android Studio today this frequently mentioned checkbox does not exists. If you encounter this, you may be looking at documentation based on older versions of Android Studio.
In Android Studio you will want to ensure the Instant App SDK is installed. In the SDK Manager you will find it under the “SDK Tools” tab. The item is titled “Google Play Instant Development SDK.”
Create an Android application. To enable the instant app feature, a few modifications are needed. You can make these modifications manually or through a menu option. To make the change through the menu option right-click on your app’s module, select “Refactor” and then “Enable Instant Apps Support…”
Selecting this menu option makes changes to your application’s Manifest and the App level build.gradle. In AndroidManifest.xml, a new namespace is added to the root element. An item specifying a sandbox version is also added to the element.
An additional element is added to the manifest named <dist:module /> with an attribute dist:instant set to true. You can add an optional dist:title attribute with a string that may be presented to the user to identify your application.
While this enable’s an application for instant launch, there are other considerations that you will want to make for the best experience. This includes potentially dividing your application into modules to put the most essential features that will be available in the Instant app in a smaller module for quick launch while the other features of your application are in another module. Presently, instant apps are limited to 15 megabytes. One strategy may be having activities for viewing data in a module (so that user’s can view data that your application’s services offer) with some light-weight editors and placing a more capable editor and other application features in a different module.
There are several ways to test your Instant App. One way is through the Google Play development console. You have the option of your Instant app and the full install as being the same or separate applications. If they are separate, they don’t even need to be in the same project. They do need to use the same package name. If you decided for them to be different projects, then their version numbers must be different. The Instant App needs to have a lower version number than the full application. The transition from the instant app to the full app, should the user decide to perform an install, is treated as an upgrade.
Within the console, upload your full application as you normally would within the choses testing track. After it is uploaded, select your application from the console and select “Advance settings.” Under the tabs, select “Release Types” and then select the button to add a new release type. “Google Play Instant” is the type that you want to add.
In the development console select the option to make a new release. You will now have a drop-down where you can select the release type. Select “Google Play Instant.”
You will be prompted to select or upload an application package. If your instant application is the same as your full application, here you can select the previously uploaded AAB. Otherwise, upload the instant version of the application. After filling in the information for the release, you are done, but possibly not ready to test.
When I uploaded my first instant app, the process was a bit frustrated by not knowing that the Instant App isn’t necessarily available in the Google Play Store instantly. For me, the full application showed, but the Instant app was nowhere to be found. It can take a day (and sometimes longer) for the option to try the application to show up. Have a bit of patience here. The instant version of your application will (ironically) become available with time.
Posts may contain products with affiliate links. When you make purchases using these links, we receive a small commission at no extra cost to you. Thank you for your support.