Saving your Automotive data from Automatic.com with NodeJS

One of the less glamorous experiences that has come with Consumer IoT products is a parade of items that cease to work when the company that made them shuts down. The economic down turn of 2020 has seen it’s share of products that have experienced this. In a few days the automotive adapters from Automatic.com will be on the list of causalities.

Automatic.com provided a device that connect to a car through the ODB-II port and would relay information about a vehicle back to the owner that they could view through an application or through the web portal.  Through these views someone could see where their car is, read any engine trouble code, view the paths the car has traveled, and view information about hard breaks, hard accelerations, and other car data.

I have three of these adapters and have data from tracking the vehicles for the past 5 years. I would rather keep my information. Looking on Automatic.com’s page about the shutdown there is a statement about exporting one’s data.

To download and export your driving data, you’ll need to log in to the Automatic Web Dashboard on a desktop or laptop computer at dashboard.automatic.com. Click on the “Export” button in the lower right-hand corner of the page.
[…]
Although the number of trips varies between each user, the web app may freeze when selecting “Export all trips” if you are exporting a large amount of driving data. We recommend requesting your trip history in quarterly increments, but if you drive in excess of 1,500 trips per year, please request a monthly export.”

I tried this out myself and found it to be problematic. Indeed, after several years of driving across multiple vehicles the interface would freeze on me. I could only actually export a month of data at a time.  Rather than download my data one month at a time across 60 months it was easier to just write code to download my data. Looking through the API documentation there were three items of data that I wanted to download. I’ll be using NodeJS to access and save my data.

To access the data it’s necessary to have an API key. Normally there would be the process of setting up OAUTH authentication to acquire this key. But this code is essentially throw away code; after Automatic completes it’s shutdown it won’t be good for much. So instead I’m going to get a key directly from the developer panel on https://developer.automatic.com. I’ve got more than one automatic account. It was necessary to do this for each on of the accounts to retrieve the keys.

On https://developer.automatic.com/my-apps#/ select “Create new App.”  Fill out some description for the app. After the entry is saved select “Test Token for your Account.”

Automatic.com_TestToken

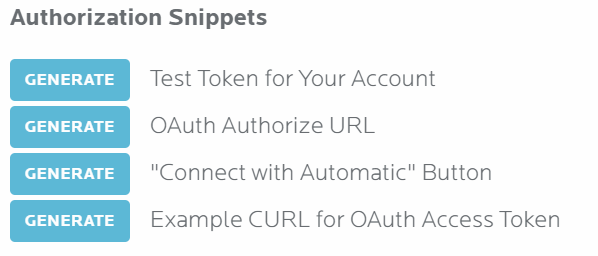
You’ll be presented with a key. Hold onto this. I placed my keys in a comma delimited string and saved it to an environment variable named “AutomaticTokens.”  It was an easy location from which to retrieve them where I won’t have to worry about accidentally sharing them while sharing my code.  In the code I will retrieve these keys, break them up, and process them one at a time. 

var AutomaticTokensString = process.env.AutomaticTokens;
const AutomaticTokenList = AutomaticTokensString.split(',');
For calling Automatic.com’s REST based API most of the calls look the same differing only in the URL. I’ve made a method to make calls, accumulate the responses, and pass them back.
function AutomaticAPI(path) {
    return new Promise(function(resolve,reject) {
        var options = {
            host: 'api.automatic.com',
            path: path,
            port:443,
            method: 'GET',
            headers: {Authorization:`Bearer ${AuthorizationToken}`}
        };
    
        var req = https.request(options,function(res) {
            let data = ''
            res.setEncoding('utf8');
            res.on('data', function (chunk) {
                data += chunk;
            });
            res.on('end',function() {
                resolve(JSON.parse(data));
            });
        });
    
        req.on('error', function(e) {
            console.error('error',e);
            console.log('problem with request: ' + e.message);
            reject(e);
          });    
          req.end();
    });
}
This greatly simplifies the implementations of the rest of the calls.
Now that I have the keys and something in place to simply the calls the first piece of information to retrieve is a list of vehicles in the account. This information is the root of of the other information that I wanted to save.
function listVehicles() {
    return new Promise((resolve,reject)=>{
        AutomaticAPI('/vehicle/')
        .then(function(d) {
            resolve(d);
        })    
    });
}

Let’s take a look at one of the responses from this call.

{
     _metadata: { count: 1, next: null, previous: null },
     results: [
          {
               active_dtcs: [],
               battery_voltage: 12.511,
                created_at: '2017-01-28T21:49:24.269000Z',
               display_name: null,
               fuel_grade: 'regular',
               fuel_level_percent: -0.39215687,
               id: 'C_xxxxxxxxxxxxxxxxx',
               make: 'Honda',
               model: 'Accord Sdn',
               submodel: 'EX w/Leather',
               updated_at: '2018-07-24T19:57:54.127000Z',
               url: 'https://api.automatic.com/vehicle/C_xxxxxxxxxxxxxxxxx/',
               year: 2001
          }
     ]
}

From the response I need to id field to retrieve the other information. While this response doesn’t change any ground breaking information I’m persisting it to disc so that I can map the other data that I’m saving to a real car.

The next thing I grab is the MIL. This contains the last set of engine trouble codes with date stamps.

function getMil(vehicleID, limit,) {
    return new Promise((resolve,reject)=>{
        var url = `/vehicle/${vehicleID}/mil/`;
        console.debug('url',url);
        AutomaticAPI(url)
        .then((data)=>resolve(data));
    });
}

Here is a sample response.

{
   "_metadata": {
      "count": 3,
      "next": null,
      "previous": null
   },
   "results": [
      {
         "code": "P0780",
         "on": false,
         "created_at": "2019-07-09T20:19:04Z",
         "description": "Shift Error"
      },
      {
         "code": "P0300",
         "on": false,
         "created_at": "2018-02-24T16:05:02Z",
         "description": "Random/Multiple Cylinder Misfire Detected"
       },
      {
         "code": "P0306",
         "on": false,
         "created_at": "2018-02-24T16:05:02Z",
         "description": "Cylinder 6 Misfire Detected"
      }
   ]
}

The last, and most important piece of information that I want is the trip data. The trip data contains a start address, end address, and the path traveled.  Information about hard stopping and hard acceleration and many other items of data is stored within trips. For the REST API a start time and end time are arguments to the request for trip information. The API is supposed to support paging when there are a lot of trips to return. Some number of trips are returned from a request along with a URL that contains the next page of data. When I’ve requested the second page I get an error response back. Given the short amount of time until the service shuts down it doesn’t feel like the time to report that dependency to the staff at Automatic.com. Instead I’m requesting the travel information for 7 to 9 days at a time. The results come back in an array. I’m writing each trip to it’s own file.

To more easily navigate to a trip I’ve separated them out in the file system by date. The folder structure follows this pattern.

VehicleID/year/month/day

The information within these files is the JSON portion of the response for that one trip without any modification.  The meaning of the information in most of the fields of a response are easy to intuitively understand without further documentation. The field names and the data values are descriptive. The one exception is the field “path.” While the purpose of this field is known (to express the path driven) the data value is not intuitive. The data value is an encoded poly line. But documentation on how this is encoded can be found in the Google Maps documentation ( https://developers.google.com/maps/documentation/utilities/polylinealgorithm ).

Now that I’ve got my data saved I may implement my own solution for continuing to have access to this functionality. At first glance I see some products that appear to offer similar services. But the lack of an API for accessing the data makes them a no-go to me. I’m instead am learning towards making a solution with an ELM327 ODB-II adapter, something I’ve used before.

Download Code: https://github.com/j2inet/AutomaticDownload

twitterLogofacebookLogoyoutubeLogoInstagram Logo

Linked In


ODB II Bluetooth Adapter


OSB II Scanner

Microsoft Build 2020 Live Stream

The Microsoft 2020 Live Stream starts at about 08:00 Pacific time on 19 May 2020. This year Build will be a free online event. If you haven’t already it isn’t too late to register. Microsoft will have sessions going around the clock for 48 continuous hours. Even though it is online some sessions do have a capacity.  Go register and choose your sessions at https://mybuild.microsoft.com/. The link for the live stream is below.


ASP.NET Core: Pushing Data over a Live Connection

Today I am creating an application in ASP.NET Core 3.1.  The application needs to to continually push out updated information to any clients that are actively connected.  There are a few possible ways to do this.  I have decided to use PushStreamContent for this.

With this class I can have an open HTTP connection over which data can be arbitrarily pushed.  The stream itself is raw.  I could push out text, binary data, or anything else that I wish to serialize.  This means that any parsing and interpretation of data is my responsibility, but that is totally fine for this purpose.  But how do I use PushStreamContent to accomplish this?

I will start by creating a new ASP.NET Core project.

ASP.netCoreNewProject

For the ASP.NET Core Project type there are several paths to success.  The one that I am taking is not the only “correct” one.  I have chosen the template for “Web Application (Model-View-Controller)”.  A default web application is created and a basic HTML UI is put in place.

ASP.NETCoreProjectType

Now that the project is created, there are a few configuration items that we need to handle.  Startup.cs requires some updates since we are going to have WebAPI classes in this project.

ASP.NETCoreMVCProjectFiles

Within Startup.cs there is a method named ConfigureServices.

public void ConfigureServices(IServiceCollection services)
{
    services.AddControllersWithViews();
}

In this method an additional line is needed to support WebApiConventions.

public void ConfigureServices(IServiceCollection services)
{
    services.AddControllersWithViews();
    services.AddMvc().AddWebApiConventions();
}

For the sake of development the CORS headers for the application also need some updating.  Further down in Startup.cs is a method named Configure.

app.UseCors(builder =>  builder.AllowAnyHeader().AllowAnyOrigin().AllowAnyMethod());

If you are using Visual Studio as an editor you might see that AddApiWebConventions() has a red underline and an error about that method being undefined.  To resolve this there is a NuGet packet to add to the project.  Right-click on Dependencies, select “NuGet Package Manager.” Click on the “Browse” tab and search for a package named Microsoft.AspNetCore.Mvc.WebApiCompactShim.

Microsoft.aspNetCore.Mvc.WebApiCompactShim

After that is added the basic configuration is complete.  Now to add code.

Right-click on the Controllers folder and select “Add New”, “Controller.”  For the controller type select “API Controller – Empty.”  For the controller name I have selected “StreamUpdateController.”  There are three members that will need to be on the controller.

  • Get(HttpRequestMessage) – the way that a client will subscribe to the updates.  They come through an HTTP Get.
  • OnStreamAvailable(Strea, HttpContent, TransportContext) – this is a static method that is called when the response stream is ready to receive data.  Here it only needs to add a client to the collection of subscribers.
  • Clients – a collection of the currently attached clients subscribing to the message.

For the collection of clients an auto-generated property is sufficient.  A single line of code takes care of its implementation.

private static ConcurrentBag Clients { get; } = new ConcurrentBag();

The Get() method adds the new connection to the collection of connections and sets the response code and mime type.  The mime type used here is text/event-stream.

public HttpResponseMessage Get(HttpRequestMessage request)
{
    const String RESPONSE_TYPE = "text/event-stream";
    var response = new HttpResponseMessage(HttpStatusCode.Accepted)
    {
        Content = new PushStreamContent((a, b, c) =>
        { OnStreamAvailable(a, b, c); }, RESPONSE_TYPE)
    };
    response.Content.Headers.ContentType = new System.Net.Http.Headers.MediaTypeHeaderValue(RESPONSE_TYPE);
    return response;
}

The static method, OnStreamAvailable, only has a couple of lines in which it adds the stream to the collection with a StreamWriter wrapped around it.

private void OnStreamAvailable(Stream stream, HttpContent content,
    TransportContext context)
{
    var client = new StreamWriter(stream);
    clients.Add(client);
}

As of yet there is not anything being written to the streams.  To keep this sample simple all clients will receive the same data to their streams.  Everything is in place to start writing data out to clients.  I will use a static timer deciding when to write something to the stream.  Every time its period has elapsed all clients connected to the stream will receive a message.

        private static System.Timers.Timer writeTimer = new System.Timers.Timer() { Interval = 1000, AutoReset = true };

        static StreamUpdateController()
        {
            writeTimer.Start();
            writeTimer.Elapsed += TimerElapsed;
            writeTimer.Start();
        }

The handler for the timer’s elapsed event will get the current date and print it to all client streams.

static async void TimerElapsed(object sender, ElapsedEventArgs args)
{
    var dataToWrite = DateTime.Now.ToString();
    foreach(var clientStream in Clients)
    {
        await clientStream.WriteLineAsync(dataToWrite);
    }
}

You can now test the stream out.  If you run the project and navigate to https://localhost:yourPort/api/StreamUpdate you can see the data being written…

…well, kind of.  The browser window is blank.  Something clearly has gone wrong, because there is no data here.  Maybe there was some type of error and we are not getting an error message.  Or perhaps the problems was caused by… wait a second, there is information on the screen.  What took so long?

The “problem” here is that writes are buffered.  This normally is not a problem and can actually contribute to performance improvements.  But we need for that buffer to be transmitted when a complete message is within it.  To resolve this the stream can be requested to clear its buffer. Stream.Flush() and Stream.FlushAsync() will do this.  The updated TimerElapsed method now looks like the following.

static async void TimerElapsed(object sender, ElapsedEventArgs args)
{
    var dataToWrite = DateTime.Now.ToString();
    foreach(var clientStream in Clients)
    {
        await clientStream.WriteLineAsync(dataToWrite);
        await clientStream.FlushAsync();

    }
}

Run the program again and open the URL to now see the messages rendered to the screen every second.  But how does a client receive this?

While it is easy for .Net programs to interact with this, I wanted to consume the data from HTML/JavaScript.  Provided that you use a certain data format there is an object named EventSource that makes interacting with the output from this stream easy.  I have not used that format.  The option available to me is to use XmlHttpRequest.  If you have used XmlHttpRequest before, then you know that after a request is complete an event is raised making the completed data available to you.  That does not help for getting the chunks of available data.  The object has another event of help, onprogress.

When onprogress is fired the responseText member has the accumulated data.  The length field indicates how long the accumulated data is.  Every time the progress event is raised the new characters added to the string can be examined to grab the next chunk of data.

function xmlListen() {
    var xhr = new XMLHttpRequest();
    var last_index = 0;
    xhr.open("GET", "/api/Stream/", true);
    //xhr.setRequestHeader("Content-Type", "text/event-stream");
    xhr.onload = function (e) {
        console.log(`readystate ${xhr.readyState}`);
        if (xhr.readyState === 4) {
            if (xhr.status >=200 && xhr.status <= 299) {                                  console.log(xhr.responseText);             } else {                 console.error(xhr.statusText);             }         }     };     xhr.onprogress = (p) => {

        var curr_index = xhr.responseText.length;
        if (last_index == curr_index) return;
        var s = xhr.responseText.substring(last_index, curr_index);
        last_index = curr_index;
        console.log("PROGRESS:", s);
    }
    xhr.onerror = function (e) {
        console.error(xhr.statusText);
    };
    xhr.send(null);
}

This works.  But I do have some questions about this implementation.  The XmlHttpRequest‘s responseText object appears to be just growing without end.  For smaller data sizes this might not be a big deal, but since I work on some HTML applications that may run for over 24 hours it could lead to unnecessarily increased memory pressure.  That is not desirable.  Let us go back to EventSource

The data being written is not in the right format for EventSource.  To make the adjustment, the data must be proceeded by the string “data: ” and followed by two new line characters.  That is it.  A downside of conforming to something compatible with EventSource is that all data must be expressible as text.

static async void TimerElapsed(object sender, ElapsedEventArgs args)
{
    var dataToWrite = $"data: {DateTime.Now.ToString()}\n\n";
    foreach(var clientStream in Clients)
    {
        await clientStream.WriteLineAsync(dataToWrite);
        await clientStream.FlushAsync();
    }
}

On the client side the following will create an EventSource that receives those messages.

function startEventSource() {
    var source = new EventSource('/api/Push/');
    source.onmessage = (message) => {
        console.log(message.id, message.data);
    }
    source.onerror = (e) => {
        console.error(e);
    }
    source.onopen = () => {
        console.log('opened');
    }
}

I would still like to be able to stream data less constrained through the same service.  To do this instead of having a collection of StreamWriter objects I have made a class to hold the streams along with another attribute that indicates the format in which data should be.  A client can specify a format through a query parameter.

enum StreamFormat
{
    Text,
    Binary
}
class Client
{
    public Client(Stream s, StreamFormat f)
    {
        this.Stream = s;
        this.Writer = new StreamWriter(s);
        this.Format = f;
    }

    public Stream Stream { get;  }
    public StreamWriter Writer { get; }
    public StreamFormat Format { get; }

}

public HttpResponseMessage Get(HttpRequestMessage request)
{
    var format = request.RequestUri.ParseQueryString()["format"] ?? "text";
    const String RESPONSE_TYPE = "text/event-stream";
    HttpResponseMessage response;
    if (format.Equals("binary"))
    {
        response = new HttpResponseMessage(HttpStatusCode.Accepted)
        {
            Content = new PushStreamContent((a, b, c) =>
            { OnBinaryStreamAvailable(a, b, c); }, RESPONSE_TYPE)
        };
    }
    else
    {
        response = new HttpResponseMessage(HttpStatusCode.Accepted)
        {
            Content = new PushStreamContent((a, b, c) =>
            { OnStreamAvailable(a, b, c); }, RESPONSE_TYPE)
        };
    }           
    return response;
}

static void OnStreamAvailable(Stream stream, HttpContent content, TransportContext context)
{                        
    Clients.Add(new Client(stream, StreamFormat.Text));
}

static void OnBinaryStreamAvailable(Stream stream, HttpContent content, TransportContext context)
{
    Clients.Add(new Client(stream, StreamFormat.Binary));
}

        static async void TimerElapsed(object sender, ElapsedEventArgs args)
        {
            var data = new byte[] { 0x01, 0x02, 0x03, 0x04, 0x10, 0x40 };

            List unsubscribeList = new List();
            foreach(var client in Clients)
            {
                try
                {
                    if (client.Format == StreamFormat.Binary)
                        await client.Stream.WriteAsync(data, 0, data.Length);
                    else 
                        await client.Writer.WriteLineAsync($"data: {ByteArrayToString(data)}\n\n");
                    await client.Writer.FlushAsync();
                } catch(Exception exc)
                {
                    unsubscribeList.Add(client);
                }
            }
            Clients.RemoveAll((i) => unsubscribeList.Contains(i));
        }
twitterLogofacebookLogoyoutubeLogoInstagram Logo

Linked In


Posts may contain products with affiliate links. When you make purchases using these links, we receive a small commission at no extra cost to you. Thank you for your support.