Video Streaming with Node and Express

I’ve got a range of media that I’m moving from its original storage to hard drives. Among this media are some DVDs that I’ve collected over time. It took a while, but I managed to convert the collection of movies and TV shows to video files on my hard drive. Now that they are converted, I wanted to build a solution for browsing and playing them. I tried using a drive with DLNA built in, but the DLNA clients I have appear to have been built with a smaller collection of videos in mind. They present an alphabetical list of the video files. Not the way I want to navigate.

I decided to instead make my own solution. To start though, I wanted to make a solution that would stream a file video file. Unlike most HTML resources, which are relatively small, video files can be several gigabytes. Rather than have the web server present the file in its entirety I need for the web server to present the file in chunks. My starting point is a simple NodeJS project that is presenting HTML pages through Express.

const express = require('express');
const fileUpload = require('express-fileupload');
const session = require('express-session');
const bodyParser = require('body-parser');
const createError = require('http-errors');
const path = require('path');
const { uuid } = require('uuidv4');
require('dotenv').config();

var sessionSettings = {
   saveUninitialized: true,
   secret: "sdlkvkdfbjv",
   resave: false,
   cookie: {},
   unset: 'destroy',
   genid: function (req) {
      return uuid();
   }
}

app = express();
app.use(session(sessionSettings));
if (app.get('env') === 'production') {
   app.set('trust proxy', 1);
   sessionSettings.cookie.secure = true;
}
app.use(express.static('public'));
app.use(bodyParser.json());
app.use(fileUpload({
   createPath: true
}));
app.use(function (req, res, next) {
   console.log(req.originalUrl);
   next(createError(404));
});
app.set('views', path.join(__dirname, 'views'));
app.engine('html', require('ejs').renderFile);
app.set('view engine', 'html');

module.exports = app;

With the above application, static content any files that are put in the folder named “public” will be served when requested. In that folder, the stylesheet, JavaScript, HTML, and other static content will be placed. The videos will be in another folder that is not part of the project. The path to this folder is specified by the setting VIDEO_ROOT in the .env file.

For this to stream files, there are two additional routes that I am going to add. One route will return a list of all of the video IDs. The other route will return the video itself.

For this first iteration for video streaming, I’m going to return file names as video IDs. At some point during the development of my solution this may change. But for testing streaming the file name is sufficient. The route handler for the library will get a list of the files and return it in a structure that is marked with a date. The files it returns are filtered to only include those with an .mp4 extension.

const fs = require('fs');
const express = require('express');
require('dotenv').config();

var router = express.Router();

var fileInformation = { 
    lastUpdated: null, 
    fileList: []
}

function isVideoFile(path) { 
    return path.toLowerCase().endsWith('.mp4')||path.toLowerCase().endsWith('.m4v');
}

function updateFileList() { 
    return new Promise((resolve,reject)=> {
        console.log('getting file list');
        console.log([process.env.VIDEO_ROOT])
        fs.readdir(process.env.VIDEO_ROOT, (err, files) => {
            if(err) reject(err);
            else {
                var videoFiles = files.filter(x=>isVideoFile(x));
                fileInformation.fileList = videoFiles;
                fileInformation.lastUpdated = Date.now();
                resolve(fileInformation);
            } 
        });
    });
}

router.get('/',(req,res,next)=> {
    console.log('library')
    updateFileList()
    .then(fileList => {
        res.json(fileList);
    })
    .catch(err => {
        console.error(err);
        res.status(500).json(err)
    });
});

module.exports = router;

The video element in an HTML page will download a video in chunks (if the server supports range headers). The video element sends a request with a header stating the byte range being requested. In the response, the header will also state the byte range that is being sent. Our express application must read the range headers and parse out the range being request. The range header will contain a starting byte offset and may or may not contain an ending byte offset. The value in the content range may look something like the following.

byte=0-270
byte=500-

In the first example, there is a starting and ending byte range. In the second, the request only specifies a starting byte. It is up to the server to decide how many bytes to send. This header is easily parsed with a couple of String.split operations and integer parsing.


function getByteRange(rangeHeader) {
    var byteRangeString = rangeHeader.split('=')[1];
    byteParts = byteRangeString.split('-');
    var range = [];
    range.push(Number.parseInt(byteParts[0]));
    if(byteParts[1].length == 0 ) {
        range.push(null);
    } else {
        range.push(Number.parseInt(byteParts[1]))
    }
    return range;
}

There is the possibility that the second number in the range is not there, or is present but is outside of the range of bytes for the file. To handle this, there’s a default chunk size defined that will be used when the byte range is not specified. But the range is also checked against the file size and clamped to ensure that there is no attempt to read past the end of the file.

const CHUNK_SIZE = 2 ** 18;
//...
var start = range[0];
if(range[1]==null)
    range[1] = Math.min(fileSize, start+CHUNK_SIZE);
var end = range[1] ;
end = Math.min(end, fileSize);

In the response, the header contains a header defining the range of bytes in the response and it’s length. We build out those headers, set them on the response header, and then write the range of bytes. To write out the bytes, a read stream from the video file and piped to the response stream.

const contentLength = end - start + 1;
const headers = { 
    "Content-Range": `bytes ${start}-${end}/${fileSize}`,
    "Accept-Ranges":"bytes",
    "Content-Length": contentLength,
    "Content-Type": getContentType(videoID)
};

console.log('headers', headers);
res.writeHead(206, headers);
const videoStream = fs.createReadStream(videoPath, {start, end});
videoStream.pipe(res);

The server can now serve video files for streaming. For the client side, some HTML and JavaScript is needed. The HTML contains a video element and a <div/> element that will be populated with a list of the videos.

<!DOCTYPE html>
<html>
    <head>
        
        <link rel="stylesheet" href="./style/main.css" />
        <script src="scripts/jquery-3.5.1.min.js"></script>
        <script src="scripts/main.js"></script>
    </head>
    <body>
        <div id="videoBrowser" ></div>
        <video id="videoPlayer" autoplay controls></video>
    </body>
</html>

The JavaScript will request a list of the videos from the /library route. For each video file, it will create a text element containing the name of the video. Clicking on the text will set the src element on the video.

function start() { 
    fetch('/library')
    .then(data=>data.json())
    .then(data=> { 
        console.log(data);
        var elementRoot = $('#videoBrowser');
        data.fileList.forEach(x=>{
            var videoElement = $(`<div>${x}</div>`);
            $(elementRoot).append(videoElement);
            $(videoElement).click(()=>{
                var videoURL = `/video/${x}`;
                console.log(videoURL);
                $('#videoPlayer').attr('src', videoURL );
            })
        });
        
    });
}

$(document).ready(start());

Almost done! The only thing missing is adding these routes to the source of app.js. As it stands now, app.js will only serve static HTML file.

const libraryRouter = require('./routers/libraryRouter');
const videoRouter = require('./routers/videoRouter');
app.use('/library', libraryRouter);
app.use('/video', videoRouter);

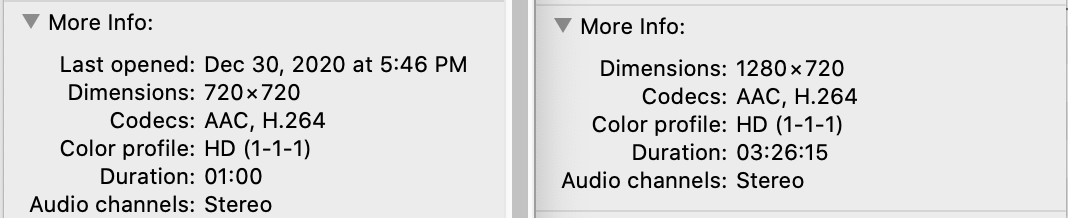
I started the application (npm start) and at first, I thought that the application was not working. The problem was in the encoding of the first MP4 file that I tried. There are a range of different video encoding options that one can use for MP4 files. Looking at the encoding properties of two MP4 files (one file streamed successfully, the other did not) there was no obvious difference at first.

The problem was with metadata stored in the file. A discussion of video encodings is a topic that could be several posts of its own. But the short explanation is that we need to ensure that the metadata is at the begining of the file. We can use ffmpeg to write a new file. Unlike the process of re-encoding a file, for this process the video data is untouched. I used the tool on a movie and it completed within a few seconds.

./ffmpeg  -i Ultraviolet-1.mp4  -c copy -movflags faststart Ultraviolet.mp4

With that change applied, I the videos now stream fine.

If you would like to try this code out, it is available in GitHub at the following URL.

https://github.com/j2inet/VideoStreamNode

Saving your Automotive data from Automatic.com with NodeJS

One of the less glamorous experiences that has come with Consumer IoT products is a parade of items that cease to work when the company that made them shuts down. The economic down turn of 2020 has seen it’s share of products that have experienced this. In a few days the automotive adapters from Automatic.com will be on the list of causalities.

Automatic.com provided a device that connect to a car through the ODB-II port and would relay information about a vehicle back to the owner that they could view through an application or through the web portal.  Through these views someone could see where their car is, read any engine trouble code, view the paths the car has traveled, and view information about hard breaks, hard accelerations, and other car data.

I have three of these adapters and have data from tracking the vehicles for the past 5 years. I would rather keep my information. Looking on Automatic.com’s page about the shutdown there is a statement about exporting one’s data.

To download and export your driving data, you’ll need to log in to the Automatic Web Dashboard on a desktop or laptop computer at dashboard.automatic.com. Click on the “Export” button in the lower right-hand corner of the page.
[…]
Although the number of trips varies between each user, the web app may freeze when selecting “Export all trips” if you are exporting a large amount of driving data. We recommend requesting your trip history in quarterly increments, but if you drive in excess of 1,500 trips per year, please request a monthly export.”

I tried this out myself and found it to be problematic. Indeed, after several years of driving across multiple vehicles the interface would freeze on me. I could only actually export a month of data at a time.  Rather than download my data one month at a time across 60 months it was easier to just write code to download my data. Looking through the API documentation there were three items of data that I wanted to download. I’ll be using NodeJS to access and save my data.

To access the data it’s necessary to have an API key. Normally there would be the process of setting up OAUTH authentication to acquire this key. But this code is essentially throw away code; after Automatic completes it’s shutdown it won’t be good for much. So instead I’m going to get a key directly from the developer panel on https://developer.automatic.com. I’ve got more than one automatic account. It was necessary to do this for each on of the accounts to retrieve the keys.

On https://developer.automatic.com/my-apps#/ select “Create new App.”  Fill out some description for the app. After the entry is saved select “Test Token for your Account.”

Automatic.com_TestToken

You’ll be presented with a key. Hold onto this. I placed my keys in a comma delimited string and saved it to an environment variable named “AutomaticTokens.”  It was an easy location from which to retrieve them where I won’t have to worry about accidentally sharing them while sharing my code.  In the code I will retrieve these keys, break them up, and process them one at a time. 

var AutomaticTokensString = process.env.AutomaticTokens;
const AutomaticTokenList = AutomaticTokensString.split(',');
For calling Automatic.com’s REST based API most of the calls look the same differing only in the URL. I’ve made a method to make calls, accumulate the responses, and pass them back.
function AutomaticAPI(path) {
    return new Promise(function(resolve,reject) {
        var options = {
            host: 'api.automatic.com',
            path: path,
            port:443,
            method: 'GET',
            headers: {Authorization:`Bearer ${AuthorizationToken}`}
        };
    
        var req = https.request(options,function(res) {
            let data = ''
            res.setEncoding('utf8');
            res.on('data', function (chunk) {
                data += chunk;
            });
            res.on('end',function() {
                resolve(JSON.parse(data));
            });
        });
    
        req.on('error', function(e) {
            console.error('error',e);
            console.log('problem with request: ' + e.message);
            reject(e);
          });    
          req.end();
    });
}
This greatly simplifies the implementations of the rest of the calls.
Now that I have the keys and something in place to simply the calls the first piece of information to retrieve is a list of vehicles in the account. This information is the root of of the other information that I wanted to save.
function listVehicles() {
    return new Promise((resolve,reject)=>{
        AutomaticAPI('/vehicle/')
        .then(function(d) {
            resolve(d);
        })    
    });
}

Let’s take a look at one of the responses from this call.

{
     _metadata: { count: 1, next: null, previous: null },
     results: [
          {
               active_dtcs: [],
               battery_voltage: 12.511,
                created_at: '2017-01-28T21:49:24.269000Z',
               display_name: null,
               fuel_grade: 'regular',
               fuel_level_percent: -0.39215687,
               id: 'C_xxxxxxxxxxxxxxxxx',
               make: 'Honda',
               model: 'Accord Sdn',
               submodel: 'EX w/Leather',
               updated_at: '2018-07-24T19:57:54.127000Z',
               url: 'https://api.automatic.com/vehicle/C_xxxxxxxxxxxxxxxxx/',
               year: 2001
          }
     ]
}

From the response I need to id field to retrieve the other information. While this response doesn’t change any ground breaking information I’m persisting it to disc so that I can map the other data that I’m saving to a real car.

The next thing I grab is the MIL. This contains the last set of engine trouble codes with date stamps.

function getMil(vehicleID, limit,) {
    return new Promise((resolve,reject)=>{
        var url = `/vehicle/${vehicleID}/mil/`;
        console.debug('url',url);
        AutomaticAPI(url)
        .then((data)=>resolve(data));
    });
}

Here is a sample response.

{
   "_metadata": {
      "count": 3,
      "next": null,
      "previous": null
   },
   "results": [
      {
         "code": "P0780",
         "on": false,
         "created_at": "2019-07-09T20:19:04Z",
         "description": "Shift Error"
      },
      {
         "code": "P0300",
         "on": false,
         "created_at": "2018-02-24T16:05:02Z",
         "description": "Random/Multiple Cylinder Misfire Detected"
       },
      {
         "code": "P0306",
         "on": false,
         "created_at": "2018-02-24T16:05:02Z",
         "description": "Cylinder 6 Misfire Detected"
      }
   ]
}

The last, and most important piece of information that I want is the trip data. The trip data contains a start address, end address, and the path traveled.  Information about hard stopping and hard acceleration and many other items of data is stored within trips. For the REST API a start time and end time are arguments to the request for trip information. The API is supposed to support paging when there are a lot of trips to return. Some number of trips are returned from a request along with a URL that contains the next page of data. When I’ve requested the second page I get an error response back. Given the short amount of time until the service shuts down it doesn’t feel like the time to report that dependency to the staff at Automatic.com. Instead I’m requesting the travel information for 7 to 9 days at a time. The results come back in an array. I’m writing each trip to it’s own file.

To more easily navigate to a trip I’ve separated them out in the file system by date. The folder structure follows this pattern.

VehicleID/year/month/day

The information within these files is the JSON portion of the response for that one trip without any modification.  The meaning of the information in most of the fields of a response are easy to intuitively understand without further documentation. The field names and the data values are descriptive. The one exception is the field “path.” While the purpose of this field is known (to express the path driven) the data value is not intuitive. The data value is an encoded poly line. But documentation on how this is encoded can be found in the Google Maps documentation ( https://developers.google.com/maps/documentation/utilities/polylinealgorithm ).

Now that I’ve got my data saved I may implement my own solution for continuing to have access to this functionality. At first glance I see some products that appear to offer similar services. But the lack of an API for accessing the data makes them a no-go to me. I’m instead am learning towards making a solution with an ELM327 ODB-II adapter, something I’ve used before.

Download Code: https://github.com/j2inet/AutomaticDownload

twitterLogofacebookLogoyoutubeLogoInstagram Logo

Linked In


ODB II Bluetooth Adapter


OSB II Scanner

Using WITS for Samsung/Tizen TV Development


One of the development scenarios that makes me cringe is an environment in which the steps and time from changing a line of code to seeing its effect is high. This usually happens in an environment with specialized hardware, limited licenses, or sensitive configurations leading to the development machine (as in the machine on which code is edited) is not suitable or capable of running the code that has been written.  There is sometimes some aspect of this in cross platform development. While emulators are often helpful in reducing this, they are not always a suitable solution since emulators don’t emulate 100% of the target platform’s functionality.

When developing for TVs running Tizen(which will be more than just Samsung TVs) Samsung has made available a tool to reduce the cycles from changing code to seeing it run through a tool called WITS.

Setting up WITS

To Setup WITS first you need to have already installed and configured Tizen Studio and Node. The system’s PATH variable must also include the path to tizen-studio/tools and tizen-studio/tools/ide/bin (you’ll need to complete those paths according to the location at which you’ve installed Tizen Studio).  You’ll also need to already have a certificate profile defined for your TV.

The files that you need for WITS are hosted on git. Clone the files onto your machine.

git clone https://github.com/Samsung/Wits.git

Enter the Wits folder and install the node dependencies

cd Wits
npm install

Next the folder there is a file named profileInfo.json. The contents of the file must be updated to point to your profiles.xml for your certificate and the name of the certificate profile to use. Windows users, note that when ever you enter a path for Wits you will need to use forward slashes (/), not back slashes (\).  For my installation the updated file looks like the following.

{
  "name": "TizenTVTest2",
  "path": "C:/shares/sdks/tizen/tizen-studio-data/profile/profiles.xml"
}


Configuring Wits to Use Your Project

Wits needs to know the location of your project. Open connectionInfo.json. There is an array element named baseAppPaths. Enter the path to your Tizen application here.  If you would like to make things convinent within this file also set the “ip” element to the IP address of the TV you are targeting. This isn’t necessary since you will be prompted for it when running a program. But it will default to the value that you enter here.

Running your Project

From the command prompt while in the Wits directory use npm to start the project

npm start

You will be prompted for a number of items. The default values for these items comes from the connectionInfo.json file that you modified in the previous section. You should be able to press enter without changing the values of any of these elements.

PS C:\shares\projects\j2inet\witsTest\Wits> npm start

> Wits@1.0.0 start C:\shares\projects\j2inet\witsTest\Wits
> node app.js

Start Wits............
? Input your Application Path : C:/shares/projects/j2inet/MastercardController/workspace/SystemInfo2
? Input your Application width (1920 or 1280) : 1920
? Input your TV Ip address(If using Emulator, input 0.0.0.0) : 10.11.86.62
? Input your port number : 8498
? Do you want to launch with chrome DevTools? : Yes


A few moments later you’ll see your project running on the TV.

Deploying File Changes

This is where Wits is extremely convenient. If you make a change to a file the application will automatically update on the TV. There’s nothing you need to do. Wits will watch the project for changes and react to them automatically!

NodeJS on BrightSign

When I left off I was trying to achieve data persistence on a BrightSign  (model XT1144) using the typical APIs that one would expect to be available in an HTML application. To summarize the results, I found that using typical methods of checking localStorage and indexedDB show as being available; but indexedDB isn’t actually available; and localStorage appears to work, but doesn’t survive a device reset.

The next method to try is NodeJS.  The BrightSign devices support NodeJS, but the entry point is different than a standard entry point of a NodeJS project. A typical NodeJS project will have its entry point defined in a JavaScript file. For BrightSign, the entry point is an HTML file. NodeJS is disabled on the BrightSign by default. There is nothing in BrightAuthor that will enable it. There is a file written to the memory card (that one might otherwise ignore when using BrightAuthor) that must be manually modified. For your future deployments using BrightAuthor, take note that you will want to have the file modification described in this article saved to a back-up device so that it can be restored if a mistake is made.

The file, AUTORUN.BRS, is the first point of execution on the memory card. You can look at the usual function of this file as being like a boot loader; it will get your BrightSign project loaded and transfer execution to it. For BrightSign projects that use an HTML window the HTML window is actually created by the execution of this file. I am not going to cover the BrightScript language. For those that were ever familiar with the language, it looks very much like a variant of the B.A.S.I.C. language. When an HTML window is being created it is done with a call to the CreateObject method with “roHtmlWidget” as the first parameter to the function. The second parameter to this call is a “rectangle” object that indicates the coordinates at which the HTML window will be created. The third (optional) parameter is the one that is of interest. The third parameter is an object that defines options that can be applied to the HTML window.  The options that we want to specify are those that enable NodeJS, set a storage quota, and define the root of the file system that we will be accessing.

The exact layout of your Autorun.js may differ, but in the one that I am currently working with, I have modified the “config” object by adding the necessary parameters. It is possible that in your AutoRun.brs that the third parameter is not being passed at all. If this is the case, you can create your own “config” object to be passed as a third parameter. The additions I have made are in bold in the following.

is = {
    port: 3999
}    
security = {
        websecurity: false,
        camera_enabled: true
}
    
config = {
    nodejs_enabled: true,
    inspector_server: is,
    brightsign_js_objects_enabled: true,
    javascript_enabled: true,
    mouse_enabled: true,
    port: m.msgPort,
    storage_path: "SD:"
    storage_quota: 1073741824            
    security_params: {
        websecurity: false,
        camera_enabled: true
    },
    url: nodeUrl$
}
    
htmlWidget = CreateObject("roHtmlWidget", rect, config)

Once node is enabled the JavaScript for your page will run with the capabilities that you would generally expect to have in a NodeJS project. For my scenario, this means that I now have acces to the FS object for reading and writing to the file system.

fs = require('fs');
var writer = fs.createWriteStream('/storage/sd/myFile.mp4',{defaultEncoding:'utf16le'});
writer.write("Hello World!\r\n");
writer.end()

I put this code in an HTML page and ran it on a BrightSign. After inspecting the SD card after the device booted up and was on for a few moments I saw that my file was still there (Success!).  Now I have a direction in which to move for file persistence.

One of the nice things about using the ServiceWorker object for caching files is that you can treat a file as either successfully cached or failed. When using a file system writer there are other states that I will have to consider. A file could have partially downloaded, but not finished (due to a power outage; network outage; timeout; or someone pressing the reset button; etc.). I’m inclined to be pessimistic when it comes to guaging the reliability of external factors to a system. I find it necessary to plan with the anticipation of them failing.

With that pessimism in mind, there are a couple of approaches that I can immediately think to apply to downloading and caching files.  One is to download files with a temporary name and change the name of the file from its temporary to permanent name only after the download is successful. The other (which is a variation of that solution) is to download the file structure to a temporary location. Once all of the files are downloaded, I could move the folder to its final place (or simply change the path at which the HTML project looks to load its files). Both methods could work.

I am going to try some variations of the solutions I have in mind and will write back with the results of one of the solutions.

-30-