Many of the people with which I work are classified as being technical or creative (though there is a spectrum between these classifications). On many projects, the creative workers design UIs while the technical people transform those designs into something that is working. I’m a proponent of empowering those that are creating a design with the ability to implement it. This is especially preferred on projects where a design will go through several iterations.
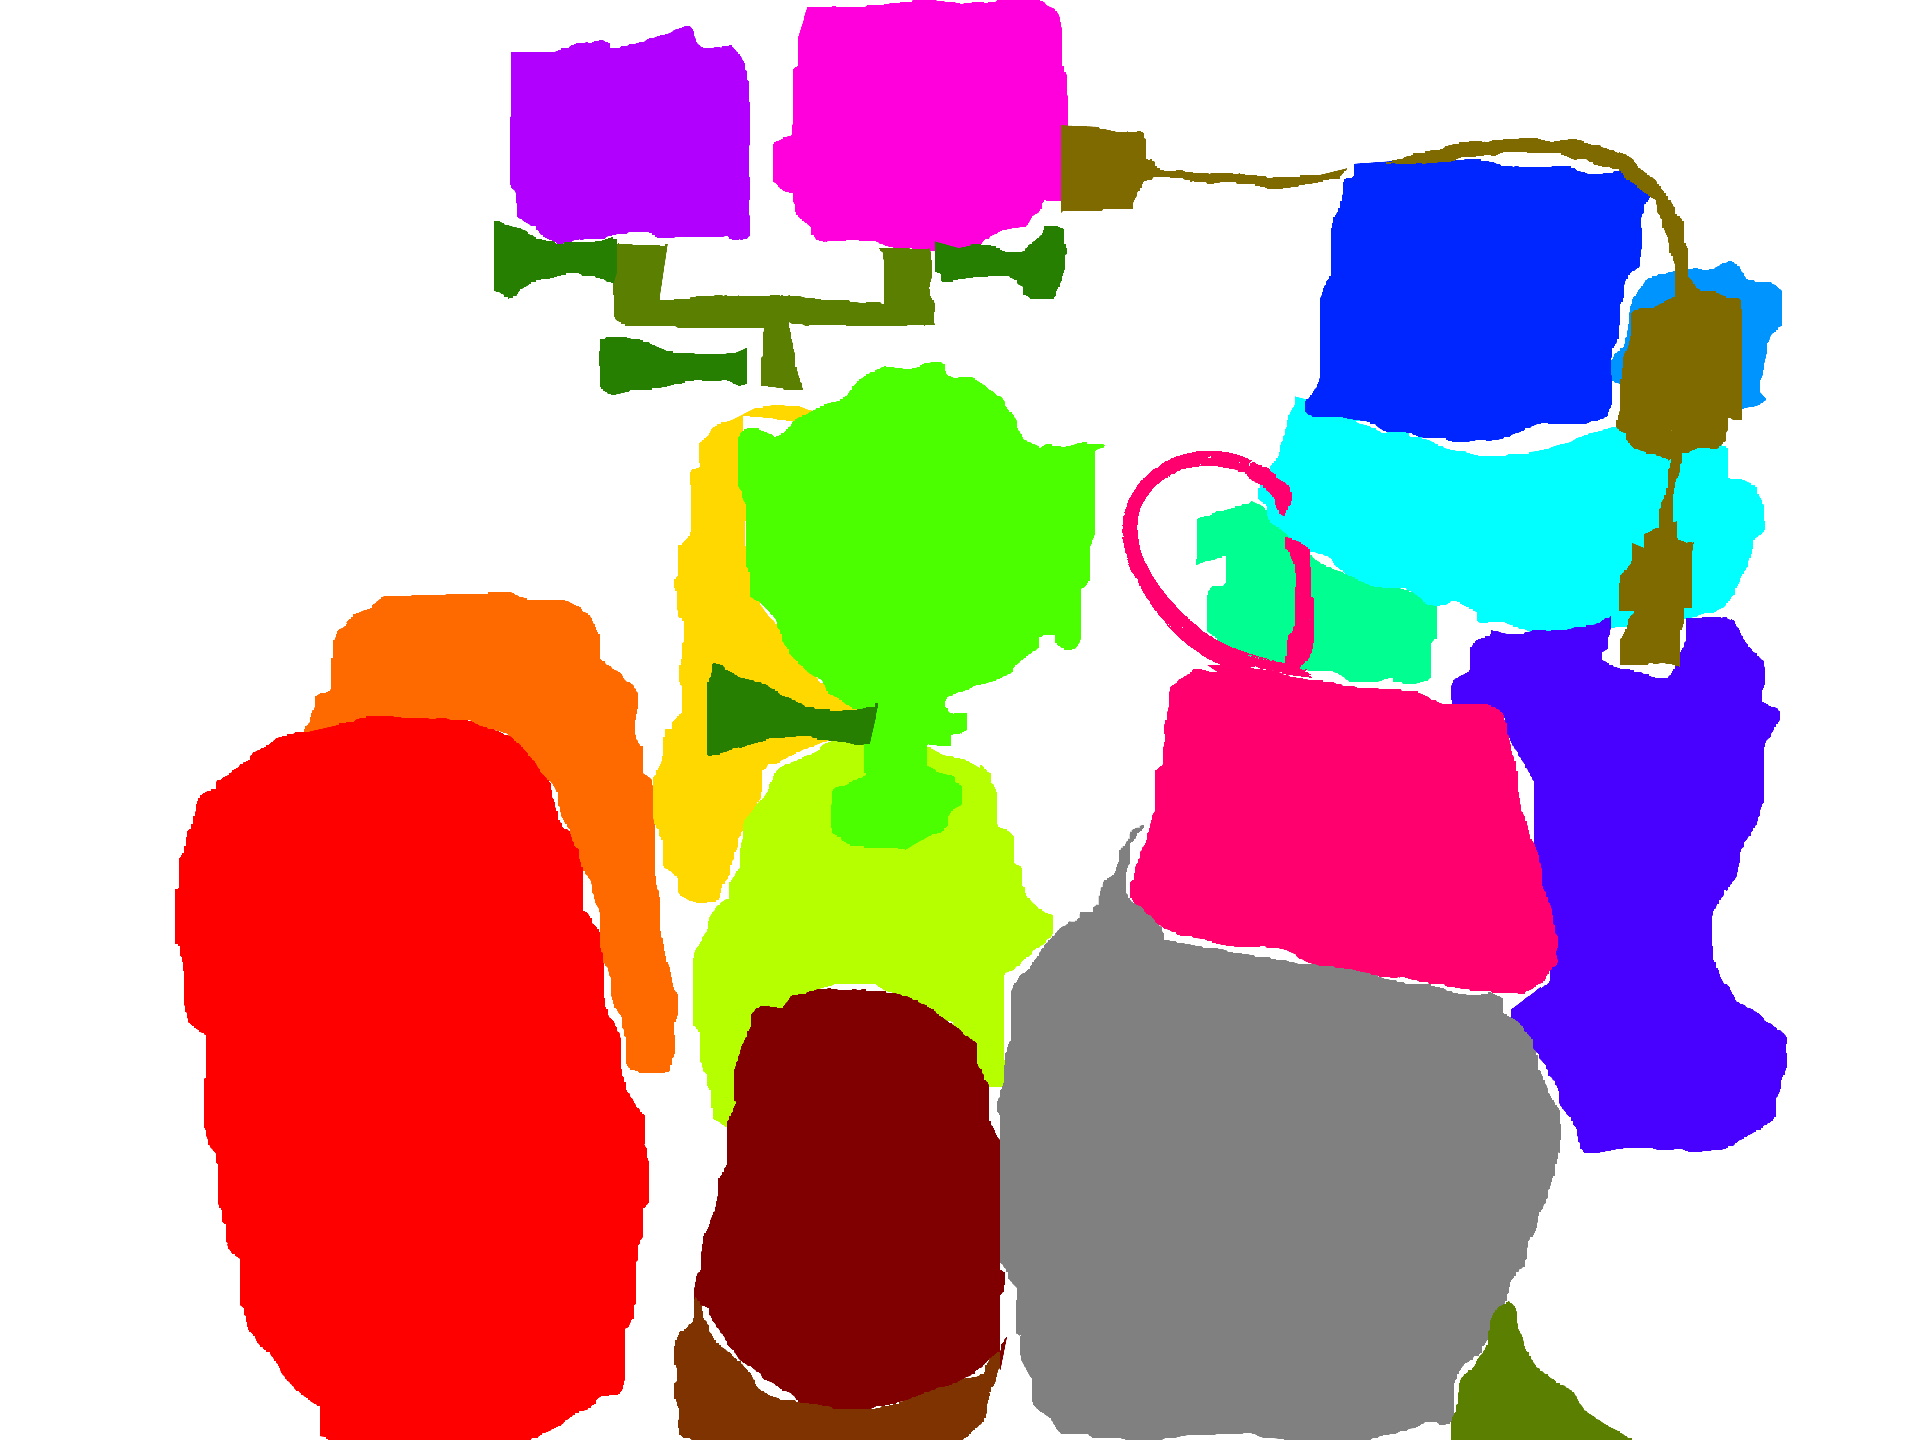
I was recently working on a project for which there would be a menu with a map of a building. Clicking on a room in the map would take the user to web page that had information on the room. I had expected the rooms on the map to generally be rectangular. When I received the map, I found that many of the rooms had irregular shapes. HTML does provide a solution for defining shapes within the image that are clickable through Image Maps. I’ve never been a fan of those, and for this specific project I would not be able to ask the creatives to update the image map. I decided on a different solution. I can’t show the picture of the map that was the image being displayed. As an example, I’ll use a picture of some lenses that are sitting in the corner of my room.
Collection of Lenses
Let’s say I wanted someone to be able to click on a lens and get information about them. In this picture, these lenses overlap. Defining rectangular regions isn’t sufficient. I opened the picture in a paint program and applied color in a layer over the objects of interest. Each color is associated with a different object classification. Image editing isn’t my skill though. The result looks rough, but sufficient. This second image will be used in an HTML page to figure out which object that someone has clicked on. I’ll have a mapping of these color codes to objects.
When a user clicks on the real image, the pixel color data is extracted from the associated image map and converted to a hex string. To extract the pixel data, the image map is rendered to a canvas off-screen. The canvas’s context exposes methods for accessing the pixel data. The following code renders the image map to a canvas and sets a variable containing the canvas 2D context.
function prepareMap(width, height) {
    var imageMap = document.getElementById('target-map');
    var canvas = document.createElement('canvas');
    canvas.width = width;
    canvas.height = height;
    var canvasContext = canvas.getContext('2d');
    canvasContext.drawImage(imageMap, 0, 0, imageMap.width, imageMap.height);
    areaMapContext = canvasContext;
}
I need to know the position of the image relative to the browser’s client area. To retrieve that information, I have a method that recurses through the positioning containers for the image and accumulates the positioning settings to a usable set of coordinates.
function FindPosition(oElementArg) {
    if (oElementArg == undefined)
        return [0, 0];
    var oElement = oElementArg;
    if (typeof (oElement.offsetParent) != "undefined") {
        for (var posX = 0, posY = 0; oElement; oElement = (oElement.offsetParent)) {
            posX += oElement.offsetLeft;
            posY += oElement.offsetTop;
        }
        return [posX, posY];
    }
    return [0.0];
}
The overall flow of what happens during a click is defined within mapClick in the example code. To convert the coordinates on which someone clicked (relative to the body of the document) to coordinates relative to the image, I only need to subtract the offsets that are returned by the FindPosition function. The retrieved colorcode for the area on which the user clicked can be used as an indexer on the color code to product identifier mapping. The product identifier is used as a indexer on the product identifier to product data mapping.
function mapClick(e) {
    var PosX = e.pageX;
    var PosY = e.pageY;
    var position = FindPosition(targetImage);
    var readX = PosX - position[0];
    var readY = PosY - position[1];

    if (!areaMapContext) {
        prepareMap(targetImage.width, targetImage.height);
    }
    var pixelData = areaMapContext.getImageData(readX, readY, 1, 1).data;
    var newState = getStateForColor(pixelData[0], pixelData[1], pixelData[2]);
    var selectedProduct = productData[newState];
    showProduct(selectedProduct);
}
Once could simplify the mappings by having the color data map directly to product information. I chose to keep the two separated though. If the color scheme were ever changed (which I think is very possible for a number of reasons) I thought it better that these two items of data be decoupled from each other.
You can find the full source code for this post on GitHub at this url. Because of security restrictions in the browser, you must run this code within a local HTTP server. Attempting to run it from the file system will fail due to limitations in how an application can use the data it loads when loaded from a local file. I also have brief videos on my social media account to walk through the code.
Posts may contain products with affiliate links. When you make purchases using these links, we receive a small commission at no extra cost to you. Thank you for your support.
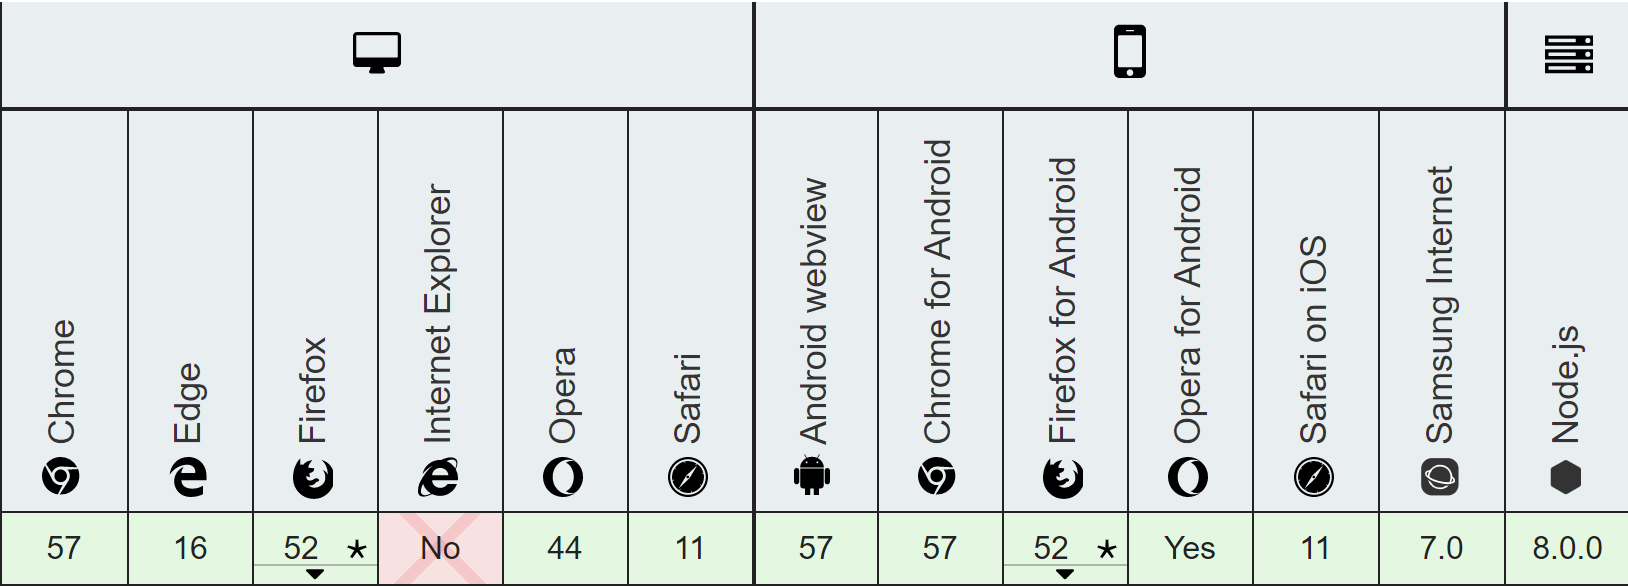
I’ve been taking advantage of Web Assembly lately. It is supported by all the major browsers, let’s one make use of already existing useful code that has been written for other environments, and provides some performance benefits over JavaScript. Web Assembly has a lot of potential and support and I’d like to introduce other developers to it. I’m going to be using C++ in this post. But by no means is this the only language in which someone can make use of Web Assembly. In this post I talk about why someone might want to consider web assembly and how to get a development environment setup.
What is Web Assembly?
Web Assembly is a specification for a virtual machine that runs in the browser. Compared the the highly dynamic JavaScript Web Assembly can achieve much higher performance. Contrary to popular misconception though Web Assembly doesn’t completely replace JavaScript. You will probably use the two together. Web Assembly is based on LLVM (Low Level Virtual Machine), a stack based virtual machine that compilers can target. If someone wanted to make a new programming language they could have the compiler for their language produce LLVM code and then use an already existing tool chain to compile it to platform specific code. A person building a compiler for a new language wouldn’t need to make completely separate systems for different CPU architectures. Web Assembly being LLVM based could run code that was written by a variety of languages. Currently there isn’t support for garbage collection yet which restricts the languages that target it presently. C/C++, C#, and Rust are a few languages that can be used with Web Assembly presently with more expected in the future.
What Other Languages Can I Use?
C/C++ – I’ll be using that language in this article
C#/.Net – I’ve got interest in this one and will write about it in the future.
I suggest Web Assembly primarily for the performance benefits in computationally expensive operations. The binary format it uses is much more strict than JavaScript and it is more suitable for computationally intensive operations. There is also a lot of existing and tested code for work such as cryptography or video decoders that exists in C/C++ that one might want to use in a page. Despite all its flexibility interpreted JavaScript code doesn’t run as fast as a native binary. For some types of applications this difference in performance isn’t important (such as in a word processor). For other applications differences in performance translate into differences in experiences.
While the demand for performance is a motivation to make a native binary there are also security considerations. Native binaries may have access to more system resources than a web implemented solution. There may be more concern with ensuring that a program (especially if it is from a third party) doesn’t do anything malicious or access resources without permission. Web Assembly helps bridge the gap between these two needs; it provides a higher performance execution environment within a sandbox.
C++? Can’t I Cause a Buffer Overflow With That?
Sure. But only within the confines of the sandbox in which the code will run. It could crash your program, but it can’t cause arbitrary execution of code outside the sandbox. Also note that presently Web Assembly doesn’t have any bindings to Host APIs. When you target Web Assembly you don’t have an environment that allows you to bypass the security restrictions in which JavaScript code will run. There’s no direct access to the file system, there’s not access to memory outside of your program, you will still be restricted to communicating with WebSockets and HTTP request that don’t violate CORS restrictions.
How Do I Setup a Developer Environment
There are different versions of instructions on the Internet for installing the Web Assembly tools. If you are running Windows 10 you may come across a set of instructions that start with telling you to install the Windows Subsystem for Linux. Don’t use those instructions; I personally think they are unnecessarily complex. While I have the Windows Sub System for Linux installed and running for other purposes that’s not where I like to compile my Web Assembly code.
Using your operating system of choice (Windows 10/8/7, macOS, Linux) clone the Emscripten git repository, run a few scripts from it, and you are ready to go. Here are the commands to use. If you are on Windows omit the ./ at the beginning of the commands.
With the tools installed you will also want to set the some environment variables. There is a script for doing this. On Windows 10 run
emsdk_env.bat
For the other operating systems run
source emsdk_env.sh
The updates that this makes to environment variables isn’t persistent; it will need to be run again with the next reboot. For an editor I suggest using Visual Studio Code. I’ll be compiling from the command line in this article. Feel free to use the editor of your choice.
Web Assembly Explorer
I don’t use it in this tool within this article, but Web Assembly Explorer is available as an online tool for compiling C++ into Web Assembly and is an option if you don’t have the tools installed.
Now that we have the tools installed we can compile and run something. We will do a hello world program. Type the following source code and save it in hello.cpp.
To compile the code from the command line type the following.
emcc hello.cpp -o hello.html
After the compiler runs you will have three new files.
hello.wasm – the compiled version of your program
hello.html – an HTML page for hosting your web assembly
hello.js – JavaScript for loading your web assembly into the page
If you try to open the HTML file directly your code probably will not run. Instead the page will have to be served through an HTTP server. If you have node installed use the node http-server. You can install the http-server with
npm install http-server -g
Then start the server from the directory with your hello.html
http-server . -p 81
Here I’ve instructed the http-server to run on port 81. You can use the port of your choice here provided nothing else is using it. Remember to substitute the port that you chose throughout the rest of these instructions.
Open a browser and navigate to http://localhost:81/hello.html. You’ll see your code run. If you view the source for the page there is a lot of “noise” in the file. Much of that noise is from the displayed images being embedded within the HTML. That’s fine for playing around. But you will want to have something customized to your own needs.
We can provide a shell or template file for the compiler to use. Emscripten has a minimal file available at https://github.com/emscripten-core/emscripten/blob/master/src/shell_minimal.html. Download that file. It will be used as our starting point. It is convenient for the sake of distribution for everything to be in one file. But I don’t like the CSS and JavaScript being embedded within the file. The CSS here isn’t needed and is being deleted. I’m moving the JavaScript to its own file and added a script references to it in my HTML. There are several items within the HTML and the script that are not necessarily needed. Let’s look at the script first and start making this minimal file even more minimalist.
At the top of the script there are three variables to page elements to indicate download and progress. Those are not absolutely necessary. I’m deleting them. I need to delete references to them too. Lower in the JavaScript is a method named setStatus . I’m replacing it’s body with a call to console.log() to print the text that is passed to it. The first set of programs that I’m going to write won’t use a canvas. The element isn’t needed for now; I’m commenting it out instead of deleting it so that I can use it later. Having deleted the first three lines of this file and and code that references them I’m returning to the HTML. Most of it is being deleted. I’ve commented out the canvas reference. There is a line in the HTML file with the text {{{ SCRIPT }}}. The compiler will take this file as a template and replace {{{ SCRIPT }}} with the reference to the script specific to our Web Assembly file.
When the Web Assembly program executes a printf() the text will be written to the textarea element. I place my hello.cpp file among these files and then compile it with the following command.
The –shell-file argument indicates what file to use as a template. The -o parameter tells the name of the HTML file to write to. If you look at hello.html you can see it is almost identical to the input template. Run the site now and you’ll see the same result, but with a much cleaner interface. Run the program again and you will see the same result with a much cleaner interface.
Binding Functions
I earlier mentioned that Web Assembly doesn’t have any bindings to any operating system functions. It also doesn’t have bindings do the browser. Nor does it have access to the DOM. It is up to the page that loads the web assembly to expose functions to it. In emscripten.js the Modules object defines a number of functions that are going to be made available to the Web Assembly. When the C/C++ code calls printf it will be passed through the JavaScript function defined here of the same name. It isn’t a requirement that the names be the same, but it is easier to keep track of function associations if they are.
Calling C/C++ From JavaScript
But what if you have your own functions that you wish to bind so that your JavaScript code can call the C++ code? The Module object has a function named ccall that can be used to call C/C++ code from JavaScript and another function named cwrap to build a function object that we can hold onto for repeated calls to the same function. To use these functions some additional compile flags will be needed.
To demonstrate the use of both of these methods of calling C/C++ code from JavaScript I’m going to declare three new functions in the C++ code.
void testCall() – accepts no parameters and returns no value. This method only prints a string so that we know that our call to it was successful.
void printNumber(int num) – accepts an integer argument and prints it. This lets us know that our value was successfully called.
int square(int c) – accepts an integer and returns the square of that integer. This let’s us see that a value can be returned back from the code.
The C++ language perform what is called name mangling; the names of the functions in the compiled code is different than the uncompiled code. For the functions that we want to use from outside the C++ code we need to wrap declarations for the functions in an extern “C” block. If our code were being written in C instead of C++ this wouldn’t be necessary. I still prefer C++ because of some of the features that the language offers. Normally I would have a declaration such as this in a header file. But for now my C++ program is in a single file. Close to the top of the program I make the following declarations.
The implementation for the functions is what you would expect.
void testCall()
{
    printf("function was called!\n");
}

void printNumber(int f) {
    printf("Printing the number %d\n", f);
}

int square(int c)
{
    return c*c;
}
There’s a change to my main method too. I’ve had to include a new header file, enscripten.h, because I am about to use one of the functions that it provides. In main added the following line.
EM_ASM ( InitWrappers());
It will result in a JavaScript function named InitWrappers() to get called. I will talk about how EM_ASM works in a following section. I’m adding a third
SASS, or Syntactically Awesome Style Sheets, are a style sheet language that compile to CSS. I have mentioned languages that compile to another language before. TypeScript is an example. If you have used a system that compiles one language to another you may be able to guess why someone might want to make a new style sheet language that compiles to another.
SASS retains some amount of familiarity with CSS. This alternative syntax is more expressive; a developer can write less code to express the same design as the equivalent CSS. It also is not necessary to wait on browsers to have some feature to start using SASS; the layer of separation provided by the compiler allows SASS to have less dependencies on a browser supporting a set of features to be useful. In this first of a two part post I wanted o introduce some of the elements of SASS. Here I demonstrate variables, nesting, and replacement. In the second post I will focus on control structures and functions.
There are several GUI and command line solutions for compiling SASS. My preference is for the command line tool. The command line tool is easy enough to use both directly and to integrate into other build tools. Installation using the Node Package Manager works on Windows, Linux, and macOS (though for me it does not work with the Windows Power Shell while it works fine in the command terminal).
npm install sass -g
If you would like to check if a system has sass installed and the version number type the following.
sass --version
Much like TypeScript, think of SASS as a super set of CSS. This is not 100% the case, but it is a good starting point for understanding. SASS styles might be distributed among several files, but when compiled the output will be in a single files. SASS files will typically have the extension *.scss. As an initial test I have created two files in a folder. One is named first.scss and the other is named second.scss. The following is the contents of first.sass:
@import 'second';
first {
font-family: Arial;
}
And of second.sass:
second{
font-family: Arial;
}
Since first.sass is my main file of this set to compile these files I am selecting first.sass as the input to the pre-processor. When the pre-processor encounters the @import keyword it will replace that line with the contents of the files whose name is specified there. Note that I did not need to include the extension to the file name here. To compile these files I use the following command:
sass first.sass output.css
After running the command there is a new file named output.css.
second {
font-family: Arial;
}

first {
font-family: Arial;
}
Chances are that you are not going to want to issue a command at the command prompt every time you make a change to one of the SASS files. To avoid this you can add the parameter –watch to the command line and allow it to continue to run. Every time you modify a SASS file the compiler will regenerate output.css.
sass --watch first.scss output.css
Variables
One of the first constructs that you will use in SASS is variables. Variables are recognizable from the $ prefix that they have. A variable can hold a Boolean, color, numeric, or string values. It is easy to undervalue variables at first; CSS already provide variables. Why are SASS variables needed? SASS variables are usable in places and ways in which CSS variables are not. Some of the ways that variables can be used to create a style sheet will come up in some of the following sections. Let us look at a typical scenario first.
This creates two variables that hold colors. These colors can be used within the SASS in place of an actual color code.
body {
   color:$primaryColor;
   background-color: $secondaryColor;
}

.container > div {
   margin:1px;
   color:$secondaryColor;
   background-color: $primaryColor;
}
Variables have a scope. If a variable is declared outside of brackets it is globally accessible. If it is declared within the SASS block enveloped by brackets it is only visible to the SASS code within that block. In the following the second instance of $borderColor will cause an error from a variable not being defined. The variable of the same name declared in the first block is not within scope.
You may make a SASS and want to allow a user to customize it through defining values for some variables. But you might not want to obligate the user to define values for all of the variables that your SASS uses. For this scenario there are default values. To assign a variable a default values append the assignment with !default.
$primaryColor: #FF0000 !default;
The assignment occurs only if the variable is undefined or has a null values. If there are any SASS definitions that use the variable before it is assigned a values other than its default those blocks that occur before the new assignment will not have the new values. The default would need to be overridden before it was used. This could mean defining a variable before including the library that will be used. But there is another way that I think is cleaner.
With the @use directive a SASS library can be included and the variables to be assigned new values can be specified using the keyword “with” and a list of the variable assignments.
@use  'second' with (
   $primaryColor: #FF00FF
)
Nesting Selectors
The ability to nest selectors is a feature that in my opinion allows for much neater style sheets. It is common within CSS to have selectors based on some parent/child relationship. Here is a simple example.
While these style selectors are all related they are each in their own own declaration independent of each other. Under SASS they could be grouped together. Each selector is referring to elements that are children of an element of the demoView class. A single demoView declaration is made in my SASS file. For selectors that are targeting children of demoView within SASS they are declared within the demoView class selector.
Not that this is the only way that a string substitution can occur. There is also the string interpolation operation.
String Interpolation
String interpolation substitutes the values of a variable into a string. String interpolation operations use #{} with a variable name inserted between the brackets. String interpolation can be used in a selector, attribute name, or values.
$index:4;
item-#{$index} {
   color:red;
}
expands to
item-4 {
color: red;
}
The potential for this operation becomes more powerful once used within other constructs such as loops. Control structures will be the topic of the second half of this post, but I will show a brief example here.
@for $i from 1 to 4 {
   item-#{$i} {
      animation-delay: #{$i}s;
   }
}
Placeholder selectors look like class selectors. But they are proceeded with a % instead of a period. The first thing to note about placeholder selectors is that they do not generate any CSS output. Any selector that contains a place holder selector will not be rendered to the CSS output. At first, placeholders appear useless. The placeholder selectors are made to be used with @extend. Use @extend to import the attributes from a place holder selector into another selector.
Nothing in what I have shown thus far is complex and I think it is easy to to understand the individual elements. But for a deeper understanding I think it best to start putting this information to use. Exercise one’s understanding through some simple projects to strengthen that understanding. When the next portion of this post is published will dive straight into control structures and functions. With those the potential to generate complex CSS from much simpler SASS increases significantly.
Until the next entry if you would like to see my other posts on HTMLrelated topics click here.
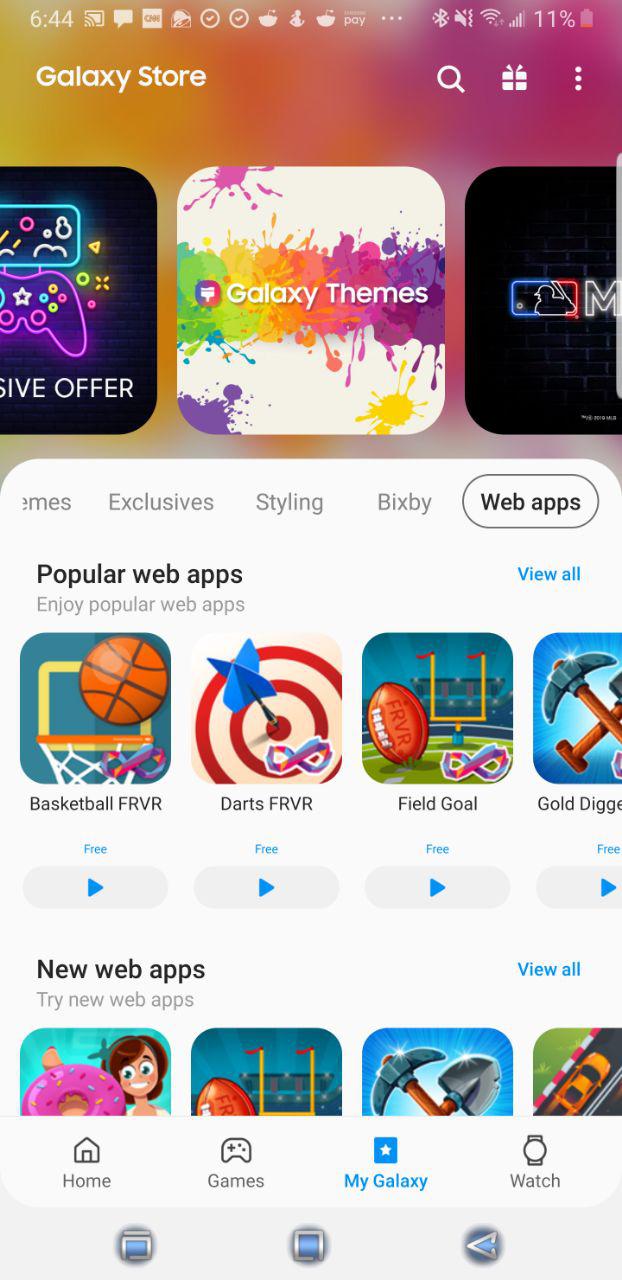
The Galaxy Store for Samsung Devices now supports Progressive Web Apps; your progressive applications can be listed there. In the Galaxy Store App if you navigate to My Apps->Web Apps you can see the PWAs that are presently available. But why target PWAs?
Progress web applications have a advantages over native apps. They can run on a variety of operating systems. PWAs tend to be smaller and the installation process is simple. Updates to a PWA can be deployed much faster than a conventional application since updates don’t need to go through an application store. Because of the sandbox in which most browsers run PWA applications have much lower potential for exploiting someone’s computing device.
A license agreement is a basic requirement. You need to own the app and give Samsung permission to have the app listed in their store. While this is a work in progress it is something that is available today; though presently the process is of enrolling an application is manual. You would need to e-mail pwasupport{-at-}samsung.com (replace the {-at-} with an @. I don’t list e-mail address plainly as not to feed to spam bots). Someone will review your web application and assist with getting the application listed.
Progressive Web Apps (PWA) are HTML based applications that run as though they are desktop applications. Google Chrome received support for PWAs on Chrome OS in May with the release of Chrome 67. Linux and Windows received support in August with the release of Chrome 70. Support for Mac OS X is yet to come.
One of the first differences that stands out for PWAs is that they can run in their own application window and are indistinguishable from other applications running on a machine. That difference is largely visual. But the differences extend well beyond what is visible. Resources that are not usually available to an HTML page are available to a PWA such as access to Bluetooth, serial ports, UDP networking, and more. Chrome PWAs can be installed and have their own icon in your programs menu and function offline.
There are requirements that must be satisfied before an HTML page can be installed as a PWA. These are the conditions that must be met.
The page must be served over SSL/HTTPS.
The page must have a service worker with a fetch handler.
User engagement requirements must be met (interaction with the domain for at least 30 seconds).
A manifest must be present.
192px and 512px icons must be included.
Application must have a short name and long name.
The display mode must be specified.
start_url must be specified.
If all of these requirements are met Chrome will trigger a beforeinstallprompt event for the web page. Once this event is triggered your application can present the user with an install prompt. Depending on the Chrome version your application may be able to suppress this prompt and display it to the user later (allowing you to decide where in the interaction flow that the prompt shows up) or your app might not be allowed to suppress it.
I’ll make a minimilastic application that satisfies the requirements for being a PWA. The application that I’ll make will calculate sidereal time. Sidereal time is a time tracking system used by astronomers and is always expressed in 24 hour format. The usual system of tracking time was formed around trying to map the time of the day to the position of the sun (solar time, though it is far less than perfect). Sidereal time is based on the position of the stars relative to the observer. I will not talk much about the algorithm behind this calculation much here. I talked about calculating sidereal time in an application I had made for the now defunct Windows Phone 7; while that OS is no more the description I gave on how sidereal time works is still applicable.
Using SVG I’ve made a simple 24 hour clock face. The clock face is really there for aesthetics. Chances are if you try to read the hands of the clock the hour hand will cause confusion since it’s position on a 24 hour clock will not meet expectations that have been formed from being able to read a 12 hour clock. The digital readout is the part that will actually give the information of interest. Every second the time is updated and the hands animate to their new position. There’s also a gear icon for opening the settings interface.
Satisfying the SSL/HTTP Requirement
A lot of the necessary features are only available if your application is being served over SSL. If you don’t see HTTPS in the address bar then these features simply will not work. To satisfy this requirement for now I’m using Google Firebase and the temporary URL that it has assigned to me. I don’t plan on keeping this URL forever, but at the time of this post you can play with the application over at https://siderealtimepiece.firebaseapp.com.
Satisfying Manifest Resources Requirements
The manifest for my application is in the root directory of the application. It is a JSON formatted file with information on where the program icons can be found, the starting URL, and the name of the application as it should appear on the user’s machine.
To satisfy the service worker requirement there’s a JavaScript file in the root of this application’s files named sw.js. The service worker works in the background behind the page. For this application we only want the service worker to do two things; respond to an install event by caching the required files locally and serve up those files when needed. The list of the files that are to be cached are in an array named urlsToCache. When the service worker response to the install event it will pass this list of URLs to a call of the addAll method on the cache object. The cache object will then download the resources at these URLs and save them locally where we can use them offline.
For the fetch event I’m using code from a Google recommendation. This handler will serve the contents from the cache when there is a cache hit and also add new files to the cache when a request is made for a file that isn’t already there.
self.addEventListener('fetch', function(event) {
    event.respondWith(
      caches.match(event.request)
        .then(function(response) {
          // Cache hit - return response
          if (response) {
            return response;
          }

          // IMPORTANT: Clone the request. A request is a stream and
          // can only be consumed once. Since we are consuming this
          // once by cache and once by the browser for fetch, we need
          // to clone the response.
          var fetchRequest = event.request.clone();

          return fetch(fetchRequest).then(
            function(response) {
              // Check if we received a valid response
              if(!response || response.status !== 200 || response.type !== 'basic') {
                return response;
              }

              // IMPORTANT: Clone the response. A response is a stream
              // and because we want the browser to consume the response
              // as well as the cache consuming the response, we need
              // to clone it so we have two streams.
              var responseToCache = response.clone();

              caches.open(CACHE_NAME)
                .then(function(cache) {
                  cache.put(event.request, responseToCache);
                });

              return response;
            }
          );
        })
      );
  });
This file must be registered as the service worker for it to be able to do anything. In one of the JavaScript files loaded by the page I check the navigator object to ensure there is a serviceWorker member (if there isn’t then the browser in which the code is running currently doesn’t support service workers). If it is there then the service worker can be registered with navigator.serviceWorker.register(path_to_service_worker).
If your code is running on a Chrome implementation that supports it you can defer the presentation of the installation prompt. In my case I’ve decided to defer it and make a button available in the settings UI. The variable installPrompt will hold the reference to the event object that when activated will present the user with the Chrome install UI. When the event is raised the variable is populated with the event object and the install button within my settings UI is made visible.
var installPrompt;


function beforeInstall(e) {
    console.log('beforeInstallPrompt()')
    e.preventDefault();
    installPrompt = e;
    $('.installUI').show();
}


window.addEventListener('beforeinstallprompt', beforeInstall);
Testing the application on Chrome on Ubuntu Linux when I select my install button the Chrome install prompt shows.
The Install Prompt that shows on Google Chrome on a desktop
Program Launchers on the Desktop
On the desktop once installed the icon for the PWA shows up in the computer’s program launcher. It also shows up in the Chrome app list. When launched since this application was made to run in standalone mode the application runs in it’s own window with the OS appropriate buttons for going full screen, minimizing, and closing the window. My test application uses location services to acquire the longitude at which the sidereal time is being calculated. When run in a regular browser window I’m prompted each time I visit the page to give permission for location information. This gets a little annoying after a while. When the application is running in stand alone mode the application’s border shows an icon indicating that the location is being detected. Clicking on the icon gives the user the ability to change the location permissions for the application.
Samsung Internet Compatibility
Samsung Internet, the default browser for a long period on many Samsung phones, also supports PWAs. (Samsung Internet can also be installed on non-Samsung phones). Samsung Internet is a Chromium based browser and Samsung is one of the contributors to the Chromium project. It may come as no surprise that no code changes are necessary for this application to work on The UI it presents for installing PWAs is different than what Chrome presents. When Samsung Internet detects that a page can be installed as a PWA an icon is shown in the address bar that resembles a house with a plus in the center. Selecting it will add the icon to the home screen. The icon shows with a smaller image of the Samsung Internet icon indicating that it is a PWA. The beforeinstallprompt event will never be triggered. Since the presentation of the custom install button was driven by this event it simply will not show.
Adding iOS Compatibility
If you saw the original iPhone announcement back in 2007 Steve Jobs had announced that making apps for the iPhone could be done with HTML; at the time there was no SDK available to developers and if they wanted to target the iPhone they were making a web app that had an icon on the home screen. From 2007 to 2018 Apple didn’t do much to advance the platform. It wasn’t until March 2018 that Apple made significant updates to their support to HTML based applications. Apple added support for web manifest, and services workers, web assembly, and other features.
There’s not 100% parity between iOS and Android for available features in PWA. On iOS storage is limited to 50MB per app. On Android the application can request more storage. Android BWAs also have access to Bluetooth features, speech recognition, background sync, and other features. For my sample application none of these mentioned differences matter. While the Android implementations have UI notifications that let the user know that the app can be installed on iOS there’s no visual notification. To install the application the user must select the share option and add the page to their home screen.
Safari ignores most of the attributes of the manifest. It also doesn’t save state if the user leaves the application. So the developers must make their own implementation to save state as the user jumps in and out of the application. If you want a custom icon to show in Safari for your application Apple has a document on specifying the icon using the link tag. An icon can be specified like the following.
If you want to specify multiple icons and allow the phone to select the most appropriate one for the user’s resolution add a sizes attribute to the tag.
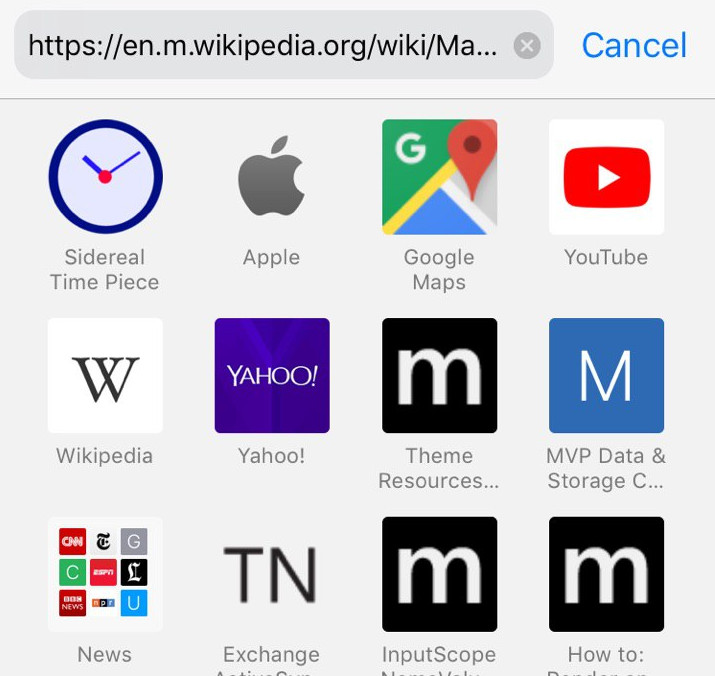
My clock icon for the program shows up in the iPhone favourites list as the following.
Offline Functionality
This application doesn’t need the internet for any functionality. It’s only inputs are the current local time and the user’s longitude. With the lack of need for any network resources and the service worker caching the required files for the application it will work just fine offline after it has been installed. If you make an application that requires network access you will want to give some thought to what to do when there is no data connection. Even if the application can’t do anything without a connection it would be better to show a friendly message than to just let the application not work.
An Alternative to the App Store
PWAs longtime might turn out to be a good alternative to app stores for some types of applications. Whether or not it is a good fit for the needs that you have will depend on the functionality that your applications require and what is available on the devices that you need to target. Apple appears to be behind on this front at the moment. But I hope that the attention that they’ve put on the platform this year to be indicative of future efforts. I’m personally am interested in what could be done when PWAs and WebAssembly are combined together. These are topics to which I hope to give a good bit of attention over the following months.
When I left off I was trying to achieve data persistence on a BrightSign (model XT1144) using the typical APIs that one would expect to be available in an HTML application. To summarize the results, I found that using typical methods of checking localStorage and indexedDB show as being available; but indexedDB isn’t actually available; and localStorage appears to work, but doesn’t survive a device reset.
The next method to try is NodeJS. The BrightSign devices support NodeJS, but the entry point is different than a standard entry point of a NodeJS project. A typical NodeJS project will have its entry point defined in a JavaScript file. For BrightSign, the entry point is an HTML file. NodeJS is disabled on the BrightSign by default. There is nothing in BrightAuthor that will enable it. There is a file written to the memory card (that one might otherwise ignore when using BrightAuthor) that must be manually modified. For your future deployments using BrightAuthor, take note that you will want to have the file modification described in this article saved to a back-up device so that it can be restored if a mistake is made.
The file, AUTORUN.BRS, is the first point of execution on the memory card. You can look at the usual function of this file as being like a boot loader; it will get your BrightSign project loaded and transfer execution to it. For BrightSign projects that use an HTML window the HTML window is actually created by the execution of this file. I am not going to cover the BrightScript language. For those that were ever familiar with the language, it looks very much like a variant of the B.A.S.I.C. language. When an HTML window is being created it is done with a call to the CreateObject method with “roHtmlWidget” as the first parameter to the function. The second parameter to this call is a “rectangle” object that indicates the coordinates at which the HTML window will be created. The third (optional) parameter is the one that is of interest. The third parameter is an object that defines options that can be applied to the HTML window. The options that we want to specify are those that enable NodeJS, set a storage quota, and define the root of the file system that we will be accessing.
The exact layout of your Autorun.js may differ, but in the one that I am currently working with, I have modified the “config” object by adding the necessary parameters. It is possible that in your AutoRun.brs that the third parameter is not being passed at all. If this is the case, you can create your own “config” object to be passed as a third parameter. The additions I have made are in bold in the following.
Once node is enabled the JavaScript for your page will run with the capabilities that you would generally expect to have in a NodeJS project. For my scenario, this means that I now have acces to the FS object for reading and writing to the file system.
fs = require('fs');
var writer = fs.createWriteStream('/storage/sd/myFile.mp4',{defaultEncoding:'utf16le'});
writer.write("Hello World!\r\n");
writer.end()
I put this code in an HTML page and ran it on a BrightSign. After inspecting the SD card after the device booted up and was on for a few moments I saw that my file was still there (Success!). Now I have a direction in which to move for file persistence.
One of the nice things about using the ServiceWorker object for caching files is that you can treat a file as either successfully cached or failed. When using a file system writer there are other states that I will have to consider. A file could have partially downloaded, but not finished (due to a power outage; network outage; timeout; or someone pressing the reset button; etc.). I’m inclined to be pessimistic when it comes to guaging the reliability of external factors to a system. I find it necessary to plan with the anticipation of them failing.
With that pessimism in mind, there are a couple of approaches that I can immediately think to apply to downloading and caching files. One is to download files with a temporary name and change the name of the file from its temporary to permanent name only after the download is successful. The other (which is a variation of that solution) is to download the file structure to a temporary location. Once all of the files are downloaded, I could move the folder to its final place (or simply change the path at which the HTML project looks to load its files). Both methods could work.
I am going to try some variations of the solutions I have in mind and will write back with the results of one of the solutions.
BrightSign Media Players work with a number of content management systems. With a content management system, you can upload a BrightSign presentation as an asset and it will be distributed to the the units out in the field automatically.
Recently, I was investigating what the options are for other persistent storage. The assets to be managed were not a full presentation, but were a few files that were going to be consumed by a presentation. As expected, the solution needed to be tolerant to a connection being dropped at any moment. If an updated asset were to be partially downloaded, the expected behavior would be that the BrightSign continues with the last set of good assets that it had until a complete new set could be completely downloaded.
The first thing that I looked into was whether the BrightSign units supported service workers. If they did, this would be a good area to place an implementation that would check for new content and initiate a download. I also wanted to know what storage options were supported. I considered indexedDB, localStorage, and caches. The most direct way of checking for support was to make an HTML project that would check if the relevant objects were available on the window object. I placed a few fields on an HTML page and wrote a few lines of JavaScript code to place the results in the HTML page.
Things looked good, at first. Then, I checked the network request. While inspection of the objects suggests that the service worker functionality is supported, the call to register a service worker script did not result in the script downloading and executing. There was no attempt made to access it at all. This means that service worker functionality is not available. Bummer.
Usually, I’ve used the cache object from a service worker script. The use of it there was invisible to the other code that was running in the application. But with the unavailability of the service worker the code for the presentation will show more awareness of the object. Not quite what I would like, but I know know that is one of the restrictions in which I must operate.
The Caches object is usually used by a service worker. But the object can be used by the window, while it is defined as a part of the service worker spec, there’s no requirement that it be only used by it.
The next thing worth trying was to manually cache something and see if it could be retrieved.
This doesn’t actually do anything with the cache yet. I just wanted to make sure I could retrieve a cache object. I ran this locally and it ran just fine. I tried again, running it on the BrightSign player, and got an unexpected result, window.caches is non-null, and I can call window.caches.open and get a callback. The problem is that the callback always receives a null object. It appears that the cache object isn’t actually supported. It is possible that I made a mistake. To check on this, I posted a message in the BrightSign forum and moved on to trying the next storage option, localStorage.
The localStorage option didn’t give me the results that I expected on the BrightSign. For the test I made a function that would keep what I hoped to be a persistent count of how many times it ran.
function localStorageTest() {
    if(!window.localStorage) {
        console.log('local storage is not supported' );
        return;
    }
    var result = localStorage.getItem('bootCount0') || 0;
    console.log('old local storage value is ', result);
    result = Number.parseInt( result) + 1;
    localStorage.setItem('bootCount0', result);
    result = localStorage.getItem('bootCount0', null)
    console.log('new local storage value is ', result);
}
When I first ran this, things ran as expected. My updated counts were saving to localStorage. So I tried rebooting. Instead of saving, the count reset to zero. On the BrightSign, localStorage had a behavior exactly like sessionStorage.
Based on these results, it appears that persistent storage isn’t available using the HTML APIS. That doesn’t mean that it is impossible to save content to persistent storage. The solution to this problem involves NodeJS. I’ll share more information about how Node works on BrightSign in my next post. It’s different than how one would usually use it.
Of the many HTML capable clients that I’ve worked with, among them is an interesting family of devices called BrightSign Media Players (made by Roku). One of the things that they do exceptionally well is playing videos. They support a variety of codecs for that job and it’s easy to have them go from one video to another in response to a network signal, a switch being pressed, or a touch on the screen. I’m using the XT1143 and XT1144 models for my test.
For simple video-only projects, the free tool BrightAuthor works well. But the scenarios that this is best fit for seem to be scenarios with relatively low amounts of navigation complexity. For projects with higher amounts of navigational complexity or projects that require more complex logic in general, an HTML based project may be a better choice.
After working on a number of HTML projects for BrightSign, I’ve discovered some of the boundaries of what can and can’t be done to have a different shape than on some other platforms. I have seen that there are some things that while taxing to other devices, work well on the BrightSign players; and other things that don’t work so well on BrightSign that will work fine on other players.
The BrightSign HTML rendering engine in devices with recent firmware is based on Chromium.
BrightSign Firmware Version
Rendering Engine
4.7-5.1
Webkit
6.0-6.1
Chromium 37
6.2-7.1
Chromium 45
8.0 (not released yet)
Chromium 65
You can encounter some quirky rendering behaviour if you are on a device with an older firmware version. At the time that I’m writing this the 8.0 firmware isn’t actually available (coming soon). I’ve found that while the device can render SVG, if I try to animate SVG objects, then performance can suffer greatly. It is also only possible to have no more than two media items playing at a time (audio or video). If an attempt is made to play more than two items, then the third item will be queued and will not begin to play until the previous two complete playing.
Rather than spend a lot of time developing and testing something in Chrome before deploying it to a BrightSign, it is better if you start off testing your code on the BrightSign as soon as possible. The normal deployment process for code that is to run from the BrightSign is to copy a set of files to an HTML card, insert it into the BrightSign, reboot it, and wait a minute or two for the device to start up and render your content.
Compared to something being tested locally ,where you can just hit a refresh button to see how it renders, this process is way too long. A better alternative, if your development machine and BrightSign are on the same network and sub-net is to make a BrightSign presentation that contains an HTML widget that points back to your development machine. You’ll need to have a web server up and running on your machine and use the URL for the page of interest in the BrightSign presentation. You will also want to make sure that you have enabled HTML debugging. This is necessary for quick refreshes of the page.
When the BrightSign boots up, if everything is properly configured you should see your webpage show up. You’ve got access to all of the BrightSign specific objects even though the page is being served from another page. You can inspect the elements of the page or debug the JavaScript by opening a Chrome browser on your development machine and browsing to the IP address of the BrightSign, port 2999. Note that only one browser tab instance can be debugging the code running on the BrightSign.
The interface that you see here is identical to what you would see in the Chrome Developer Console when debugging locally. If you make a change to the HTML, refreshing the page is simply a matter of pressing [CTRL]+[R] from the development window. This will invoke a refresh on the BrightSign too.
I’ll be working on a BrightSign project over the course of the next few weeks and will be documenting some of the other good-to-know things and things that do or don’t work well on the devices.
This is the second part of a two-part post. The first part can be found here.
At the end of the first part, I had gotten discovery of the bridge implemented and had performed the pairing of the bridge. In this part, I will show you how to create a query for the state of the light groups and control them.
Querying Group State
I’m only allowing the modification of the state of groups of lights on the Hue. First I need to query the bridge for what states exist. The list of groups and the state of the group are available at `http://${this.ipAddress}/${this.userName}/groups`. Here the data in this.userName is the user name that was returned from the Hue bridge in the pairing process. With this information I am able to create a new UI element for each group found. I only show groups of type “room” from this response. It is also possible that the user has grouped an arbitrary set of lights together in a group. I don’t show these.
var hueDB = (function () {
    var db = {};
    var datastore = null;
    var version = 1;
    db.open = function (callback) {
        var request = indexedDB.open('hueDB', version);
        request.onupgradeneeded = function (e) {
            var db = e.target.result;
            e.target.transaction.onerror = db.onerror;
            var store = db.createObjectStore('bridge', { keyPath: 'bridgeID' });
        };
        request.onsuccess = function (e) {
            datastore = e.target.result;
            callback();
        };
    };

    db.getBridgeList = function () {
        return new Promise((resolve, reject) => {
            var transaction = datastore.transaction(['bridge'], 'readonly');
            transaction.onerror = function (e) {
                reject(e.error);
            };
            transaction.oncomplete = function (e) {
                console.log('transaction complete');
            };

            var objStore = transaction.objectStore('bridge');
            objStore.getAll().onsuccess = function (e) {
                console.log('bridge retrieval complete');
                resolve(e.target.result);
            };

            var bridgeList = [];


        });
    };

    db.addBridge = function (bridge) {
        console.log('adding bridge ', bridge);
        return new Promise((resolve, reject) => {
            var transaction = datastore.transaction(['bridge'], 'readwrite');
            transaction.onerror = function (e) {
                reject(e.error);
            };
            transaction.onsuccess = function (e) {
                console.log('item added');
            };
            var objStore = transaction.objectStore('bridge');
            var objectStoreRequest = objStore.add(bridge);
            objectStoreRequest.onsuccess = function (e) {
                resolve();
            };
        });
    };

    return db;
})();
Changing the State of a Light Group Attributes
There are several elements of a light group’s state that can be modified. I’m only considering two: the brightness of the light group and whether or not the group of lights is turned on. Both can be set with a PUT request to the bridge at the the URL http://${this.ipAddress}/${this.userName}/groups/${id}/action`. This endpoint accepts a JSON payload. Turning a group of lights on or off; changing the brightness; activating a scene to change the color; and many other options can be changed through this end point. It is not necessary to specify all of the possible attributes when calling this endpoint. If an attribute is not specified it will remain at its current state. I have made a method named setGroupState that will be used by all other methods that make use of this endpoint. The methods will differ in the payloads that they build and pass to this method.
Of the many attributes that could be packaged in the payload are bri and on. The on state sets whether or not the lights are turned on. The bri attribute accepts a value in the range of 0 to 254. Note that a value of 0 doesn’t mean off. Zero is the value level assigned to the lowest level of illumination above off that the light will provide.
Activating Scenes
Scenes, or a collection of settings that applies to lights, can by associated with a predefined light group or with some arbitrary group of lights. The Hue API labels scenes as either LightScene or GroupScene accordingly. I am only working with groups scenes. A list of all of the scenes defined on the bridge is retrievable through the the endpoint http://${this.ipAddress}/api/${this.userName}/scenes.
The object returned is a dictionary of the scene IDs and the attributes. The scene ID is a string of what appears to be random characters. It’s not user friendly and should only be used internally by the code and never presented to the user. Here is a response showing only two scenes.
To activate a scene on a group I use the same endpoint that is used for turning light groups on and off or setting their brightness level. The JSON payload will have a single element named scene whose value is one of the cryptic looking scene identifiers above.
    activateScene(sceneID) {
        var scene;
        if(sceneID in this.sceneList) {
            var scene = this.sceneList[sceneID];
            var group = scene.group;
            var req = {scene:sceneID};
            return this.setGroupState(group,req );
        }
    }
Application Startup
To hide some of the events that occur at startup the application has a splash screen. The splash screen is only momentarily present. During the time that it is momentarily shown the application will attempt to reconnect to the last bridge that it had connected to and will query for the available groups and scenes. This is just enough of a distraction to hide the time taken to do this additional setup.
The Application Splash Screen
Installing and Running the Application
If you have downloaded the source code to your local drive, you can add the program to Chrome as an unpacked extension. In a browser instance open the URL chrome://extensions. In the upper-left corner of this UI is a button labeled Load Unpacked. Select this option.
UI for loading unpacked Chrome extensions
You will be prompted to select a folder. Navigate to the folder where you have unpacked the source code and select it. After selecting it you will see the application in the list of installed extensions.
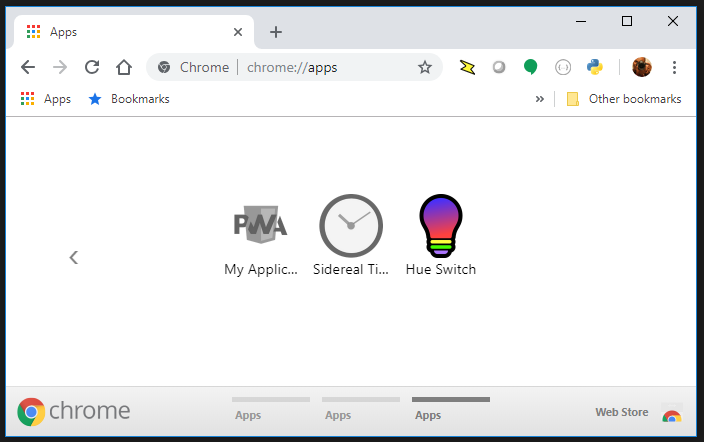
The application will now show up in the Chrome app launcher. This may be exposed through the regular app launcher that is part of your operating system (such as the Program menu on Windows) and will also appear in Chrome itself. Close to the address bar is a button labeled “Apps.”
The application in the Chrome app launcher
Completing the Application
As I mentioned in the opening, this is not meant to be a complete application. It is only an operational starting point, creating something that is functional enough to start testing different functions in the Hue API.
I will close with mentioning some other potential improvements. For a user running the application for the first time the setup process might be smoothed out by automatically trying to pair with the first bridge seen (if there is only one bridge seen) and prompting the user to press the link button. This makes the setup process a two step process: start the application and press the link button on the bridge. There could also be other people that are operating the Hue lighting at the same time that this application is running. Periodically polling the state of the lights and light groups on the network and updating the UI accordingly would improve usability. A user may also want to control individual lights within a group or have control over the light color. For this a light selection UI would also need to be developed.
It took me about an evening to get this far in the development and it was something enjoyable to do during a brief pause between projects. As such projects go, I’m not sure when I’ll get a change to return to it. But I hope that in it’s current form that it will be of utility to you.
Screenshot of Chrome application for controlling Hue lighting.
Continuing from the post I made on SSDP discovery with Chrome, I’m making an application that will do more than just discovery. For this post I’m going to show the starting point of a Chrome application for controlling your home Hue lighting. I’ve divided this into two parts. In this first part I’m showing the process of pairing with the bridge. In the second part I’ll control the lights.
The features that this application will implement will include bridge discovery and pairing; the power state of the light; and the brightness level of the light. There’s many other features that could still be implemented. Given the full range of capabilities that the Hue kits support (changing color, timers, response to motion sensors, etc.) this will not be an application that utilizes the full capability of the Hue lighting sets.
Chrome Only
This application is designed to only run in Chrome. If you want to adapt it to run outside of Chrome, you can do so by first disabling SSDP discovery. (Other HTML application platforms might not support UDP for discovery.)
The other discovery methods (querying Hue’s discovery web service or asking the user to enter the IP address) can still work. A non-chrome target will also need to allow CORS to be ignored and allow communication without SSL.
What is Hue Lighting?
Hue Lighting is an automated lighting solution made by Philips. Generally the lighting kits are sold in a package that contains three LED based light bulbs and a bridge. The bridge is a device that connects to your home network with an Ethernet jack and communicates with the light bulbs.
Philips also makes free applications for iOS and Android for controlling the lights. For any Hue light the light’s brightness and whether or not it is turned on can be controlled through the applications. Some lights also allow the color temperature to be changed (adjusting the tint between red, yellow and blue). Some lights support RGB (Red, Green, Blue) parameters so that their colors can be changed. These settings can be individually adjusted or settings for a collection of the lights can be defined together as a “scene.” When a scene is activated the state of all of the lights that make up the scene are updated. Scenes can be activated through special light switches, through an app, through a schedule, or in response to a Hue motion sensor detecting motion.
Discovery: Review and New Methods
The central piece of hardware for the Hue lighting is the Hue Bridge. At the time of this writing there are two versions of the bridge. For the functionality that this application will utilize, the differences between the two bridges will not matter. The messaging and interaction to both versions of the bridge will be the same. My UI will properly represent the bridge that the system discovers. The first version of the Hue Bridge is round. The second version of the Hue Bridge is square. In either case we must first find the bridge’s IP address before we can begin interaction.
Phillips Hue Bridge Version 1 (left) and Version 2 (right)
The Hue bridge can be discovered in multiple ways. It can be discovered using SSDP. The basics of SSDP discovery were previously discussed here. Please refer back to it if you need more detail than what is found in this brief overview. Devices that support SSDP discovery join a multicast group on the network that they are connected to. These devices generally wait for a request for discovery to be received. An SSDP request is sent as an HTTP over UDP message and every SSDP device that receives it responds with some basic information about itself and a URL to where more information on the device can be found. Examples of some devices that support SSDP are network attached storage; set top boxes like Android TVs and Rokus; printers; and home automation kits.
Two other methods of discovering a bridge include asking the user to enter an IP address and asking for a list of IP addresses of bridges on your network through the Hue discovery service. If you have a Hue bridge connected to your network right now you can see it’s IP address by visiting https://discovery.meethue.com/ . If you are on a shared network then you may also see IP addresses of other bridges on your network. It is also possible that not all bridges on your network are reachable. This method is much easier to implement than SSDP based discovery. But on a network for which there is no Internet connection (whether by design or from an outage) this method will not work. The SSDP method is only dependent on the local network.
function discoverBridge() {
    discovredHueBridgeList = [];
    fetch(' https://discovery.meethue.com')
        .then(response => response.json())
    .then(function (hueBridgeList) {
        console.info(hueBridgeList);
        hueBridgeList.forEach((item)=> {
         // each item processed here has a bridge IP address
         // and serial number exposed through item.id and
         // item.internalipaddress
       }
     );
}
Once I have a bridge IP address I attempt to query it for more information. If communication succeeds, then I show a representation of the bridge with an icon that matches the version of the bridge that the user has. The UI layout has two images ( one named hueBridgev1 and the other hueBridgev2) I show the appropriate image and hide the other.
Pairing
Now that the bridges have been discovered, it is up to the user to select one with which to pair. After the user selects a bridge, she is instructed to press the pairing button on the bridge. While this instruction is displayed the application is repeatedly attempting to request a new user ID name from the bridge. This should be viewed more as an access token. The Hue documentation uses the term “user name” but the actual value is what appears to be a random sequence of characters. To request a user name a JSON payload with one member named devicetype is posted to the bridge. The value assigned to devicetype matters little. It is recommended that it be a string that is unique to your application. The payload is posted to http://%5Byour bridge IP address]/api. A failure response will result. This is expected. The application must repeatedly make this request and prompt the user to press the link button on the bridge. The request will fail until the pairing button on the bridge is passed.
function pairBridge(ipAddress) {
   console.info('attempting pairing with address ', ipAddress);
   var req = { devicetype: "hue.j2i.net#browser" };
   var reqStr = JSON.stringify(req);
   var tryCount = 0;
   return new Promise(function(resolve, reject)  {
      var tryInterval = setInterval(function () {
      console.log('attempt ', tryCount);
      ++tryCount;
      if (tryCount > 60) {
        clearInterval(tryInterval);
         reject();
         return;
      }
      fetch(`http://${ipAddress}/api`, {
         method: "POST",
         headers: {
            "Content-Type": "application/json"
         },
         body: reqStr
      })
      .then(function(response)  {
         console.log('text:',response);
         return response.json();
      })
      .then(function(data)  {
          console.log(data);
          if (data.length > 0) {
             var success = data[0].success;
             var error = data[0].error;
             if (success) {
                console.log('username:', success.username);
                var bridge = {
                   ipAddress: ipAddress,
                   username: success.username
                };
                clearInterval(tryInterval);
                 resolve(bridge);
                  return;
               }
               else if (error) {
                  if (error.type === 101) {
                     console.log('the user has not pressed the link button');
                  }
               }
            }
         });
      }, 2000);
   });
}
Once the button is pressed the bridge will respond to the first pairing request it receives with a user name that the application can use. This user name must be saved and used for calls to most of the functionality that is present in the bridge. I save the bridge’s serial number, IP address, and the name that must be used for the various API calls to an indexedDB object store. The access information for multiple paired bridges could be stored in the object store at once. But the application will only be able to communicate with one bridge at a time.
While implementing a few projects I decided to implement them in HTML since it would work on the broadest range of my devices of interest. My projects of interest needed to discover additional devices that are connected to my home network. I used
SSDP for discovery.
SSDP (Simple Service Discover Protocol ) is a UDP based protocol that is a part of UPnP for finding other devices and services on a network. It’s implemented by a number of devices including network attached storage devices, Smart TVs, and home automation systems. There are a lot of these devices that expose functionality through JSON calls. You can easily make interfaces to control these devices. However, since the standards for HTML and JavaScript don’t include a UDP interface, how to perform discovery isn’t immediately obvious. Alternatives to SSDP include having the user manually enter the IP address of the device of interest or scanning the network. The latter of those options can raise some security flags when performed on some corporate networks.
For the most part, the solution to this is platform dependent. There are various HTML based solutions that do allow you to communicate over UDP. For example, the BrightSign HTML5 Players support UDP through the use of roDatagramSocket. Chrome makes UDP communication available through chrome.udp.sockets. Web pages don’t have access to this interface (for good reason, as there is otherwise potential for this to be abused). Although web apps don’t have access, Chrome extensions do. Chrome Extensions won’t work in other browsers. But at the time of this writing Chrome accounts for 67% of the browser market share and Microsoft has announced that they will use Chromium as the foundation for their Edge browser. While this UDP socket implementation isn’t available in a wide range of browsers, it is largely available to a wide range of users since this is the browser of choice for most desktop users.
To run HTML code as an extension there are two additional elements that are needed: a manifest and a background script. The background script will create a window and load the starting HTML into it.
I won’t go into a lot of detail about what is in the manifest, but I will highlight its most important elements. The manifest is in JSON format. The initial scripts to be run are defined app.background.scripts. Other important elements are the permission element, without which the attempts to communicate over UDP or join a multicast group will fail and the manifest_version element. The other elements are intuitive.
Google already has a wrapper available as a code example chrome.udp.sockets that was published for using Multicast on a network. In it’s unaltered form the Google code sample assumes that text is encoded in the 16-bit character encoding of Unicode. SSDP uses 8-bit ASCII encoding. I’ve taken Google’s class and have made a small change to it to use ASCII instead of Unicode.
To perform the SSDP search the following steps are performed.
Create a UDP port and connect it to the multicast group 239.255.255.250
Send out an M-SEARCH query on port 1900
wait for incoming responses originating from port 1900 on other devices
Parse the response
Stop listening after some time
The first item is mostly handled by the Google Multicast class. We only need to pass the port and address to it. The M-SEARCH query is a string. As for the last item, it isn’t definitive when responses will stop coming in. Some devices appear to occasionally advertise themselves to the network even if not requested. In theory you could keep getting responses. At some time I’d suggest just no longer listening. Five to ten seconds is usually more than enough time. There are variations in the M-SEARCH parameters but the following can be used to ask for all devices. There are other queries that can be used to filter for devices with specific functionality. The following is the string that I used; what is not immediately visible, is that after the last line of text there are two blank lines.
When a response comes in, the function that we assign to MulticastScoket.onDiagram will be called with a byte array containing the response, the IP address from which the response came, and the port number from which the response was sent (which will be 1900 for our current application). In the following code sample, I initiate a search and print the responses to the JavaScript console.
Not that parsing the response strings is difficult, by any means it would be more convenient if the response were a JSON object. I’ve made a function that will do a quick transform on the response so I can work with it like any other JSON object.
function discoveryStringToDiscoveryDictionary(str) {
    var lines = str.split('\r');
    var retVal = {}
    lines.forEach((l) => {
        var del = l.indexOf(':');
        if(del>1) {
            var key = l.substring(0,del).trim().toLowerCase();
            var value = l.substring(del+1).trim();
            retVal[key]=value;
        }
    });
    return retVal;
}
After going through this transformation a Roku Streaming Media Player on my network returned the following response. (I’ve altered the serial number)
Enough code has been shared for the sample to be used, but rather than rely on the development JavaScript console, I’ll change the sample to show the responses in the UI. To keep it simple I’ve defined the HTML structure that I will use for each result as a child element of a div element of the class palette. This element is hidden, but for each response I’ll clone the div element of the class ssdpDevice; will change some of the child members; and append it to a visible section of the page.