Introduction to Web Assembly with C/C++: Part 1

webassembly-logo

I’ve been taking advantage of Web Assembly lately. It is supported by all the major browsers, let’s one make use of already existing useful code that has been written for other environments, and provides some performance benefits over JavaScript. Web Assembly has a lot of potential and support and I’d like to introduce other developers to it. I’m going to be using C++ in this post. But by no means is this the only language in which someone can make use of Web Assembly. In this post I talk about why someone might want to consider web assembly and how to get a development environment setup.

What is Web Assembly?

Web Assembly is a specification for a virtual machine that runs in the browser. Compared the the highly dynamic JavaScript Web Assembly can achieve much higher performance. Contrary to popular misconception though Web Assembly doesn’t completely replace JavaScript. You will probably use the two together.  Web Assembly is based on LLVM  (Low Level Virtual Machine), a stack based virtual machine that compilers can target.  If someone wanted to make a new programming language they could have the compiler for their language produce LLVM code and then use an already existing tool chain to compile it to platform specific code. A person building a compiler for a new language wouldn’t need to make completely separate systems for different CPU architectures.  Web Assembly being LLVM based could run code that was written by a variety of languages. Currently there isn’t support for garbage collection yet which restricts the languages that target it presently. C/C++, C#, and Rust are a few languages that can be used with Web Assembly presently with more expected in the future.

What Other Languages Can I Use?

  • C/C++ – I’ll be using that language in this article
  • C#/.Net – I’ve got interest in this one and will write about it in the future.
  • Elixir
  • Go
  • Java
  • Python
  • Rust – This is a newer language

Why Use Web Assembly?

I suggest Web Assembly primarily for the performance benefits in computationally expensive operations.  The binary format it uses is much more strict than JavaScript and it is more suitable for computationally intensive operations. There is also a lot of existing and tested code for work such as cryptography or video decoders that exists in C/C++ that one might want to use in a page. Despite all its flexibility interpreted JavaScript code doesn’t run as fast as a native binary. For some types of applications this difference in performance isn’t important (such as in a word processor). For other applications differences in performance translate into differences in experiences.

While the demand for performance is a motivation to make a native binary there are also security considerations. Native binaries may have access to more system resources than a web implemented solution. There may be more concern with ensuring that a program (especially if it is from a third party) doesn’t do anything malicious or access resources without permission. Web Assembly helps bridge the gap between these two needs; it provides a higher performance execution environment within a sandbox.

WebAssemblySupport

C++? Can’t I Cause a Buffer Overflow With That?

Sure. But only within the confines of the sandbox in which the code will run. It could crash your program, but it can’t cause arbitrary execution of code outside the sandbox. Also note that presently Web Assembly doesn’t have any bindings to Host APIs. When you target Web Assembly you don’t have an environment that allows you to bypass the security restrictions in which JavaScript code will run. There’s no direct access to the file system, there’s not access to memory outside of your program, you will still be restricted to communicating with WebSockets and HTTP request that don’t violate CORS restrictions.

How Do I Setup a Developer Environment

There are different versions of instructions on the Internet for installing the Web Assembly tools. If you are running Windows 10 you may come across a set of instructions that start with telling you to install the Windows Subsystem for Linux. Don’t use those instructions; I personally think they are unnecessarily complex. While I have the Windows Sub System for Linux installed and running for other purposes that’s not where I like to compile my Web Assembly code.

Using your operating system of choice (Windows 10/8/7, macOS, Linux) clone the Emscripten git repository, run a few scripts from it, and you are ready to go. Here are the commands to use.  If you are on Windows omit the ./ at the beginning of the commands.

git clone https://github.com/emscripten-core/emsdk.git
cd emsdk
git pull
./emsdk install latest
./emsdk activate latest

With the tools installed you will also want to set the some environment variables. There is a script for doing this. On Windows 10 run

emsdk_env.bat

For the other operating systems run

source emsdk_env.sh

The updates that this makes to environment variables isn’t persistent; it will need to be run again with the next reboot.  For an editor I suggest using Visual Studio Code. I’ll be compiling from the command line in this article. Feel free to use the editor of your choice.

Web Assembly Explorer

I don’t use it in this tool within this article, but Web Assembly Explorer is available as an online tool for compiling C++ into Web Assembly and is an option if you don’t have the tools installed.

https://mbebenita.github.io/WasmExplorer/

Hello World

Now that we have the tools installed we can compile and run something. We will do a hello world program. Type the following source code and save it in hello.cpp.

#include 
int main(int argc, char**argv) 
{
     printf("Hello World!\n");
    return 0;
}

To compile the code from the command line type the following.

emcc hello.cpp -o hello.html

After the compiler runs you will have three new files.

  • hello.wasm – the compiled version of your program
  • hello.html – an HTML page for hosting your web assembly
  • hello.js – JavaScript for loading your web assembly into the page

If you try to open the HTML file directly your code probably will not run. Instead the page will have to be served through an HTTP server. If you have node installed use the node http-server. You can install the http-server with

npm install  http-server -g

Then start the server from the directory with your hello.html

http-server . -p 81

Here I’ve instructed the http-server to run on port 81. You can use the port of your choice here provided nothing else is using it. Remember to substitute the port that you chose throughout the rest of these instructions.

Open a browser and navigate to http://localhost:81/hello.html. You’ll see your code run. If you view the source for the page there is a lot of “noise” in the file. Much of that noise is from the displayed images being embedded within the HTML.  That’s fine for playing around. But you will want to have something customized to your own needs.

We can provide a shell or template file for the compiler to use. Emscripten has a minimal file available at https://github.com/emscripten-core/emscripten/blob/master/src/shell_minimal.html. Download that file. It will be used as our starting point. It is convenient for the sake of distribution for everything to be in one file. But I don’t like the CSS and JavaScript being embedded within the file.  The CSS here isn’t needed and is being deleted. I’m moving the  JavaScript  to its own file and added a script references to it in my HTML.  There are several items within the HTML and the script that are not necessarily needed. Let’s look at the script first and start making this minimal file even more minimalist.

At the top of the script there are three variables to page elements to indicate download and progress. Those are not absolutely necessary. I’m deleting them.  I need to delete references to them too. Lower in the JavaScript is a method named setStatus . I’m replacing it’s body with a call to console.log() to print the text that is passed to it.  The first set of programs that I’m going to write won’t use a canvas. The element isn’t needed for now; I’m commenting it out instead of deleting it so that I can use it later.  Having deleted the first three lines of this file and and code that references them I’m returning to the HTML. Most of it is being deleted. I’ve commented out the canvas reference. There is a line in the HTML file with the text {{{ SCRIPT }}}. The compiler will take this file as a template and replace {{{ SCRIPT }}} with the reference to the script specific to our Web Assembly file.

webAssemble-templateHTML

When the Web Assembly program executes a printf() the text will be written to the textarea element. I place my hello.cpp file among these files and then compile it with the following command.

emcc hello.cpp --shell-file shell_minimal.html -o hello.html

The –shell-file argument indicates what file to use as a template. The -o parameter tells the name of the HTML file to write to. If you look at hello.html you can see it is almost identical to the input template. Run the site now and you’ll see the same result, but with a much cleaner interface. Run the program again and you will see the same result with a much cleaner interface.

Binding Functions

I earlier mentioned that Web Assembly doesn’t have any bindings to any operating system functions. It also doesn’t have bindings do the browser. Nor does it have access to the DOM. It is up to the page that loads the web assembly to expose functions to it. In emscripten.js the Modules object defines a number of functions that are going to be made available to the Web Assembly. When the C/C++ code calls printf it will be passed through the JavaScript function defined here of the same name. It isn’t a requirement that the names be the same, but it is easier to keep track of function associations if they are.

Calling C/C++ From JavaScript

But what if you have your own functions that you wish to bind so that your JavaScript code can call the C++ code? The Module object has a function named ccall that can be used to call C/C++ code from JavaScript and another function named cwrap to build a function object that we can hold onto for repeated calls to the same function. To use these functions some additional compile flags will be needed.

To demonstrate the use of both of these methods of calling C/C++ code from JavaScript I’m going to declare three new functions in the C++ code.

  • void testCall() – accepts no parameters and returns no value. This method only prints a string so that we know that our call to it was successful.
  • void printNumber(int num) – accepts an integer argument and prints it. This lets us know that our value was successfully called.
  • int square(int c) – accepts an integer and returns the square of that integer. This let’s us see that a value can be returned back from the code.

The C++ language perform what is called name mangling; the names of the functions in the compiled code is different than the uncompiled code. For the functions that we want to use from outside the C++ code we need to wrap declarations for the functions in an extern “C” block. If our code were being written in C instead of C++ this wouldn’t be necessary. I still prefer C++ because of some of the features that the language offers.  Normally I would have a declaration such as this in a header file. But for now my C++ program is in a single file. Close to the top of the program I make the following declarations.

extern "C" {
    void testCall();
    void printNumber(int f);
    int square(int c);
}
The implementation for the functions is what you would expect.
void testCall() 
{
    printf("function was called!\n");
}

void printNumber(int f) {
    printf("Printing the number %d\n", f);
}

int square(int c)
{
    return c*c;
}
There’s a change to my main method too. I’ve had to include a new header file, enscripten.h, because I am about to use one of the functions that it provides.  In main added the following line.
EM_ASM ( InitWrappers());
It will result in a JavaScript function named InitWrappers() to get called. I will talk about how EM_ASM works in a following section.   I’m adding a third

Introduction to Direct 2D: DirectWrite

In my previous installment of this series I was rebuilding a video game interface.  The interface resembled my target, but did not have any text.  How can I render text with Direct2D?  The answer is: DirectWrite.

What is DirectWrite?

DirectWrite is a GPU accelerated text rendering API that runs on top of Direct2D.  It originally shipped with Windows 7 and (as of the publishing date of this article) receives updates from Microsoft in the Windows 10 updates.  It is a great solution for rendering text within a DXGI based program.  Surfaces are generally dependent on the device.  DirectWrite resources are device independent.  There is no need to recreate them if the surface is lost.

Text Format

There is no default text style.  When text is being rendered it must have a definite font, style, size, and weight.  All of these text attributes are packaged in IDWriteTextFormat.  If you have worked with CSS think of IDWriteTextFormat as being a style for text.  In this interface you select the font face, weight, size, and text alignment.

TOF(_pWriteFactory->CreateTextFormat(
	TEXT("Segoe UI"),	//font family
	NULL,				//font collection
	DWRITE_FONT_WEIGHT_EXTRA_BOLD,
	DWRITE_FONT_STYLE_NORMAL,
	DWRITE_FONT_STRETCH_NORMAL,
	40.0f,
	TEXT("en-us"),
	&_pDefaultFont
));

Drawing Text

I will discuss two ways to render a text string: DrawText and DrawTextLayout.  The easier method of rendering a text string is to use ID2D1RenderTarget::DrawText.  This method accepts a text format object and a bounding rectangle.  It renders the text string at the location specified by the bounding rectangle.  It also accepts optional arguments that affect text layout and metrics.  This is the easiest of the two methods for rendering text, but it does not support having mixed styles within the same text string.  For that you would need to use a text block rendered in IDWriteTextLayout with ID2D1RenderTarget::DrawTextLayout (discussed in the next section).  Text rendered with this method will appear center-aligned to the bounding rectangle in which it is placed.

std::wstring test = TEXT("TEST");
D2D1_RECT_F textLocation{20,200,800,800};
_pRenderTarget->DrawTextW(
	test.c_str(), test.size(), //The text string and length
	_pDefaultFont.Get(),  //The font and style description
        &textLocation,  //The location in which to render the text
	_pBackgroundBrush.Get(),  //The brush to use on the text
	D2D1_DRAW_TEXT_OPTIONS_NONE, 
	DWRITE_MEASURING_MODE_NATURAL
);

Text Layout

A text layout serves a similar function as a text block in that it is used for showing text.  The primary difference is that a text block has a one-to-one relationship with what is rendered on the screen and a text layout (through the IDWriteTextLayout interface) can be rendered several times.  If there were labels that were used repeatedly with the same text, they could be implemented by creating an IDWriteTextLayout object and rendering it several times.

//In InitDeviceIndependentResources()

std::wstring  stringResult = L"RESULT";
TOF(_pWriteFactory->CreateTextLayout(
	stringResult.c_str(),
	stringResult.size(),
	_pDefaultFont.Get(),
	400, 90, 
	&_pTextLayout
));

//In OnRender()
_pRenderTarget->DrawTextLayout({ 00,0 }, _pTextLayout.Get(), _pBackgroundBrush.Get());
ID2D1AppWindow_DWrite_TextLayout
The resulting text from the above code

Unlike text rendered with ID2D1RenderTarget::DrawText, text rendered with IDWriteTextLayout can have styling applied to specific ranges of letters within the text.  If you need to mix text styles, use IDWriteTextLayout instead of using ID2D1RenderTarget::DrawText.  Create a TextLayout initially using a text format that covers the majority of the text in your layout.  Where deviations to your selected default should apply, create a DWRITE_TEXT_RANGE instance.  DWRITE_TEXT_RANGE contains the index of the starting character for the new text styling and the number of characters to which it should be applied.  Here are some of the functions for adjusting text styling.

When creating the IDWriteTextLayout a width and a height for the text area are needed.  Content rendered within this rectangle will automatically be wrapped.

std::wstring  stringResult = L"RESULT";
TOF(_pWriteFactory->CreateTextLayout(
	stringResult.c_str(),
	stringResult.size(),
	_pDefaultFont.Get(),
	400, 90, 
	&_pTextLayout
));
DWRITE_TEXT_RANGE range{ 2,3 };
_pTextLayout->SetFontWeight(DWRITE_FONT_WEIGHT_EXTRA_LIGHT, range);

ID2D1AppWindow_DWrite_TextLayout_range

Applying DirectWrite to the Project Interface

Where I left off, I had used Direct2D to render color to areas in which the interface will show information.

D2DAppWindow_sonicInterface

The next step is to apply text to the interface.  This interface will ultimately be used for performing batch processing of some media files.  The details and implementation of that processing are not shown here and are not important since this is only showing an interface.  The text populating the interface in this example is for demonstrative purposes only.

As shown in creating the interface, I am making a list of shape types to render.  In the call to OnRender() there is a case statement that will make the necessary calls depending on the next shape type in the list.  Between the last post and this one I changed my shape representation to have a shape base class and subclasses instead of having a single struct with the additional data needed packaged in unioned elements.

I am using  IDWriteTextLayout to render text instead of ID2D1RenderTarget::DrawText. Since DrawText centers the text within the bounding rectangle I could not get the layout to be what I wanted. Using IDwriteTextLayout in combination with layout options I was able to achieve the layout that I was looking for.

With the development of a hierarchy for the types of items that I am rendering, I am almost tempted at this point to just start defining a control hierarchy.  While that would have utility it may also distract from the concepts being shown here.  A control hierarchy may be written some other day.  For now the hierarchy I am using for shapes is shown is this code.

interface  IDispose {
	virtual void Dispose() = 0;
};

struct Shape: public IDispose {
	Shape() {}

	Shape(ShapeType shapeType, PaletteIndex paletteIndex)
	{
		this->shapeType = shapeType;
		this->paletteIndex = paletteIndex;
	}
	virtual void Dispose()
	{

	}
	std::wstring tag;
	ShapeType shapeType;
	PaletteIndex paletteIndex;
};

struct TextShape :public Shape {
	TextShape() {}
	TextShape(std::wstring text, D2D1_RECT_F location, TextStyle textStyle = TextStyle_Label, PaletteIndex palette = PaletteIndex_Primary, 
		DWRITE_TEXT_ALIGNMENT textAlignment = DWRITE_TEXT_ALIGNMENT_LEADING, 
		DWRITE_PARAGRAPH_ALIGNMENT paragraphAlignment = DWRITE_PARAGRAPH_ALIGNMENT_CENTER)
		:Shape(ShapeType_Text, palette)
	{
		this->text = text;
		this->location = location;
		this->textStyle = textStyle;
		this->paragraphAlignment = paragraphAlignment;
		this->textAlignment = textAlignment;
	}

	void Dispose() override 
	{
		this->textLayout = nullptr;
	}
	std::wstring text;
	D2D1_RECT_F location;
	TextStyle textStyle;
	ComPtr textLayout;
	DWRITE_PARAGRAPH_ALIGNMENT paragraphAlignment;
	DWRITE_TEXT_ALIGNMENT textAlignment;

};

struct RectangleShape : public Shape {
	RectangleShape() :Shape(ShapeType_Rectangle, PaletteIndex_Primary) {

	}
	RectangleShape(D2D1_RECT_F rect, PaletteIndex p) :
		Shape(ShapeType_Rectangle, p)
	{
		this->rect = rect;
	}
	D2D1_RECT_F rect;
};

struct EllipseShape : public Shape {
	EllipseShape():Shape(ShapeType_Ellipse, PaletteIndex_Primary)
	{}
	EllipseShape(D2D1_ELLIPSE ellipse, PaletteIndex p = PaletteIndex_Primary)
		:Shape(ShapeType_Ellipse, p)
	{
		this->ellipse = ellipse;
	}

	D2D1_ELLIPSE ellipse;
	
};

The OnRender() method has now been modified to reflect the new struct hierarchy and now has additional code for rendering text.

switch ((*current)->shapeType)
{
	case ShapeType::ShapeType_Rectangle: 
	{
		std::shared_ptr r = std::static_pointer_cast(*current);
		_pRenderTarget->FillRectangle(r->rect, brush.Get());
		break;
	}
	case ShapeType_Ellipse: 
	{
		std::shared_ptr e = std::static_pointer_cast(*current);
		_pRenderTarget->FillEllipse(e->ellipse, brush.Get()); 
		break;
	}
	case ShapeType_Text:
	{
		std::shared_ptr t = std::static_pointer_cast(*current);
		if (t->textLayout)
		{
			ComPtr format = _pDefaultFont;
			//_pRenderTarget->DrawTextW(t->text.c_str(), t->text.size(), format.Get(), t->location, brush.Get());
			D2D1_POINT_2F p = { t->location.left, t->location.top };
			_pRenderTarget->DrawTextLayout(p, t->textLayout.Get(), brush.Get());
		}
		break;
	}
	default:
		break;
}

And now the UI looks more complete.

D2D1_UI_With_Text

There are adjustments to be made with the margins on the text and positioning.  Those are going to be ignored until other items are in place.  One could spend hours making adjustments to positioning.  I am holding off on small adjustments until the much larger items are complete.

The complete source code can be found in the following commit on Github.

https://github.com/j2inet/CppAppBase/tree/5189359d50e7cdaee79194436563b45ccd30a88e

There are a few places in the UI where I would like to have vertically rendered text.  A 10 to 15 degree tilt has yet to be applied to the entire UI.  I would also like to be able to display preview images from the items being processed.  My next posts in this series will address: Displaying Images in Direct2D and Applying Transformations in Direct2D.

twitterLogofacebookLogo   youtubeLogo

Introduction to Direct2D:Part 1

DirectX is a family of APIs that provide functionality related to multimedia. Some of the APIs are focused on sound, some on input, and some on graphics. Today I want to present on of the graphical APIS based on the Direct X Graphics Infrastructure (DXGI) known as Direct2D. The Direct2D API is for rendering graphics in 2D (as suggested by the name). The API takes advantage of the features in the graphics card for accelerating the rendering.

When working with Direct2D you don’t create the objects directly. Instead you will use a factory method that creates the objects and returns interfaces to the object or you will use those returned interfaces to requested additional objects. The interfaces returned by the Direct2D APIs are COM pointers. COM, or Component Object Model is an interface for making components that interact with each other. The standard has existed since 1993. Despite being 30 years old it is important to Windows and used more than one might think within .NET.  There are books that cover how COM works. Some of them are old, but don’t let that make you think that the book’s information isn’t relevant. A full discussion of COM is outside of the scope of this post.

To get an initialized window with which to work I’ll be using the sample Win32/C++ code that I presented in the post. See that post for more information about how the base window works. In my derived class I’ll begin initializing Direct2D specific objects.

Adding Update and Render Methods

The AppWindow sample implements a message pump that uses PeekMessage instead of GetMessage. This allows the application to do other things instead of halting when there are no messages to be processed. When there are no messages a method named Idle() is called. This method will be repurposed for adding an update/render loop.

There will be 4 methods added: Update(), OnUpdate(), Render(), and OnRender(). Both OnUpdate() and OnReader()  are virtual; these methods contain code that could be completely replaced or overridden if this code were re-purposed for another application.  The other two methods, Update and Render, contain code that needs to be called on every update cycle and rendering cycle that I would not want affected when derived applications are overriding the rendering or the updating. The Update method also is querying the performance timer to calculate the amount of time that has passed since the last update. This information could be used to know how far to move an object in a scene on the next frame update or to calculate the FPS.

D2D1AppWindow_Idle_cpp

Initializing D2D

You’ll see two variations of the D2D Interfaces. One version is prefixed with D2D1 (note the numeral 1 at the end). The D2D1 interface was released with Windows 8 and is the one that I’ll be using here.  There’s two interfaces that we need to initialized. ID2D1Factory, which will be the object from which we directly or indirectly make the other D2D1 objects, and ID2D1HwndRenderTarget, which is an interface that we use for painting our scene onto the window object created by the application base.  As we create objects something to keep in mind is two classifications into which DXGI objects can be classified (this isn’t limited to Direct2D, but applicable to other DirectX graphical APIs). An object could be a Device Dependent resource or a Device Independent Resource. What’s the difference?

Device Dependent and Device Independent Resources

Device in this context refers to the video rendering device. This will usually be the video card but in some scenarios could be a purse software device or even refer to a resource that is hosted on another computer. To keep things simple let’s just view Device as being synonymous with video card or video adapter. Some resources allocate resources on the device (video adapter). But these resources could be lost at any moment if the state of the device changes (changing the resolution of the device will do this) or if the device gets disconnected (yes, a video adapter could be disconnected while the program is still running). If this occurs then none of the device dependent resources is valid.

Device Independent Resources do not allocate resources on the video card. These resources use RAM allocated to the CPU and are not affected by changes int he display configuration.

When a device is lost all of the device dependent resources must be released and recreated. In some programs a valid and simple way to do this is to simply terminate the program and start a new instance of the program. While an easy solution the program will loose any context of what the user was doing unless the program also saves state and restores this context. For scenarios in which I’ve used this solution the access to the computer hardware was restricted making the loss of a device an extremely low frequency event (something that might happen once a day at 3am in the morning while automated maintenance is doing something to the computer).

Examples of objects that are device independent resources include the ID2D1Factory object that is used for creating the other objects, Geometry objects used for describing shapes (objects that implement the ID2D1Geometry interface), and stroke style objects (ID2D1StrokeStyle).

Examples of Device Dependent Resources include ID2D1Device (which refer to the device that itself was lost), brush resources (implement IBrush), and ID2D1Layer (for creating rendering layers).

Object Creation

When initializing my D2D objects I have two methods in which the initialization occurs. The method InitDeviceResources() initialized the deveice dependent resources. InitDeviceIndependentResources()  creates the other resources. During a program’s lifecycle InitDeviceIndependentResources() will only be called once. InitDeviceResources() will be called at least once but could be called many other times.  To ensure that these resources are released there’s an additional method, DiscardDeviceResources(), that releases all of the device dependent resources. Since the ComPtr type is being used setting the pointer to nullptr will result in the resources being released.

D2DWindow_Init

The call to AppWindow::Init() results in the creation of the window. The initial implementations for InitDeviceIndependentResources() and InitDeviceResources() will create the ID2D1Factory object and create a RenderTarget for rendering to the screen.

d2dAppWindow_InitDeviceResources_cpp

The InitDeviceIndependentResources will create the D2D1Factory(). The other resources will be created in InitDeviceResources() and cleared in DiscardResources();

Loosing the Device

During the render phase of the application the various calls made result in commands being queued to be executed on the video card to render our scene.  The commands are not executed until we end our drawing (which actually ends adding commands to the queue). If the connection to the device were lost when we end our drawing the function call to EndDraw() returns a value that can be examined to detect that the device has disconnected.  If the returned value is D2DERR_RECREATE_TARGET the resources must be reinitialized.

d2dAppWindowDeviceLost_cpp

Rendering

In DXGI applications  drawing is performed using render target objects. There are several types of render targets. We will be using an ID2D1RenderTarget in this sample application.  We have a render target that renders to the application window. Render targets could also render to off screen surfaces, textures, or remote machines.

In the previous code sample a render target was already being used to clear the application window and fill it with the color blue. The general usage pattern will look like the following.

ID2D1RenderTarget* myRenderTarget;
myRenderTarget->BeginDraw();
//call draw functions here
myRenderTarget->EndDraw();

Let’s draw a square. There are three things that we need; a description of the square’s geometry, a brush to draw the square with, and a color to assign to the brush. If you’ve used Win32’s GDI (Graphical Device Interface) you’ve seen the term “Brush” used before in a similar sense. A Brush is a system resource that contains information on what color to use when drawing something. A brush could be for rendering a solid color or it could be used to use portions of a bitmap to fill a shape.

The struct D2D1_RECT_F is used to describe the square here (also available, D2D1_RECT_U and D2D1_RECT_L). This structure contains the elements left, top, right, and bottom. Any D2D1_RECT_F instances that are created reside within the CPU’s memory.  The color to be used with the brush is also assigned in a struct that only uses the CPUs memory. The type D2D1_COLOR_F  is used here, with the values red, green, blue, and alpha of type float.

For the brush there are GPU resources that will be consumed. It is a device dependent resource. We request that a brush be created and receive a pointer to its interface by calling ID2D1RenderTarget::CreateSolidColorBrush. The method arguments are the color that the brush should be and a pointer to the object that will receive the interface address.

d2d1AppWindow_CreateResources

To render the square the OnRender() method requires one or two additional calls. When rendering a geometry there are two types of methods available. One type will outline the geometry and the other is to fill the shape (which results in a solid shape). To render a geometry that has both a solid fill and an outline first use the fill method and then the draw method as I do below.

D2D1AppWindow_DrawSquare

There are a number of other geometries that ID2D1RenderTarget supports; Ellipses, rectangles, rounded rectangles, text, and other constructed geometries.

Resizing the Window

The square renders, but if you resize the window you’ll see a problem. As the window is shrunk on one axis or the other the square will shrink on that axis; the square will become a rectangle with uneven sides. Fixing this is easy enough. The RenderTarget must be updated to reflect the new window size. Since this sample application is derived from the CppAppBase that I presented in a previous post there exist a resize method that can be overridden to to update the render target. ID2D1RenderTarget::Resize accepts a D2D1_SIZE_U struct and updates the render target size accordingly.

void D2D1AppWindow::OnResize(UINT width, UINT height)
{
	this->_size = D2D1_SIZE_U{ width, height };
	if (_pRenderTarget)
	{
		_pRenderTarget->Resize(_size);
	}
}

There is still an annoying behaviour. While the window is being resize the screen is blank. Part of the reason for this is that the rendering only occurs when there are no messages to process and resizing generates messages. One of the messages generated while resizing is a WM_PAINT message; this is telling the application to redraw itself. If we call OnRender() in response to a WM_PAINT message this will handle the screen updates while resizing. The AppWindow base class has an OnPaint() method that is called when a WM_PAINT message comes through. Overriding this method and adding a call to OnRender() results in a window that doesn’t go blank when resizing.

void D2D1AppWindow::OnPaint()
{
	this->OnRender();
}

Rendering a Shape List

One could write code to individually render each one of the primitives needed to make up a more complex scene. For applications with complex scenes doing this is especially undesirable. Instead a better solution is have the primitives that must be called encoded within a file. If a change needs to be made to a scene the change would be made with the file instead of in code.

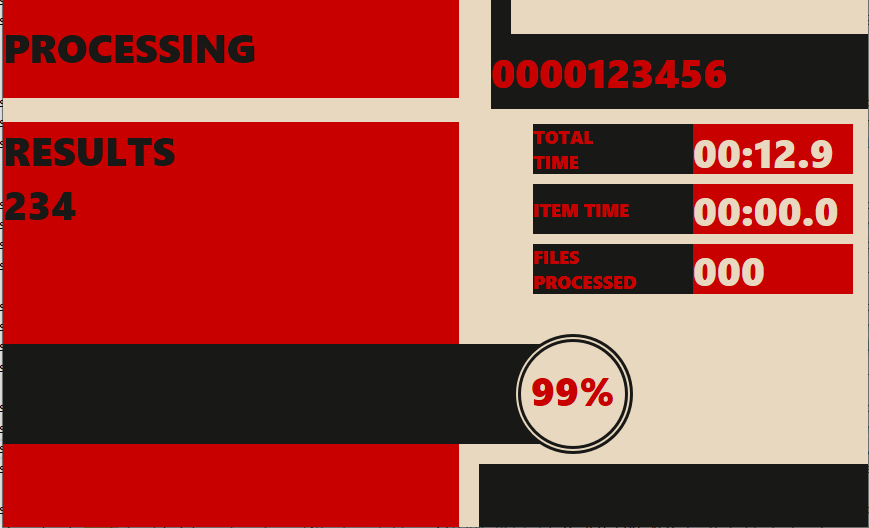
For the next sample I”m going to move halfway to such a solution. I’m making a list of primitives to be rendered and am populating the list from code. With a bit more work the data could be externalized. I’m using the list to start rebuilding an interface. I was playing a video game on my Nintendo Switch. The game had a screen that displayed between levels that shows how well someone did. I thought the interface was both simple and æsthetically pleasing.

ES4msOWUcAAzhAP

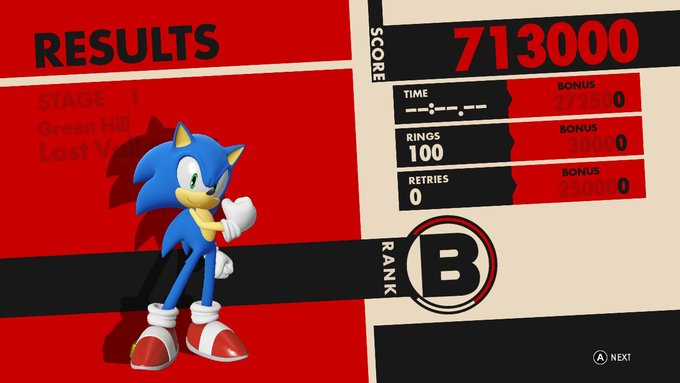
Creating something similar to this is my goal. It is composed of several rectangles, a few concentric circles, and text. Were the interface all the same type of geometry elements this could be defined with a simple list of attributes about the rectangles. Since there is more than one type of geometry the list elements must identify a geometry type. I’ve made a struct that has a field that identifies the shape type (Rectangle or Ellipse for now),  identifies which of the colors in my 3 color palette that the item should be, and has the information for the shape itself. The rectangle data and ellipse data are in a union to minimize the amount of memory used for each item.

enum   PaletteIndex {
	Primary = 0,
	Secondary = 1,
	Background = 2
};

enum ShapeType {
	ShapeType_Rectangle = 0, 
	ShapeType_Ellipse = 1
};

struct ColoredShape
{
	static ColoredShape MakeEllipse(D2D1_ELLIPSE e, PaletteIndex p)
	{
		ColoredShape c{ 0 };
		c.shapeType = ShapeType::ShapeType_Ellipse;
		c.ellipse = e;
		c.paletteIndex = p;
		return c;
	}

	static ColoredShape MakeRectangle(D2D1_RECT_F r, PaletteIndex p)
	{
		ColoredShape c{ 0 };
		c.shapeType = ShapeType::ShapeType_Rectangle;
		c.rect = r;
		c.paletteIndex = p;
		return c;
	}

	union  {
		D2D1_ELLIPSE ellipse;
		D2D1_RECT_F rect;
	};
	ShapeType shapeType;
	PaletteIndex paletteIndex;
};

The factory methods make it easier to initialize instances of the value. I’ve got a vector that holds these structs. It is populated with the data for each rectangle and ellipse to be rendered. The items will be rendered in the same order that they show in the list. If two items overlap the latter of the items to be rendered will be on top.

void D2D1AppWindow::InitDeviceIndependentResources()
{
	TOF(D2D1CreateFactory(D2D1_FACTORY_TYPE_SINGLE_THREADED, IID_PPV_ARGS(&_pD2D1Factory)));
	_primaryColor = D2D1::ColorF(0.7843F, 0.0f, 0.0f, 1.0f);
	_secondaryColor = D2D1::ColorF(0.09411, 0.09411, 0.08593, 1.0);
	_backgroundColor = D2D1::ColorF(0.91014, 0.847655, 0.75f, 1.0);
	_mySquare = { 20, 20, 30, 30 };

	
	_shapeList.push_back(ColoredShape::MakeRectangle({0,0,456,104 }, Primary));
	_shapeList.push_back(ColoredShape::MakeRectangle({ 0,128,456,550 }, Primary ));
	_shapeList.push_back(ColoredShape::MakeRectangle({ 488,0,508,110 }, Secondary ));
	_shapeList.push_back(ColoredShape::MakeRectangle({ 488,40,900,115 }, Secondary ));

	_shapeList.push_back(ColoredShape::MakeRectangle({ 530,130,850,180 }, Secondary));
	_shapeList.push_back(ColoredShape::MakeRectangle({ 690,130,850,180 }, Primary));

	_shapeList.push_back(ColoredShape::MakeRectangle({ 530,190,850,240 }, Secondary));
	_shapeList.push_back(ColoredShape::MakeRectangle({ 690,190,850,240 }, Primary));

	_shapeList.push_back(ColoredShape::MakeRectangle({ 530,250,850,300 }, Secondary));
	_shapeList.push_back(ColoredShape::MakeRectangle({ 690,250,850,300 }, Primary));

	_shapeList.push_back(ColoredShape::MakeRectangle({ 0,350,600,450 }, Secondary ));
	_shapeList.push_back(ColoredShape::MakeRectangle({ 0,350,600,450 }, Secondary));

	_shapeList.push_back(ColoredShape::MakeEllipse({ 570,400,60, 60 }, Secondary));
	_shapeList.push_back(ColoredShape::MakeEllipse({ 570,400,57, 57 }, Background));
	_shapeList.push_back(ColoredShape::MakeEllipse({ 570,400,55, 55 }, Secondary));
	_shapeList.push_back(ColoredShape::MakeEllipse({ 570,400,52, 52 }, Background));

	_shapeList.push_back(ColoredShape::MakeRectangle({ 476,470,870, 550 }, Secondary));
}

In the OnRender() method this list is iterated and each element is drawn.

void D2D1AppWindow::OnRender()
{
	HRESULT hr;
	if (!_pRenderTarget)
		return;
	_pRenderTarget->BeginDraw();
	_pRenderTarget->Clear(_backgroundColor);
	_pRenderTarget->FillRectangle(&_mySquare, _pPrimaryBrush.Get());
	_pRenderTarget->DrawRectangle(&_mySquare, _pSecondaryBrush.Get());

	for (auto current = _shapeList.begin(); current != _shapeList.end(); ++current)
	{
		ComPtr brush;
		switch (current->paletteIndex)
		{
		case Primary: brush = _pPrimaryBrush; break;
		case Secondary: brush = _pSecondaryBrush; break;
		case Background: brush = _pBackgroundBrush; break;
		default: brush = _pPrimaryBrush;
		}
		switch (current->shapeType)
		{
		case ShapeType::ShapeType_Rectangle:_pRenderTarget->FillRectangle(&current->rect, brush.Get()); break;
		case ShapeType::ShapeType_Ellipse:_pRenderTarget->FillEllipse(&current->ellipse, brush.Get()); break;
		}
		
	}
	
	hr = _pRenderTarget->EndDraw();
	if (hr == D2DERR_RECREATE_TARGET)
	{
		// The surface has been lost. We need to recreate our
		// device dependent resources. 
		this->DiscardDeviceResources();
		this->InitDeviceResources();
	}
}

Running the program gives me something that looks like it was inspired by the video game interface.

D2DAppWindow_sonicInterface

There are similarities, but there are also plenty of differences. Aside from the missing text in the video game interface the text is rotated slightly. With the way rectangles are defined now there’s no apparent way to render a rectangle that isn’t aligned with the X or Y axis. To move forward we need to know how we can apply transformations to the rendering and how to render text. I’ll continue there in the next part of this series.

The complete source code for the program can be found on github.

https://github.com/j2inet/CppAppBase


Win32/C++ Application Base

Win32/C=++

Win32 is necessary for development in many current technologies.  Some of my current projects utilize Win32/C++ applications.  Many of them use a similar pattern for starting the application.  Initializing the window that hosts these applications is not particularly interesting, but it is a foundation block for some of my applications that I will share in the future.

In Win32 UI programs there will be at least one function defined that is known as being of type WNDPROC.  A WNDPROC is a callback function.  It is the primary function through which Windows will communicate to an application various events.  When a user moves their mouse over an application WNDPROC is called.  When the user presses a key WNDPROC is called.  When an application is being notified to render its UI again WNDPROC is called.  The call signature for WNDPROC is shown below.

LRESULT CALLBACK WindowProc(
  _In_ HWND   hwnd,
  _In_ UINT   uMsg,
  _In_ WPARAM wParam,
  _In_ LPARAM lParam
);

The first argument in this function is a handle to the window that is the intended recipient of the message.  An application could have more than one window.  But an application with only one window will have the same value.  The second argument is a numerical value that identifies the event or message being sent.  The constants that define possible vales generally are prefixed by WM_ (meaning Windows Message).  Examples of such values include: WM_COMMAND, which is generally the result of a button being clicked; WM_PAINT, which tells the application to redraw its UI; WM_SIZE, meaning that the window has been resized; and WM_CLOSE, meaning that there was a request to close the window.

Because of the central position that the WNDPROC function plays in receiving notifications from the operating system, if all responses to the operating system were handled here the function would quickly grow big.  I have seen this done, and it can get to be a nightmare on shared projects.  One way to deal with this is to have the WNDPROC function act only as a method that routes these incoming messages to other functions that handle the method.  A simple way to implement this is with a switch statement where each case does a minimal amount of work before passing the message on to a function specifically made to handle the message.

That is the solution used in the projects I plan to share in the future.  I created an abstract base class named AppWindow that creates an application window; has a few methods for handling certain Windows messages; and has case statements for calling those methods in response to a Windows message.

Windows communicates these messages to an application through a message queue.  An application must retrieve the next message to begin processing it.  If an application does not retrieve any messages for a certain period of time, then Windows assumes the application is locked up or busy and may give you a prompt to either terminate or wait for the program.  To keep messages going through the queue an application must implement a message pump.  In a simple implementation of a message pump two functions are called in a loop.  GetMessage which receives a MSG struct containing the information on a message and DispatchMessage to have the message handed off to the application’s WNDPROC for processing. 

If there are no messages available, calling GetMessage will result in the application waiting until there is a message.  During this wait, the main thread of an application will not use any CPU bandwidth.  In some applications, such as games or other applications that are continuously performing UI updates, using GetMessage is undesirable since it can cause the UI thread to wait.  In such applications, PeekMessage can be used instead. With PeekMessage, unlike GetMessage, if there are no messages available PeekMessage will not block.  Its return value indicates whether or not a new message was available.  If there are no messages to be processed the application can perform other tasks.

An application may modify a message within the time that it was retrieved with PeekMessage or GetMessage and when it is passed off through DispatchMessage.  You will see the use of a method named TranslateMessage which despite its name, does not perform the modification of any messages.  Instead, it creates new messages in response to certain virtual key messages and adds these to the message queue.  For the programs that I present, the specifics of what it does are not important and I will not be modifying any messages in the message pump.

I do not use any of the traditional Win32 UI elements in the programs that I will be sharing (buttons, labels, text boxes, list boxes, etc.) but those elements could easily be created within the application.  If I were making a framework for such controls, I would probably make classes for each one.  My base class does have a CreateButton and CreateLabel method that are used for debug purposes.

AppWindow_header
The AppWindow.h file

This class is abstract and cannot be directly initialized.  So, there first must be a derived class.  The only methods that the derived class must absolutely implement are the constructor and the method GetWindowsClassName().  The constructor must accept a HINSTANCE argument and pass it to the AppWindow base class constructor. GetWindowClassName() must return a unique string.  This string is going to be used for registering the window class.

DerivedWindow_h
Full implementation of a derived window

To make an application that runs, all that is left to do is create a derived application window, call its Init() method (which is where it actually creates its Window) and call its message pump.

derivedWindow_main_cpp

Running the application will result in a window showing a label and a button.  It does not do anything yet, which is what is desired.  The code samples to be posted in the future, require that there be an initialized window (which this provides).  The entirety of the code can be found on GitHub.

Relevant Github Commit

Latest Version

HRESULT and COM Exceptions

I have some posts queued that make use of the C++ exception classes that have been useful in my previous projects.  These classes were primarily used for logging. COM calls which return an HRESULT indicating the success or failure of the call.  These return values should be examined and action should be taken if there is a failure.  What type of action to take will depend on the scenario.  In some cases an application may fallback on alternative functionality.  In other cases the failure may be irrecoverable.  The worst thing to do is nothing at all.  An early failure could result in a problem that is not realized until later and require a painful debugging experience.

For the sample code that I share here, I will not implement full error handling to avoid distraction.  But to avoid undetected failures, I do not want to leave the values untouched.  In the sample code I will use an inline function named TOF (Throw On Failure).  TOF will throw an exception if there is a failed return value.  In most of the sample code presented here, the exception will not be caught.  When the exception is not caught, the program is designed to terminate.  The TOF function itself will return the HRESULT if successful.  The HRESULT is still available for further examination if needed.

The exception classes and the TOF function can be found on Github.

https://github.com/j2inet/CppAppBase/blob/master/src/common/Exception.h