Shared Handles in C++ on Win32

Shared pointers are objects in C++ that manage pointers. As a pointer to an object is passed around, copied, or deleted a shared pointer keeps track of how many references there are to the object that it refers to. When all references to the object are destroyed or go out of scope, the shared pointer will delete the object and free its memory. This has the effect of smart pointers in C++ acting almost like a managed memory environment. The burden on the developer to managming emory is pleasantly diminished.

The standard template library offers, among others, the class std::shared_ptr for creating shared pointers. There are some other classes, such as std::unique_ptr with special behaviours (in this case, ensuring that only one reference to the object exists). std::shared_ptr also lets the developer specify a custom delete for the object; if there is some specific behaviour needed for when an object is being deallocated, this feature could be used to support that. These are the signatures for some of the constructors that allow custom deleters

template< class Y, class Deleter> shared_ptr( Y* ptr, Deleter d );
template< class Deleter> shared_ptr( std::nullptr_t ptr, Deleter d );
template< class Y, class Deleter, class Alloc > shared_ptr( Y* ptr, Deleter d, Alloc alloc );
template< class Deleter, class Alloc> shared_ptr( std::nullptr_t ptr, Deleter d, Alloc alloc );
template< class Y, class Deleter> shared_ptr( std::unique_ptr<Y, Deleter>&& r );

Structures like this are not limited to being used only for pointers. They can be used for other resources too. My interest was in using them to manage handles for Windows objects, specificly handles. Handles are values that identify a system resource, such as a file. Their value is not for a memory address, but is a generally opaque numeric identifier. Think of it as an ID number. When the object that a handle refers to is nolonger needed, it should be freed with a call to CloseHandle().

I was working with a program written in C/C++ for Windows and writing a function to load the contents of a file. This is the original function.

vector<unsigned char> LoadFileContents(std::wstring sourceFileName)
{
    vector<unsigned char> retVal;
    auto hFile = CreateFile(sourceFileName.c_str(), GENERIC_READ, FILE_SHARE_READ, NULL, OPEN_EXISTING, FILE_ATTRIBUTE_NORMAL, NULL);
    if (hFile != INVALID_HANDLE_VALUE)
    {
        DWORD fileSize = GetFileSize(hFile, NULL);

        retVal.resize(fileSize);
        DWORD bytesRead;
        HRESULT result = ReadFile(hFile, retVal.data(), fileSize, &bytesRead, FALSE);
        CloseHandle(hFile);
    }
    return retVal;
}

Well, that’s not actually the original. In the original, I forgot to make the call to CloseHandle(). Forgetting to do this could lead to resource leaks in the program or the file not being available for writing later because a read handle is still open. For my end goal, this won’t be the only file that I use, nor will files be the only type of handles. I wanted to manage these in a safer way. Here, I use the std::unique_ptr to manage handles. I’ll make a custom deleter that will close a handle.

My custom deleter is implemented as a functor. A functor is a type of object that can be used as a function. Often these are used in callback operations. Functors, unlike typical functions, can also have state. In C++ functors are generally constructed by defining the operator() for the object. operator() can take any number of arguments. For my purposes, it only needs one argument. That’s the HANDLE to be closed. A HANDLE can have two values that indicate it isn’t referencing a value object. There is a constant, INVALID_HANDLE_VALUE (whose literal value is -1) and 0. To ensure CloseHandle() isn’t called on an invalid value, I need to check that the value passed is not either of these values and only call CloseHandle() if neither of these values was passed.

struct HANDLECloser
{
	void operator()(HANDLE handle) const
	{
		if (handle != INVALID_HANDLE_VALUE && handle != 0)
		{
			CloseHandle(handle);
		}
	}
};

Since there will only ever be one object accessing my file handles, I’ll be using std::unique_ptr for my file handles. With the above declaration I could begin using std::unique_ptr objects immediately.

auto myFileHandle = std::unique_ptr<void, HANDLECloser>(hFile);

That’s a lot to type though. In the interest of brevity, let’s make a declaration so that we can invoke that with less keystrokes.

using HANDLE_unique_ptr = std::unique_ptr<void, HANDLECloser);

With that in place, the previous call to initialize a unique pointer could be shortened to the following.

auto myFileHandle = HANDLE_unique_ptr(hFile);

That’s a bit more concise. Let’s add one more thing. Generally, I would be using this with the Win32 CreateFile function. Let’s make a CreateFileHandle() function that takes the same parameters as CreateFile but returns our std::unique_ptr for our file handle.

HANDLE_unique_ptr CreateFileHandle(std::wstring fileName, DWORD dwDesiredAccess, DWORD dwShareMode, LPSECURITY_ATTRIBUTES lpSecurityAttributes, DWORD dwCreationDisposition, DWORD dwFlagsAndAttributes, HANDLE hTemplateFile)
{
	HANDLE handle = CreateFile(fileName.c_str(), dwDesiredAccess, dwShareMode, lpSecurityAttributes, dwCreationDisposition, dwFlagsAndAttributes, hTemplateFile);
	if (handle == INVALID_HANDLE_VALUE || handle == nullptr)
	{
		return nullptr;
	}
	return HANDLE_unique_ptr(handle);
}

Using these new classes that I’ve put in place,

vector<unsigned char> LoadFileContents(std::wstring sourceFileName)
{
    vector<unsigned char> retVal;
    auto hFile = CreateFileHandle(sourceFileName.c_str(), GENERIC_READ, FILE_SHARE_READ, NULL, OPEN_EXISTING, FILE_ATTRIBUTE_NORMAL, NULL);
    if (hFile)
    {
        DWORD fileSize = GetFileSize(hFile.get(), NULL);
        retVal.resize(fileSize);
        DWORD bytesRead;
        HRESULT result = ReadFile(hFile.get(), retVal.data(), fileSize, &bytesRead, FALSE);    
    }
    return retVal;
}

There are some other good bits of code in the project from which I took this code that I plan to share in the common weeks. Some parts are simple but useful, other parts are more complex. Come back in a couple of weeks for the next bit that I have to share.


Mastodon: @j2inet@masto.ai
Instagram: @j2inet
Facebook: @j2inet
YouTube: @j2inet
Telegram: j2inet
Twitter: @j2inet
Bluesky: j2inet.bsky.social

Posts may contain products with affiliate links. When you make purchases using these links, we receive a small commission at no extra cost to you. Thank you for your support.


WiFi Scanning Part 1:Scanning on Windows

I’ve enjoyed my experiments with making my own WiFi based location system. I’ll be writing on it more, but before I do I wanted to turn some attention to the WiFi scanning itself. This is fairly easy to do on both Windows and Android. I won’t be discussing iOS because at the time of this writing, iOS doesn’t allow user applications to perform WiFi scanning (the devices do it themselves and support WiFi based location, but do not expose the lower level functionality to the developers). In this first post I discuss WiFi scanning on Windows.

WiFi Scanning on Windows

Windows in my opinion was the easiest system on which to perform the scanning. An application initiates the scan and the operating system takes care of most of the rest. Is the application tries to retrieve the information a bit later, it’s there. While some might be tempted to request a scan, add a delay, and then retrieve the results, don’t do this. There a number of reasons why, including you can’t really know how long the scan will actually take. Windows also allows a callback function to be registered to receive notifications on operations. It is better to register a callback to be notified when the WiFi scanning is complete. You can see the full source code for how to perform the scanning here. Most of the rest of this is an explanation of the code.

Wireless operations start with requesting a HANDLE that is used to track request and operations. The Windows function WlanOpenHandle() will return this handle. Hold onto it until your application is either closing or nolonger needs to perform wireless operations. When you are done with the HANDLE, release it with WlanCloseHandle().

Once you have your HANDLE, use it to register a notification callback with WlanRegisterNotification. When you want to unregister a callback, call this same function again passing NULL in place of the callback function.

    if (ERROR_SUCCESS == WlanOpenHandle(2, nullptr, &version, &context.wlanHandle))
    {
        result = WlanRegisterNotification(context.wlanHandle, WLAN_NOTIFICATION_SOURCE_ACM, 
                                          TRUE, (WLAN_NOTIFICATION_CALLBACK)WlanNotificationCallback, 
                                          &context, NULL, NULL);
        ...
        // Other wireless operations go here.
        ...
         WlanRegisterNotification(context.wlanHandle, WLAN_NOTIFICATION_SOURCE_ACM, 
                                  TRUE, NULL, NULL, NULL, NULL);
         WlanCloseHandle(context.wlanHandle, NULL);
    }

Enumerating the Wireless Adapters

I’ll talk in detail about the implementation of the callback function in a moment. A device could have 0 or more wireless adapters. We could request a wireless scan on each of the adapters. For my sample program, it will perform a scan on each adapter one at a time. We can get a list of all the wireless adapters in a single call. The function accepts the address of a variable that will hold a pointer to the returned data. The call to WLanEnumInterfaces takes care of allocating the memory for this information. When we are done with it, we need to deallocate the memory ourselves with a call wo WlanFreeMemory. Enumerating through the array, each element has a property named isState. If the state is equal to the constant wlan_interface_state_connected then the wireless adapter is connected to a network. I’m only scanning when an adapter is being used and connected to a network. My reasons for this is that I ended up using this in diagnostics of some connectivity problems on some remote machines and I was only interested in the adapters being used.

The actual scanning is performed in the call to WlanScan. After the call, I reset a Windows Event object (created earlier in the program, but unused until now) and then wait for the object to have a signaled state with the function WaitForSingleObject. If you are familiar with Windows synchronization objects, then take note this is how I am coordinating code in the main thread with the callback.

PWLAN_INTERFACE_INFO_LIST interfaceList;
if (ERROR_SUCCESS == (result = WlanEnumInterfaces(context.wlanHandle, NULL, &interfaceList)))
{
    std::cout << "Host, BSSID, Access Point Name, Frequency, RSSI, Capabilities, Rateset, Host Timestamp, Timestamp, BSS Type" << std::endl;

    for (int i = 0; i < (int)interfaceList->dwNumberOfItems; i++)
    {
        PWLAN_INTERFACE_INFO wirelessInterface;
        wirelessInterface = (WLAN_INTERFACE_INFO*)&interfaceList->InterfaceInfo[i];
        if (wirelessInterface->isState == wlan_interface_state_connected)
        {
            context.interfaceGuid = wirelessInterface->InterfaceGuid;
             if (ERROR_SUCCESS != (result = WlanScan(context.wlanHandle, &context.interfaceGuid, NULL, NULL, NULL)))
            {
                std::cout << "Scan failed" << std::endl;
                retVal = 1;
            }
            else 
             {
                ResetEvent(context.scanCompleteEvent);
                WaitForSingleObject(context.scanCompleteEvent, INFINITE);
             }
        } 
    }
    WlanFreeMemory(interfaceList);
}

For those not familiar, the call to WaitForSingleObject will cause the code to block until some other thread calls SetEvent on the same object. The callback that I registered will call SetEvent after it has received and process the scan information. This frees the main code to continue its processing.

Receiving the Response

I’m primary interested in printing out some attributes about each access point that is found in a format that is CSV friendly. If the notification received is for a WLAN_NOTIFICATION_SOURCE_ACM event, then that means that the scan information is available. A call to WlanGetNetworkBssList returns the information in a structure in memory allocated for us. After we get done processing this information, we need to release the memory with WlanFreeMemory(). Most of what I do with the information is direct printing of the values. I do have a function to format the BSSID information as a colon delimited string of hexadecimal digits. Information on the capabilities for the access points is stored in bit fields, which I extract and print as string. After iterating through each item in the returned information and printing the comma delimited fields, I call SetEvent so that the main thread can continue executing.

void WlanNotificationCallback(PWLAN_NOTIFICATION_DATA notificationData, PVOID contextData)
{
    DWORD result;
    PWLAN_BSS_LIST pBssList = NULL;
    PWlanCallbackContext context = (PWlanCallbackContext)contextData;
    
    switch (notificationData->NotificationSource)
    {
    case WLAN_NOTIFICATION_SOURCE_ACM:

        result = WlanGetNetworkBssList(context->wlanHandle, &context->interfaceGuid,
            NULL /*&pConnectInfo->wlanAssociationAttributes.dot11Ssid */,
            dot11_BSS_type_any,
            TRUE, NULL, &pBssList);
        if (ERROR_SUCCESS == result)
        {
            for (auto i = 0; i < pBssList->dwNumberOfItems; ++i)
            {
                auto item = pBssList->wlanBssEntries[i];
                std::cout << context->ComputerName << ", ";
                std::cout << FormatBssid(item.dot11Bssid) << ", ";
                std::cout << item.dot11Ssid.ucSSID << ", ";
                std::cout << item.ulChCenterFrequency << ", ";
                std::cout << item.lRssi << ", ";
                std::cout << ((item.usCapabilityInformation & 0x01) ? "[+ESS]" : "[-ESS]");
                std::cout << ((item.usCapabilityInformation & 0x02) ? "[+IBSS]" : "[-IBSS]");
                std::cout << ((item.usCapabilityInformation & 0x04) ? "[+CF_Pollable]" : "[-CF_Pollable]");
                std::cout << ((item.usCapabilityInformation & 0x08) ? "[+CF_PollRequest]" : "[-CF_PollRequest]");
                std::cout << ((item.usCapabilityInformation & 0x10) ? "[+Privacy]" : "[-Privacy]");
                std::cout << ", ";
                for (int k = 0; k < item.wlanRateSet.uRateSetLength; ++k)
                {
                    std::cout << "[" << item.wlanRateSet.usRateSet[k] << "]";
                }
                std::cout << ", ";
                std::cout << item.ullHostTimestamp << ", " << item.ullTimestamp << ", ";
                switch (item.dot11BssType)
                {
                case dot11_BSS_type_infrastructure: std::cout << "infastructure"; break;
                case dot11_BSS_type_independent: std::cout << "independend"; break;
                case dot11_BSS_type_any:std::cout << "any"; break;
                default: std::cout << "";
                }

                std::cout << std::endl;

            }
            WlanFreeMemory(pBssList);
        }
    

        break;
    default:
        break;
    }
    
    SetEvent(context->scanCompleteEvent);
}

That’s everything that is needed to scan for WiFi information on Windows. If you would like to see the full source code for a console program that performs these steps, I have it posted on GitHub here.

The information is printed to standard output where it can be viewed. When I need to save it, I direct standard output to a file. Many utilities support this format. I’ve used Excel, Sheets, and SQL Server Bulk Insert for processing this information.

I’m working on an explanation for how to use the same functionality on Android. That will come to this space in a couple of weeks with working code being made available on GitHub.


Mastodon: @j2inet@masto.ai
Instagram: @j2inet
Facebook: @j2inet
YouTube: @j2inet
Telegram: j2inet
Twitter: @j2inet

Posts may contain products with affiliate links. When you make purchases using these links, we receive a small commission at no extra cost to you. Thank you for your support.

Using a Batch File as a Process Watcher

Using a utility that monitors a process and restarts it if it is terminated for any reason is a common need on programs that are driving publicly viewable displays. Were a crash to happen, or if the process were intentionally terminated, we may still need the process to restart. I’ve got several solutions for this, each with their own strengths. I recently needed a solution for this and didn’t have access to my normal solutions. I was able to make what I needed using Windows in-built command line utilities and a batch file. While I have a preference to PowerShell over batch file scripts, I used batch files this time because of constraints from organizational policies. I’m placing a copy of the script here since I thought it might be useful to others.

This script checks to see if the process of interest is running every 10 seconds. If the process is not running, it will start the program in another 5 seconds. Such large delays are not strictly necessary. But I thought it safer to have them should someone make a mistake while modifying this script. In an earlier version of the script I made a type and found myself in a situation where the computer was stuck in a cycle of spawning new processes. Stopping it was difficult because each new spawned process would take focus from the mouse and the keyboard. With the delays, were that to happen again there is sufficient delay to navigate to the command window instance running the batch file and terminate it.

ECHO OFF
SET ProcessName=notepad.exe
SET StartCommand=notepad.exe
SET WorkingDrive=c:
SET WorkingDirectory=c:\WorkingDirectory
ECHO "Watching for process %ProcessName%"
:Again
timeout /t 10 /nobreak > NUL
echo .
tasklist /fi "ImageName eq %ProcessName%" /fo csv 2> NUL | find /I "%ProcessName%" > NUL
if "%ERRORLEVEL%"=="0" (
    echo Program is running
) else (
    echo Program is not running
    timeout /t 5 /nobreak > NUL
    %WorkingDrive%
    cd %WorkingDirectory%
    start %StartCommand%
)
goto Again

Posts may contain products with affiliate links. When you make purchases using these links, we receive a small commission at no extra cost to you. Thank you for your support.

Mastodon: @j2inet@masto.ai
Instagram: @j2inet
Facebook: @j2inet
YouTube: @j2inet
Telegram: j2inet
Twitter: @j2inet

Working With Alternative Data Streams::The “Hidden” Part of Your Windows File System on Windows

In the interest of keeping a cleaner file system, I sometimes try to minimize the number of files that I need to keep data organized. A common scenario where this goal is expressed is when writing an application that must sync with some other data source such as a content management system. Having a copy of the files from another system isn’t always sufficient. Sometimes additional data is needed for keeping the computers in a solution in sync. For a given file, I may need to also track an etag, CRC, or information on the purpose of a file. There are some common solutions for organizing this data. One is to have one additional file that contains all of the additional meta data for the files being synced. Another is to make an additional data file for each content file that contains this information. The solution that I prefer isn’t quite either of these. I prefer to have the data within an “alternate stream” of the same file. If the file get’s moved elsewhere on the filesystem, the additional data will move with it.

This is very much a Windows-Only solution. This will only work on the NTFS file system. If you attempt to access an alternative stream on a FAT32 file system, it will fail since that file system does not support them.

I most recently used this system of organization when I inherited a project that was, in my opinion, built with the wrong technology. In all fairness, many features of the application in question were implemented through scope creep. I reimplemented the application in about a couple of days using .Net technologies (this was much easier for me to do since, unlike the original developers, I had the benefit of having a complete requirements). There were a lot of aspects of that project that will be expressed in posts in the coming weeks.

The reason that I call this feature “hidden” is because the Windows UI does not give any visual indicator that a file has an additional data stream. There is no special icon. If you check on the size of a file, it will only show you the size of the main data stream. (In theory, one could add 3 gigs of data to the secondary stream of a 5 byte file and the OS would only report the file as being 5 bytes in size).

I’ll demonstrate accessing this stream from within the .Net Framework. There’s not built-in support for the alternative datastreams, but there is built in support for Windows file handles. Using a P/Invoke you can get a Windows file handle and then pass it to a .Net FileStream object to be used with all the other .Net features.

Every file has a default data stream. This is the stream you would see as being the normal file. It contains the file data that you are usually working with. With our normal concept of files and directories, files contain data and directories contain files, but no data directly. A file can contain any number of alternative data streams. Each one of these streams has a name of your choosing. Directories can have alternative data streams too!

To start experimenting with streams, you only need the command prompt. Open the command prompt and navigate to a directory in which you will place your experimental streams. type the following.

echo This is data for my alternative stream > readme.txt:stream

If you get a directory listing, we find that the files is listed as zero bytes in size.

c:\temp\streams>echo This is data for my alternative stream > readme.txt:stream

c:\temp\streams>dir
 Volume in drive C has no label.
 Volume Serial Number is 46FF-0556

 Directory of c:\temp\streams

10/11/2021  11:22 AM    <DIR>          .
10/11/2021  11:22 AM    <DIR>          ..
10/11/2021  11:22 AM                 0 readme.txt
               1 File(s)              0 bytes
               2 Dir(s)  108,162,564,096 bytes free

c:\temp\streams>

Is the data really there? From the command line, we can view the data using the more command (the type command doesn’t accept the syntax needed to refer to the stream).

c:\temp\streams>more < readme.txt:stream
This is data for my alternative stream

Windows uses alternative data streams for various system purposes. There are a number of names that you may encounter in files that Windows manages. This is a list of some well known stream names.

  • $DATA – This is the default stream. This stream contains the main (regular) data for a file. If you open README.TXT, this has the same effect as opening README.TXT:$DATA.
  • $BITMAP – data used for managing a b-tree for a directory. This is present on every directory.
  • $ATTRIBUTE_LIST – A list of attributes for a file.
  • $FILE_NAME – Name of file in unicode characters, including short name and hard links
  • $INDEX_ALLOCATION – used for managing large directories

There are some other names. In general, with the exception of $DATA, I would suggest not altering these streams.

Windows does give you the ability list alternative streams through PowerShell. We will look at that in a moment. For now, let’s say you had to make your own tool for managing such resources. The utility of this example is it is giving us an opportunity to see how we might work with these resources in code. One of the first tools that I think is useful would be a command line tool that would transfer data from one stream to another. With this tool, I can read from a stream and either write it to a console or to another stream. The only thing that affects where it is written is the file name. It only took a few minutes to write such a tool using C++. It is small enough to put the entirety of the code here.

#include <Windows.h>
#include <iostream>
#include <string>
#include <vector>
#include <list>

using namespace std;

const int BUFFER_SIZE = 1048576;

int main(int argc, CHAR ** argv)
{
    wstring InputStreamName = L"";
    wstring OutputStreamName = L"con:";
    wstring InputPrefix = L"--i=";
    wstring OutputPrefix = L"--o=";

    wstring Instructions =
        L"To use this tool, provide an input and an output file for it. The syntax looks like the following.\r\n\r\n"
        L"StreamStreamer --i=inputFileName --o=OutputFileName.ext::streamName\r\n\r\n";

    HANDLE hInputFile = INVALID_HANDLE_VALUE;
    HANDLE hOutputFile = INVALID_HANDLE_VALUE;

    vector<wstring> arguments(argc);

    for (auto i = 0; i < argc; ++i)
    {
        auto arg = string(argv[i]);
        arguments[i] = (wstring(arg.begin(), arg.end()));
    }

    for (int i = 0; i < argc; ++i)
    {
        if (!arguments[i].compare(0, InputPrefix.size(), InputPrefix))
            InputStreamName = arguments[i].substr(InputPrefix.size());
        if (!arguments[i].compare(0, OutputPrefix.size(), OutputPrefix))
            OutputStreamName = arguments[i].substr(OutputPrefix.size());
    }

    if ((!InputStreamName.size()) || (!OutputStreamName.size()))
    {
        wcout << Instructions;
        return 0;
    }

    hInputFile = CreateFile(InputStreamName.c_str(), GENERIC_READ, FILE_SHARE_READ, 0, OPEN_EXISTING, FILE_ATTRIBUTE_NORMAL, 0);
    if (hInputFile != INVALID_HANDLE_VALUE)
    {
        hOutputFile = CreateFile(OutputStreamName.c_str(), GENERIC_WRITE, FILE_SHARE_READ, 0, CREATE_ALWAYS, FILE_ATTRIBUTE_NORMAL, 0);
        if (hOutputFile != INVALID_HANDLE_VALUE)
        {
            vector<char> buffer = vector<char>(BUFFER_SIZE);
            DWORD bytes_read = 0;
            DWORD bytes_written = 0;
            do {
                bytes_read = 0;
                if (ReadFile(hInputFile, &buffer[0], BUFFER_SIZE, &bytes_read, 0))
                    WriteFile(hOutputFile, &buffer[0], bytes_read, &bytes_written, 0);
            } while (bytes_read > 0);
            CloseHandle(hOutputFile);
        }
        CloseHandle(hInputFile);
    }
}


Usage is simple. The tool takes two arguments; an input stream name and an output stream name are passed prefixed with either --i= or --o=. If no output name is specified, it defaults to an output name of con:. This name, con:, refers to a console. That had been a reserved file name for the console. I have the vague idea there may be some other console name, but could not find it. con: is a carry-over of the DOS days of 30+ years ago. It worked then, and it still works now. So I’m sticking with it. Note that there is

After compiling this, I can use it to retrieve the text that I attached to the stream earlier.

c:\temp\streams>StreamStreamer.exe --i=readme.txt:Stream
This is data for my alternative stream

c:\temp\streams>

I can also use it to take the contents of some other arbitrary file and attach it to an existing file in an alternative stream. In testing, I took a JPG I had of the moon and attached it to a file. Then I extracted it from that alternative stream and wrote it to a different regular file just to ensure that I had an unaltered data stream.

c:\temp\streams>StreamStreamer.exe --i=Moon.JPG --o=readme.txt:moon

c:\temp\streams>StreamStreamer.exe --i=readme.txt:moon --o=m.jpg

c:\temp\streams>dir *.jpg
 Volume in drive C has no label.
 Volume Serial Number is 46FF-0556

 Directory of c:\temp\streams


10/12/2021  02:54 PM         3,907,101 m.jpg
12/21/2020  07:46 PM         3,907,101 Moon.JPG
               3 File(s)      7,814,202 bytes
               0 Dir(s)  105,063,383,040 bytes free

c:\temp\streams>

You will probably want the ability to see what streams are inside of a file. You could download the Streams tool from System Internals, or you could use PowerShell. PowerShell has built in support for streams. I’ll be using that throughout out the rest of this writeup. To view streams with PowerShell, use the Get-Item command with the -stream * parameter.

PS C:\temp\streams> Get-Item .\readme.txt -stream *


PSPath        : Microsoft.PowerShell.Core\FileSystem::C:\temp\streams\readme.txt::$DATA
PSParentPath  : Microsoft.PowerShell.Core\FileSystem::C:\temp\streams
PSChildName   : readme.txt::$DATA
PSDrive       : C
PSProvider    : Microsoft.PowerShell.Core\FileSystem
PSIsContainer : False
FileName      : C:\temp\streams\readme.txt
Stream        : :$DATA
Length        : 15

PSPath        : Microsoft.PowerShell.Core\FileSystem::C:\temp\streams\readme.txt:moon.jpg
PSParentPath  : Microsoft.PowerShell.Core\FileSystem::C:\temp\streams
PSChildName   : readme.txt:moon.jpg
PSDrive       : C
PSProvider    : Microsoft.PowerShell.Core\FileSystem
PSIsContainer : False
FileName      : C:\temp\streams\readme.txt
Stream        : moon.jpg
Length        : 3907101

PSPath        : Microsoft.PowerShell.Core\FileSystem::C:\temp\streams\readme.txt:stream
PSParentPath  : Microsoft.PowerShell.Core\FileSystem::C:\temp\streams
PSChildName   : readme.txt:stream
PSDrive       : C
PSProvider    : Microsoft.PowerShell.Core\FileSystem
PSIsContainer : False
FileName      : C:\temp\s\readme.txt
Stream        : stream
Length        : 43


PS C:\temp\streams>

If you are making an application that uses alternative streams, you will want to know how to list the streams from within it also. That is also easy to do. Since the much beloved Windows Vista we’ve had a Win32 API for enumerating streams. The functions FindFirstStreamW/FindFirstStreamTransactedW and FindNextStreamW will do this for you. Take note that there only exist Unicode versions of these functions. ASCII variations are non-existent. If you have ever used FindFirstFile or FindNextStreamW the usage is similar.

Two variables are needed to search for streams. One variable is a HANDLE that is used as an identifier for the resources and state of the search request. The other is a WIN32_FIND_STREAM_DATA structure into which data on streams that were found are put. FindFirstStreamW will return a handle and populate a WIN32_FIND_STREAM_DATA with the first stream it finds. From there, each time FindNextStreamW is called with the HANDLE that had been returned earlier, it will populate a WIN32_FIND_STREAM_DATA with the information on the next stream. When no more streams are found, FindNextStreamW will have a return value of ERROR_HANDLE_EOF.

#include <Windows.h>
#include <iostream>
#include <vector>
#include <string>

using namespace std;

int main(int argc, char**argv)
{
    WIN32_FIND_STREAM_DATA fsd;
    HANDLE hFind = NULL;
    vector<wstring> arguments(argc);

    for (auto i = 0; i < argc; ++i)
    {
        auto arg = string(argv[i]);
        arguments[i] = (wstring(arg.begin(), arg.end()));
    }

    if (arguments.size() < 2)
        return 0;
    wstring fileName = arguments[1];

    try {
        hFind = FindFirstStreamW(fileName.c_str(), FindStreamInfoStandard, &fsd, 0);
        if (hFind == INVALID_HANDLE_VALUE) throw ::GetLastError();
        const int BUFFER_SIZE = 8192;
        WCHAR buffer[BUFFER_SIZE] = { 0 };
        WCHAR fileNameBuffer[BUFFER_SIZE] = { 0 };

        wcout << L"The following streams were found in the file " << fileName << endl;
        for (;;)
        {
            swprintf(fileNameBuffer, BUFFER_SIZE, L"%s%s", fileName.c_str(), fsd.cStreamName);
            swprintf_s(buffer,BUFFER_SIZE, L"%-50s %d", fileNameBuffer, fsd.StreamSize);
            wstring formattedDescription = wstring(buffer);
            wcout << formattedDescription << endl;

            if (!::FindNextStreamW(hFind, &fsd))
            {
                DWORD dr = ::GetLastError();
                if (dr != ERROR_HANDLE_EOF) throw dr;
                break;
            }
        }
    }
    catch (DWORD err)
    {
        wcout << "Oops, Error happened. Windows error number " << err;
    }
    if (hFind != NULL)
        FindClose(hFind);
}

For my actual application purposes, I don’t need to query the streams in a file. The streams of interest to me will have a predetermined name. Instead of querying for them, I attempt to open the stream. If it isn’t there, I will get a return error code indicating that the file isn’t there. Otherwise I will have a file HANDLE for reading and writing. With what I’ve written so far, you could begin using this feature in C/C++ immediately. But my target is the .Net Framework. How do we use this information there?

In Win32, you can read or write these alternative data streams as you would any other file by using the correct stream name. If you try that within the .Net Framework, it won’t work. Before even hitting the Win32 APIs, the .Net Framework will treat the stream name as an invalid file name. To work around this, you’ll need to P/Invoke the Win32 API for opening files. Thankfully, once you have a file handle, the .Net Framework will work with that file handle just fine and allow you to use all the methods that you would with any other stream.

Before adding the P/Invoke that are needed to use this functionality in .Net, let’s defined a few numerical constants.

    public partial class NativeConstants
    {
        public const uint GENERIC_WRITE = 1073741824;
        public const uint GENERIC_READ = 0x80000000;
        public const int FILE_SHARE_DELETE = 4;
        public const int FILE_SHARE_WRITE = 2;
        public const int FILE_SHARE_READ = 1;
        public const int OPEN_ALWAYS = 4;
    }

These may look familiar. These constants have the same names as constants that were used in C when calling the Win32 API. These constants, as their names suggest, are used to indicate the mode in which files should be opened. Now fot the P/Invokes to the calls to open the files.

    public partial class NativeMethods
    {
        [DllImportAttribute("kernel32.dll", EntryPoint = "CreateFileW")]
        public static extern System.IntPtr CreateFileW(
            [InAttribute()][MarshalAsAttribute(UnmanagedType.LPWStr)] string lpFileName,
            uint dwDesiredAccess,
            uint dwShareMode,
            [InAttribute()] System.IntPtr lpSecurityAttributes,
            uint dwCreationDisposition,
            uint dwFlagsAndAttributes,
            [InAttribute()] System.IntPtr hTemplateFile
        );

    }

That’s it! That is the only P/Invoke that is needed.

The data that I was writing to these files was metadata on on files for matching them up with entries in a CMS. This includes information like the last date that it was updated on the CMS, a CRC or ETAG for knowing if the version on the local computer is the same as the one on the CMS, and a title for presenting to the user (Which may be different than the file name itself). I’ve decided that the name of the stream in which I am placing this data to simply be meta. I’m using JSON for the data encoding. For your purposes, you could use any format that fits your application. Let’s open a stream for writing.

I’ll use the Win32 CreateFileW function to get a file handle. That handle is passed to the .Net FileStream constructor. From there, there is no difference in how I would read or write from this

var filePath = Path.Combine(ds.DownloadCachePath, $"{fe.ID}{extension}");
FileInfo fi = new FileInfo(filePath);
var fullPath = fi.FullName;
if (fi.Exists)
{
    var metaStream = NativeMethods.CreateFileW(
        $"{fullPath}:meta",
        NativeConstants.GENERIC_READ,
        NativeConstants.FILE_SHARE_READ,
        IntPtr.Zero,
        NativeConstants.OPEN_ALWAYS,
        0,
        IntPtr.Zero);
    using (StreamReader sr = new StreamReader(new FileStream(metaStream, FileAccess.Read)))
    {
        try
        {
            var metaData = sr.ReadToEnd();
            if (!String.IsNullOrEmpty(metaData))
            {
                var data = JsonConvert.DeserializeObject<FileEntry>(metaData);
                fe.LastModified = data.LastModified;
            }
        } catch(IOException exc)
        {
        }
    }
}

I said earlier that this is a Windows-Only solution and that it doesn’t work on the Fat32 file system. The two implications of this is that if you are using this in in a .Net environment that is running on another operating system this won’t work. It will likely fail since the P/Invokes won’t be able to bind. The other potential problem demands an active check within the code. If a a program using alternative file streams is given a FAT32 file system to work with, it should detect that it is on the wrong type of file system before trying to perform actions that will fail. Detecting the file system type only requires a few lines of code. In .Net, the following code will take the path of the currently running assembly, see what drive it is on, and retrieve the file system type.

 String assemblyPath = typeof(FileSystemDetector).Assembly.Location;
 String driveLetter = assemblyPath[0].ToString();
 DriveInfo driveInfo = new DriveInfo(driveLetter);
 string fsType = driveInfo.DriveFormat;
 return fsType;

If this code is run on a a drive using the NTFS file system, the return type will be the string value NTFS. If it is anything else, know that attempts to access alternative streams will fail. If you try to copy these file to a FAT32 drive, Windows will warn you of a loss of data. Only the default streams will be copied to the FAT32 drive.

In the next posts on this I will demonstrate a practical use. I’ll also talk about what some might see as a security concern with alternate file streams.

Windows Terminal Preview

Windows_Terminal_Logo_256x256

I’ve started using the Windows Terminal preview and wish I had started sooner. Some of the functionality that is provides while simple is useful and gives a productivity boost. I’m bringing attention to the Windows Terminal because I find it so useful. The first question to answer is “What is it?”

From the name alone you might think that the Windows Terminal is yet another command line in the same ranks as the command prompt and PowerShell. This isn’t what it is. It is a new console host. The console host (c:\Windows\System32\conhost.exe)  may be something to which there’s not a lot of awareness, but it is a behind-the-scenes component that host console programs. When you start the command prompt it runs within the console host.


The Windows Terminal is an alternative console host. It is a program for managing various console environments in a single window with tabs.  Upon installation it is pre-configured for the Command Prompt, Powershell, and the Azure Cloud Shell. The availability of these items in a tabbed window alone is sufficient for me to find it useful. It isn’t limited to these programs though. The Windows Terminal is configurable to host other console programs through editing a JSON configuration file. There are some devices that I regularly connect to using SSH.  I’ve extended my configuration to have entries for these specific devices.  I had been previously using PUTTY for this but I find that with the Windows Terminal the process of opening a new tab into a device is easier.  The other connections are available in two clicks; one on a down-arrow on the tab, and another on the terminal to be opened.

WindowsTerminalOpenShell

Figuring out how to add items to the Windows Terminal is easy even without looking at the documentation. The Settings menu item in the drop down opens the configuration file in which you can see the entries for the PowerShell, Command Propmt, and Azure Cloud Shell.  If you wanted to add a new terminal you can copy one of the entries and makes changes.  There are a lot of other settings that haven’t been defined here. The fuller range of possible settings are published in Microsoft’s Github account.

https://github.com/microsoft/terminal/blob/master/doc/cascadia/SettingsSchema.md

A feature I find especially useful is the ability to set the a background image to the terminal The background image could be an animated GIF (I won’t do that, it is too distracting).  I have set the background images to something relevant to the terminal so that at a glance I can tell what terminal I’m looking at. For example, when I had a connection to one of my NVIDIA devices and a Raspberry Pi my windows look like the following.

terminals

I’ve made my images intentionally dark, but they can be within what ever color range is of your choosing. Color schemes for the text itself are also definable.  Custom images for icons and terminal backgrounds must be placed in one of two locations.

URI Scheme Location
ms-appdata:///Local/ %localappdata%\Packages\Microsoft.WindowsTerminal_8wekyb3d8bbwe\LocalState\
ms-appdata:///Roaming/ %localappdata%\Packages\Microsoft.WindowsTerminal_8wekyb3d8bbwe\RoamingState\

For the entry for one of my Raspberry Pi’s I’ve got the following configuration using the Roaming URI scheme to refer to a background image.

{

    "guid": "{89CF3D23-06EA-4B1E-B42D-FC61239443ED}",
    "closeOnExit": true,
    "backgroundImage": "ms-appdata:///roaming/pi.png",
    "backgroundImageOpacity": 0.75,
    "backgroundImageStrechMode": "fill",
    "name": "SSH Raspberry Pi 3 (Sense Hat)",
    "commandline": "ssh 192.168.1.192 -l pi",
    "hidden": false
}

As with many keyboard driven interfaces there are hotkeys that you can press to perform actions. Some hotkeys are predefined, but you can define your own or change the predefined commands through the same JSON file in which the terminal entries exists.

In many programs pressing shift+enter will change a program to full screen model. I wanted to have the same behaviour in Windows Terminal and made an entry in the keybindings section for this.

{"command": "togleFullScreen", "keys": "shift+enter"}

The Windows Terminal also supports the full range of Unicode characters.  To take advantage of this the shell that you are using also needs to have support for it to. Many already do but had no way of properly displaying the characters.

unicode

The Windows Terminal is available in the Microsoft Store for free or from Github.

twitterLogofacebookLogo youtubeLogo


Windows Powershell Cookbook


Going Text:Mastering the Power of the Command Line

Introduction to Direct 2D: DirectWrite

In my previous installment of this series I was rebuilding a video game interface.  The interface resembled my target, but did not have any text.  How can I render text with Direct2D?  The answer is: DirectWrite.

What is DirectWrite?

DirectWrite is a GPU accelerated text rendering API that runs on top of Direct2D.  It originally shipped with Windows 7 and (as of the publishing date of this article) receives updates from Microsoft in the Windows 10 updates.  It is a great solution for rendering text within a DXGI based program.  Surfaces are generally dependent on the device.  DirectWrite resources are device independent.  There is no need to recreate them if the surface is lost.

Text Format

There is no default text style.  When text is being rendered it must have a definite font, style, size, and weight.  All of these text attributes are packaged in IDWriteTextFormat.  If you have worked with CSS think of IDWriteTextFormat as being a style for text.  In this interface you select the font face, weight, size, and text alignment.

TOF(_pWriteFactory->CreateTextFormat(
	TEXT("Segoe UI"),	//font family
	NULL,				//font collection
	DWRITE_FONT_WEIGHT_EXTRA_BOLD,
	DWRITE_FONT_STYLE_NORMAL,
	DWRITE_FONT_STRETCH_NORMAL,
	40.0f,
	TEXT("en-us"),
	&_pDefaultFont
));

Drawing Text

I will discuss two ways to render a text string: DrawText and DrawTextLayout.  The easier method of rendering a text string is to use ID2D1RenderTarget::DrawText.  This method accepts a text format object and a bounding rectangle.  It renders the text string at the location specified by the bounding rectangle.  It also accepts optional arguments that affect text layout and metrics.  This is the easiest of the two methods for rendering text, but it does not support having mixed styles within the same text string.  For that you would need to use a text block rendered in IDWriteTextLayout with ID2D1RenderTarget::DrawTextLayout (discussed in the next section).  Text rendered with this method will appear center-aligned to the bounding rectangle in which it is placed.

std::wstring test = TEXT("TEST");
D2D1_RECT_F textLocation{20,200,800,800};
_pRenderTarget->DrawTextW(
	test.c_str(), test.size(), //The text string and length
	_pDefaultFont.Get(),  //The font and style description
        &textLocation,  //The location in which to render the text
	_pBackgroundBrush.Get(),  //The brush to use on the text
	D2D1_DRAW_TEXT_OPTIONS_NONE, 
	DWRITE_MEASURING_MODE_NATURAL
);

Text Layout

A text layout serves a similar function as a text block in that it is used for showing text.  The primary difference is that a text block has a one-to-one relationship with what is rendered on the screen and a text layout (through the IDWriteTextLayout interface) can be rendered several times.  If there were labels that were used repeatedly with the same text, they could be implemented by creating an IDWriteTextLayout object and rendering it several times.

//In InitDeviceIndependentResources()

std::wstring  stringResult = L"RESULT";
TOF(_pWriteFactory->CreateTextLayout(
	stringResult.c_str(),
	stringResult.size(),
	_pDefaultFont.Get(),
	400, 90, 
	&_pTextLayout
));

//In OnRender()
_pRenderTarget->DrawTextLayout({ 00,0 }, _pTextLayout.Get(), _pBackgroundBrush.Get());

ID2D1AppWindow_DWrite_TextLayout
The resulting text from the above code

Unlike text rendered with ID2D1RenderTarget::DrawText, text rendered with IDWriteTextLayout can have styling applied to specific ranges of letters within the text.  If you need to mix text styles, use IDWriteTextLayout instead of using ID2D1RenderTarget::DrawText.  Create a TextLayout initially using a text format that covers the majority of the text in your layout.  Where deviations to your selected default should apply, create a DWRITE_TEXT_RANGE instance.  DWRITE_TEXT_RANGE contains the index of the starting character for the new text styling and the number of characters to which it should be applied.  Here are some of the functions for adjusting text styling.

When creating the IDWriteTextLayout a width and a height for the text area are needed.  Content rendered within this rectangle will automatically be wrapped.

std::wstring  stringResult = L"RESULT";
TOF(_pWriteFactory->CreateTextLayout(
	stringResult.c_str(),
	stringResult.size(),
	_pDefaultFont.Get(),
	400, 90, 
	&_pTextLayout
));
DWRITE_TEXT_RANGE range{ 2,3 };
_pTextLayout->SetFontWeight(DWRITE_FONT_WEIGHT_EXTRA_LIGHT, range);

ID2D1AppWindow_DWrite_TextLayout_range

Applying DirectWrite to the Project Interface

Where I left off, I had used Direct2D to render color to areas in which the interface will show information.

D2DAppWindow_sonicInterface

The next step is to apply text to the interface.  This interface will ultimately be used for performing batch processing of some media files.  The details and implementation of that processing are not shown here and are not important since this is only showing an interface.  The text populating the interface in this example is for demonstrative purposes only.

As shown in creating the interface, I am making a list of shape types to render.  In the call to OnRender() there is a case statement that will make the necessary calls depending on the next shape type in the list.  Between the last post and this one I changed my shape representation to have a shape base class and subclasses instead of having a single struct with the additional data needed packaged in unioned elements.

I am using  IDWriteTextLayout to render text instead of ID2D1RenderTarget::DrawText. Since DrawText centers the text within the bounding rectangle I could not get the layout to be what I wanted. Using IDwriteTextLayout in combination with layout options I was able to achieve the layout that I was looking for.

With the development of a hierarchy for the types of items that I am rendering, I am almost tempted at this point to just start defining a control hierarchy.  While that would have utility it may also distract from the concepts being shown here.  A control hierarchy may be written some other day.  For now the hierarchy I am using for shapes is shown is this code.

interface  IDispose {
	virtual void Dispose() = 0;
};

struct Shape: public IDispose {
	Shape() {}

	Shape(ShapeType shapeType, PaletteIndex paletteIndex)
	{
		this->shapeType = shapeType;
		this->paletteIndex = paletteIndex;
	}
	virtual void Dispose()
	{

	}
	std::wstring tag;
	ShapeType shapeType;
	PaletteIndex paletteIndex;
};

struct TextShape :public Shape {
	TextShape() {}
	TextShape(std::wstring text, D2D1_RECT_F location, TextStyle textStyle = TextStyle_Label, PaletteIndex palette = PaletteIndex_Primary, 
		DWRITE_TEXT_ALIGNMENT textAlignment = DWRITE_TEXT_ALIGNMENT_LEADING, 
		DWRITE_PARAGRAPH_ALIGNMENT paragraphAlignment = DWRITE_PARAGRAPH_ALIGNMENT_CENTER)
		:Shape(ShapeType_Text, palette)
	{
		this->text = text;
		this->location = location;
		this->textStyle = textStyle;
		this->paragraphAlignment = paragraphAlignment;
		this->textAlignment = textAlignment;
	}

	void Dispose() override 
	{
		this->textLayout = nullptr;
	}
	std::wstring text;
	D2D1_RECT_F location;
	TextStyle textStyle;
	ComPtr textLayout;
	DWRITE_PARAGRAPH_ALIGNMENT paragraphAlignment;
	DWRITE_TEXT_ALIGNMENT textAlignment;

};

struct RectangleShape : public Shape {
	RectangleShape() :Shape(ShapeType_Rectangle, PaletteIndex_Primary) {

	}
	RectangleShape(D2D1_RECT_F rect, PaletteIndex p) :
		Shape(ShapeType_Rectangle, p)
	{
		this->rect = rect;
	}
	D2D1_RECT_F rect;
};

struct EllipseShape : public Shape {
	EllipseShape():Shape(ShapeType_Ellipse, PaletteIndex_Primary)
	{}
	EllipseShape(D2D1_ELLIPSE ellipse, PaletteIndex p = PaletteIndex_Primary)
		:Shape(ShapeType_Ellipse, p)
	{
		this->ellipse = ellipse;
	}

	D2D1_ELLIPSE ellipse;
	
};

The OnRender() method has now been modified to reflect the new struct hierarchy and now has additional code for rendering text.

switch ((*current)->shapeType)
{
	case ShapeType::ShapeType_Rectangle: 
	{
		std::shared_ptr r = std::static_pointer_cast(*current);
		_pRenderTarget->FillRectangle(r->rect, brush.Get());
		break;
	}
	case ShapeType_Ellipse: 
	{
		std::shared_ptr e = std::static_pointer_cast(*current);
		_pRenderTarget->FillEllipse(e->ellipse, brush.Get()); 
		break;
	}
	case ShapeType_Text:
	{
		std::shared_ptr t = std::static_pointer_cast(*current);
		if (t->textLayout)
		{
			ComPtr format = _pDefaultFont;
			//_pRenderTarget->DrawTextW(t->text.c_str(), t->text.size(), format.Get(), t->location, brush.Get());
			D2D1_POINT_2F p = { t->location.left, t->location.top };
			_pRenderTarget->DrawTextLayout(p, t->textLayout.Get(), brush.Get());
		}
		break;
	}
	default:
		break;
}

And now the UI looks more complete.

D2D1_UI_With_Text

There are adjustments to be made with the margins on the text and positioning.  Those are going to be ignored until other items are in place.  One could spend hours making adjustments to positioning.  I am holding off on small adjustments until the much larger items are complete.

The complete source code can be found in the following commit on Github.

https://github.com/j2inet/CppAppBase/tree/5189359d50e7cdaee79194436563b45ccd30a88e

There are a few places in the UI where I would like to have vertically rendered text.  A 10 to 15 degree tilt has yet to be applied to the entire UI.  I would also like to be able to display preview images from the items being processed.  My next posts in this series will address: Displaying Images in Direct2D and Applying Transformations in Direct2D.

twitterLogofacebookLogo   youtubeLogo

Introduction to Direct2D:Part 1

DirectX is a family of APIs that provide functionality related to multimedia. Some of the APIs are focused on sound, some on input, and some on graphics. Today I want to present on of the graphical APIS based on the Direct X Graphics Infrastructure (DXGI) known as Direct2D. The Direct2D API is for rendering graphics in 2D (as suggested by the name). The API takes advantage of the features in the graphics card for accelerating the rendering.

When working with Direct2D you don’t create the objects directly. Instead you will use a factory method that creates the objects and returns interfaces to the object or you will use those returned interfaces to requested additional objects. The interfaces returned by the Direct2D APIs are COM pointers. COM, or Component Object Model is an interface for making components that interact with each other. The standard has existed since 1993. Despite being 30 years old it is important to Windows and used more than one might think within .NET.  There are books that cover how COM works. Some of them are old, but don’t let that make you think that the book’s information isn’t relevant. A full discussion of COM is outside of the scope of this post.

To get an initialized window with which to work I’ll be using the sample Win32/C++ code that I presented in the post. See that post for more information about how the base window works. In my derived class I’ll begin initializing Direct2D specific objects.

Adding Update and Render Methods

The AppWindow sample implements a message pump that uses PeekMessage instead of GetMessage. This allows the application to do other things instead of halting when there are no messages to be processed. When there are no messages a method named Idle() is called. This method will be repurposed for adding an update/render loop.

There will be 4 methods added: Update(), OnUpdate(), Render(), and OnRender(). Both OnUpdate() and OnReader()  are virtual; these methods contain code that could be completely replaced or overridden if this code were re-purposed for another application.  The other two methods, Update and Render, contain code that needs to be called on every update cycle and rendering cycle that I would not want affected when derived applications are overriding the rendering or the updating. The Update method also is querying the performance timer to calculate the amount of time that has passed since the last update. This information could be used to know how far to move an object in a scene on the next frame update or to calculate the FPS.

D2D1AppWindow_Idle_cpp

Initializing D2D

You’ll see two variations of the D2D Interfaces. One version is prefixed with D2D1 (note the numeral 1 at the end). The D2D1 interface was released with Windows 8 and is the one that I’ll be using here.  There’s two interfaces that we need to initialized. ID2D1Factory, which will be the object from which we directly or indirectly make the other D2D1 objects, and ID2D1HwndRenderTarget, which is an interface that we use for painting our scene onto the window object created by the application base.  As we create objects something to keep in mind is two classifications into which DXGI objects can be classified (this isn’t limited to Direct2D, but applicable to other DirectX graphical APIs). An object could be a Device Dependent resource or a Device Independent Resource. What’s the difference?

Device Dependent and Device Independent Resources

Device in this context refers to the video rendering device. This will usually be the video card but in some scenarios could be a purse software device or even refer to a resource that is hosted on another computer. To keep things simple let’s just view Device as being synonymous with video card or video adapter. Some resources allocate resources on the device (video adapter). But these resources could be lost at any moment if the state of the device changes (changing the resolution of the device will do this) or if the device gets disconnected (yes, a video adapter could be disconnected while the program is still running). If this occurs then none of the device dependent resources is valid.

Device Independent Resources do not allocate resources on the video card. These resources use RAM allocated to the CPU and are not affected by changes int he display configuration.

When a device is lost all of the device dependent resources must be released and recreated. In some programs a valid and simple way to do this is to simply terminate the program and start a new instance of the program. While an easy solution the program will loose any context of what the user was doing unless the program also saves state and restores this context. For scenarios in which I’ve used this solution the access to the computer hardware was restricted making the loss of a device an extremely low frequency event (something that might happen once a day at 3am in the morning while automated maintenance is doing something to the computer).

Examples of objects that are device independent resources include the ID2D1Factory object that is used for creating the other objects, Geometry objects used for describing shapes (objects that implement the ID2D1Geometry interface), and stroke style objects (ID2D1StrokeStyle).

Examples of Device Dependent Resources include ID2D1Device (which refer to the device that itself was lost), brush resources (implement IBrush), and ID2D1Layer (for creating rendering layers).

Object Creation

When initializing my D2D objects I have two methods in which the initialization occurs. The method InitDeviceResources() initialized the deveice dependent resources. InitDeviceIndependentResources()  creates the other resources. During a program’s lifecycle InitDeviceIndependentResources() will only be called once. InitDeviceResources() will be called at least once but could be called many other times.  To ensure that these resources are released there’s an additional method, DiscardDeviceResources(), that releases all of the device dependent resources. Since the ComPtr type is being used setting the pointer to nullptr will result in the resources being released.

D2DWindow_Init

The call to AppWindow::Init() results in the creation of the window. The initial implementations for InitDeviceIndependentResources() and InitDeviceResources() will create the ID2D1Factory object and create a RenderTarget for rendering to the screen.

d2dAppWindow_InitDeviceResources_cpp

The InitDeviceIndependentResources will create the D2D1Factory(). The other resources will be created in InitDeviceResources() and cleared in DiscardResources();

Loosing the Device

During the render phase of the application the various calls made result in commands being queued to be executed on the video card to render our scene.  The commands are not executed until we end our drawing (which actually ends adding commands to the queue). If the connection to the device were lost when we end our drawing the function call to EndDraw() returns a value that can be examined to detect that the device has disconnected.  If the returned value is D2DERR_RECREATE_TARGET the resources must be reinitialized.

d2dAppWindowDeviceLost_cpp

Rendering

In DXGI applications  drawing is performed using render target objects. There are several types of render targets. We will be using an ID2D1RenderTarget in this sample application.  We have a render target that renders to the application window. Render targets could also render to off screen surfaces, textures, or remote machines.

In the previous code sample a render target was already being used to clear the application window and fill it with the color blue. The general usage pattern will look like the following.

ID2D1RenderTarget* myRenderTarget;
myRenderTarget->BeginDraw();
//call draw functions here
myRenderTarget->EndDraw();

Let’s draw a square. There are three things that we need; a description of the square’s geometry, a brush to draw the square with, and a color to assign to the brush. If you’ve used Win32’s GDI (Graphical Device Interface) you’ve seen the term “Brush” used before in a similar sense. A Brush is a system resource that contains information on what color to use when drawing something. A brush could be for rendering a solid color or it could be used to use portions of a bitmap to fill a shape.

The struct D2D1_RECT_F is used to describe the square here (also available, D2D1_RECT_U and D2D1_RECT_L). This structure contains the elements left, top, right, and bottom. Any D2D1_RECT_F instances that are created reside within the CPU’s memory.  The color to be used with the brush is also assigned in a struct that only uses the CPUs memory. The type D2D1_COLOR_F  is used here, with the values red, green, blue, and alpha of type float.

For the brush there are GPU resources that will be consumed. It is a device dependent resource. We request that a brush be created and receive a pointer to its interface by calling ID2D1RenderTarget::CreateSolidColorBrush. The method arguments are the color that the brush should be and a pointer to the object that will receive the interface address.

d2d1AppWindow_CreateResources

To render the square the OnRender() method requires one or two additional calls. When rendering a geometry there are two types of methods available. One type will outline the geometry and the other is to fill the shape (which results in a solid shape). To render a geometry that has both a solid fill and an outline first use the fill method and then the draw method as I do below.

D2D1AppWindow_DrawSquare

There are a number of other geometries that ID2D1RenderTarget supports; Ellipses, rectangles, rounded rectangles, text, and other constructed geometries.

Resizing the Window

The square renders, but if you resize the window you’ll see a problem. As the window is shrunk on one axis or the other the square will shrink on that axis; the square will become a rectangle with uneven sides. Fixing this is easy enough. The RenderTarget must be updated to reflect the new window size. Since this sample application is derived from the CppAppBase that I presented in a previous post there exist a resize method that can be overridden to to update the render target. ID2D1RenderTarget::Resize accepts a D2D1_SIZE_U struct and updates the render target size accordingly.

void D2D1AppWindow::OnResize(UINT width, UINT height)
{
	this->_size = D2D1_SIZE_U{ width, height };
	if (_pRenderTarget)
	{
		_pRenderTarget->Resize(_size);
	}
}

There is still an annoying behaviour. While the window is being resize the screen is blank. Part of the reason for this is that the rendering only occurs when there are no messages to process and resizing generates messages. One of the messages generated while resizing is a WM_PAINT message; this is telling the application to redraw itself. If we call OnRender() in response to a WM_PAINT message this will handle the screen updates while resizing. The AppWindow base class has an OnPaint() method that is called when a WM_PAINT message comes through. Overriding this method and adding a call to OnRender() results in a window that doesn’t go blank when resizing.

void D2D1AppWindow::OnPaint()
{
	this->OnRender();
}

Rendering a Shape List

One could write code to individually render each one of the primitives needed to make up a more complex scene. For applications with complex scenes doing this is especially undesirable. Instead a better solution is have the primitives that must be called encoded within a file. If a change needs to be made to a scene the change would be made with the file instead of in code.

For the next sample I”m going to move halfway to such a solution. I’m making a list of primitives to be rendered and am populating the list from code. With a bit more work the data could be externalized. I’m using the list to start rebuilding an interface. I was playing a video game on my Nintendo Switch. The game had a screen that displayed between levels that shows how well someone did. I thought the interface was both simple and æsthetically pleasing.

ES4msOWUcAAzhAP

Creating something similar to this is my goal. It is composed of several rectangles, a few concentric circles, and text. Were the interface all the same type of geometry elements this could be defined with a simple list of attributes about the rectangles. Since there is more than one type of geometry the list elements must identify a geometry type. I’ve made a struct that has a field that identifies the shape type (Rectangle or Ellipse for now),  identifies which of the colors in my 3 color palette that the item should be, and has the information for the shape itself. The rectangle data and ellipse data are in a union to minimize the amount of memory used for each item.

enum   PaletteIndex {
	Primary = 0,
	Secondary = 1,
	Background = 2
};

enum ShapeType {
	ShapeType_Rectangle = 0, 
	ShapeType_Ellipse = 1
};

struct ColoredShape
{
	static ColoredShape MakeEllipse(D2D1_ELLIPSE e, PaletteIndex p)
	{
		ColoredShape c{ 0 };
		c.shapeType = ShapeType::ShapeType_Ellipse;
		c.ellipse = e;
		c.paletteIndex = p;
		return c;
	}

	static ColoredShape MakeRectangle(D2D1_RECT_F r, PaletteIndex p)
	{
		ColoredShape c{ 0 };
		c.shapeType = ShapeType::ShapeType_Rectangle;
		c.rect = r;
		c.paletteIndex = p;
		return c;
	}

	union  {
		D2D1_ELLIPSE ellipse;
		D2D1_RECT_F rect;
	};
	ShapeType shapeType;
	PaletteIndex paletteIndex;
};

The factory methods make it easier to initialize instances of the value. I’ve got a vector that holds these structs. It is populated with the data for each rectangle and ellipse to be rendered. The items will be rendered in the same order that they show in the list. If two items overlap the latter of the items to be rendered will be on top.

void D2D1AppWindow::InitDeviceIndependentResources()
{
	TOF(D2D1CreateFactory(D2D1_FACTORY_TYPE_SINGLE_THREADED, IID_PPV_ARGS(&_pD2D1Factory)));
	_primaryColor = D2D1::ColorF(0.7843F, 0.0f, 0.0f, 1.0f);
	_secondaryColor = D2D1::ColorF(0.09411, 0.09411, 0.08593, 1.0);
	_backgroundColor = D2D1::ColorF(0.91014, 0.847655, 0.75f, 1.0);
	_mySquare = { 20, 20, 30, 30 };

	
	_shapeList.push_back(ColoredShape::MakeRectangle({0,0,456,104 }, Primary));
	_shapeList.push_back(ColoredShape::MakeRectangle({ 0,128,456,550 }, Primary ));
	_shapeList.push_back(ColoredShape::MakeRectangle({ 488,0,508,110 }, Secondary ));
	_shapeList.push_back(ColoredShape::MakeRectangle({ 488,40,900,115 }, Secondary ));

	_shapeList.push_back(ColoredShape::MakeRectangle({ 530,130,850,180 }, Secondary));
	_shapeList.push_back(ColoredShape::MakeRectangle({ 690,130,850,180 }, Primary));

	_shapeList.push_back(ColoredShape::MakeRectangle({ 530,190,850,240 }, Secondary));
	_shapeList.push_back(ColoredShape::MakeRectangle({ 690,190,850,240 }, Primary));

	_shapeList.push_back(ColoredShape::MakeRectangle({ 530,250,850,300 }, Secondary));
	_shapeList.push_back(ColoredShape::MakeRectangle({ 690,250,850,300 }, Primary));

	_shapeList.push_back(ColoredShape::MakeRectangle({ 0,350,600,450 }, Secondary ));
	_shapeList.push_back(ColoredShape::MakeRectangle({ 0,350,600,450 }, Secondary));

	_shapeList.push_back(ColoredShape::MakeEllipse({ 570,400,60, 60 }, Secondary));
	_shapeList.push_back(ColoredShape::MakeEllipse({ 570,400,57, 57 }, Background));
	_shapeList.push_back(ColoredShape::MakeEllipse({ 570,400,55, 55 }, Secondary));
	_shapeList.push_back(ColoredShape::MakeEllipse({ 570,400,52, 52 }, Background));

	_shapeList.push_back(ColoredShape::MakeRectangle({ 476,470,870, 550 }, Secondary));
}

In the OnRender() method this list is iterated and each element is drawn.

void D2D1AppWindow::OnRender()
{
	HRESULT hr;
	if (!_pRenderTarget)
		return;
	_pRenderTarget->BeginDraw();
	_pRenderTarget->Clear(_backgroundColor);
	_pRenderTarget->FillRectangle(&_mySquare, _pPrimaryBrush.Get());
	_pRenderTarget->DrawRectangle(&_mySquare, _pSecondaryBrush.Get());

	for (auto current = _shapeList.begin(); current != _shapeList.end(); ++current)
	{
		ComPtr brush;
		switch (current->paletteIndex)
		{
		case Primary: brush = _pPrimaryBrush; break;
		case Secondary: brush = _pSecondaryBrush; break;
		case Background: brush = _pBackgroundBrush; break;
		default: brush = _pPrimaryBrush;
		}
		switch (current->shapeType)
		{
		case ShapeType::ShapeType_Rectangle:_pRenderTarget->FillRectangle(&current->rect, brush.Get()); break;
		case ShapeType::ShapeType_Ellipse:_pRenderTarget->FillEllipse(&current->ellipse, brush.Get()); break;
		}
		
	}
	
	hr = _pRenderTarget->EndDraw();
	if (hr == D2DERR_RECREATE_TARGET)
	{
		// The surface has been lost. We need to recreate our
		// device dependent resources. 
		this->DiscardDeviceResources();
		this->InitDeviceResources();
	}
}

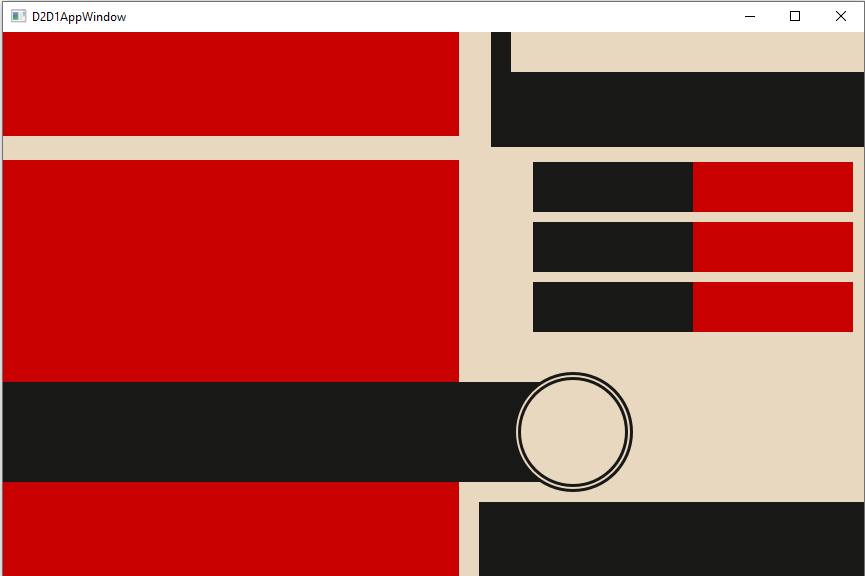
Running the program gives me something that looks like it was inspired by the video game interface.

D2DAppWindow_sonicInterface

There are similarities, but there are also plenty of differences. Aside from the missing text in the video game interface the text is rotated slightly. With the way rectangles are defined now there’s no apparent way to render a rectangle that isn’t aligned with the X or Y axis. To move forward we need to know how we can apply transformations to the rendering and how to render text. I’ll continue there in the next part of this series.

The complete source code for the program can be found on github.

https://github.com/j2inet/CppAppBase


Win32/C++ Application Base
Win32/C=++

Win32 is necessary for development in many current technologies.  Some of my current projects utilize Win32/C++ applications.  Many of them use a similar pattern for starting the application.  Initializing the window that hosts these applications is not particularly interesting, but it is a foundation block for some of my applications that I will share in the future.

In Win32 UI programs there will be at least one function defined that is known as being of type WNDPROC.  A WNDPROC is a callback function.  It is the primary function through which Windows will communicate to an application various events.  When a user moves their mouse over an application WNDPROC is called.  When the user presses a key WNDPROC is called.  When an application is being notified to render its UI again WNDPROC is called.  The call signature for WNDPROC is shown below.

LRESULT CALLBACK WindowProc(
  _In_ HWND   hwnd,
  _In_ UINT   uMsg,
  _In_ WPARAM wParam,
  _In_ LPARAM lParam
);

The first argument in this function is a handle to the window that is the intended recipient of the message.  An application could have more than one window.  But an application with only one window will have the same value.  The second argument is a numerical value that identifies the event or message being sent.  The constants that define possible vales generally are prefixed by WM_ (meaning Windows Message).  Examples of such values include: WM_COMMAND, which is generally the result of a button being clicked; WM_PAINT, which tells the application to redraw its UI; WM_SIZE, meaning that the window has been resized; and WM_CLOSE, meaning that there was a request to close the window.

Because of the central position that the WNDPROC function plays in receiving notifications from the operating system, if all responses to the operating system were handled here the function would quickly grow big.  I have seen this done, and it can get to be a nightmare on shared projects.  One way to deal with this is to have the WNDPROC function act only as a method that routes these incoming messages to other functions that handle the method.  A simple way to implement this is with a switch statement where each case does a minimal amount of work before passing the message on to a function specifically made to handle the message.
That is the solution used in the projects I plan to share in the future.  I created an abstract base class named AppWindow that creates an application window; has a few methods for handling certain Windows messages; and has case statements for calling those methods in response to a Windows message.
Windows communicates these messages to an application through a message queue.  An application must retrieve the next message to begin processing it.  If an application does not retrieve any messages for a certain period of time, then Windows assumes the application is locked up or busy and may give you a prompt to either terminate or wait for the program.  To keep messages going through the queue an application must implement a message pump.  In a simple implementation of a message pump two functions are called in a loop.  GetMessage which receives a MSG struct containing the information on a message and DispatchMessage to have the message handed off to the application’s WNDPROC for processing. 

If there are no messages available, calling GetMessage will result in the application waiting until there is a message.  During this wait, the main thread of an application will not use any CPU bandwidth.  In some applications, such as games or other applications that are continuously performing UI updates, using GetMessage is undesirable since it can cause the UI thread to wait.  In such applications, PeekMessage can be used instead. With PeekMessage, unlike GetMessage, if there are no messages available PeekMessage will not block.  Its return value indicates whether or not a new message was available.  If there are no messages to be processed the application can perform other tasks.

An application may modify a message within the time that it was retrieved with PeekMessage or GetMessage and when it is passed off through DispatchMessage.  You will see the use of a method named TranslateMessage which despite its name, does not perform the modification of any messages.  Instead, it creates new messages in response to certain virtual key messages and adds these to the message queue.  For the programs that I present, the specifics of what it does are not important and I will not be modifying any messages in the message pump.

I do not use any of the traditional Win32 UI elements in the programs that I will be sharing (buttons, labels, text boxes, list boxes, etc.) but those elements could easily be created within the application.  If I were making a framework for such controls, I would probably make classes for each one.  My base class does have a CreateButton and CreateLabel method that are used for debug purposes.

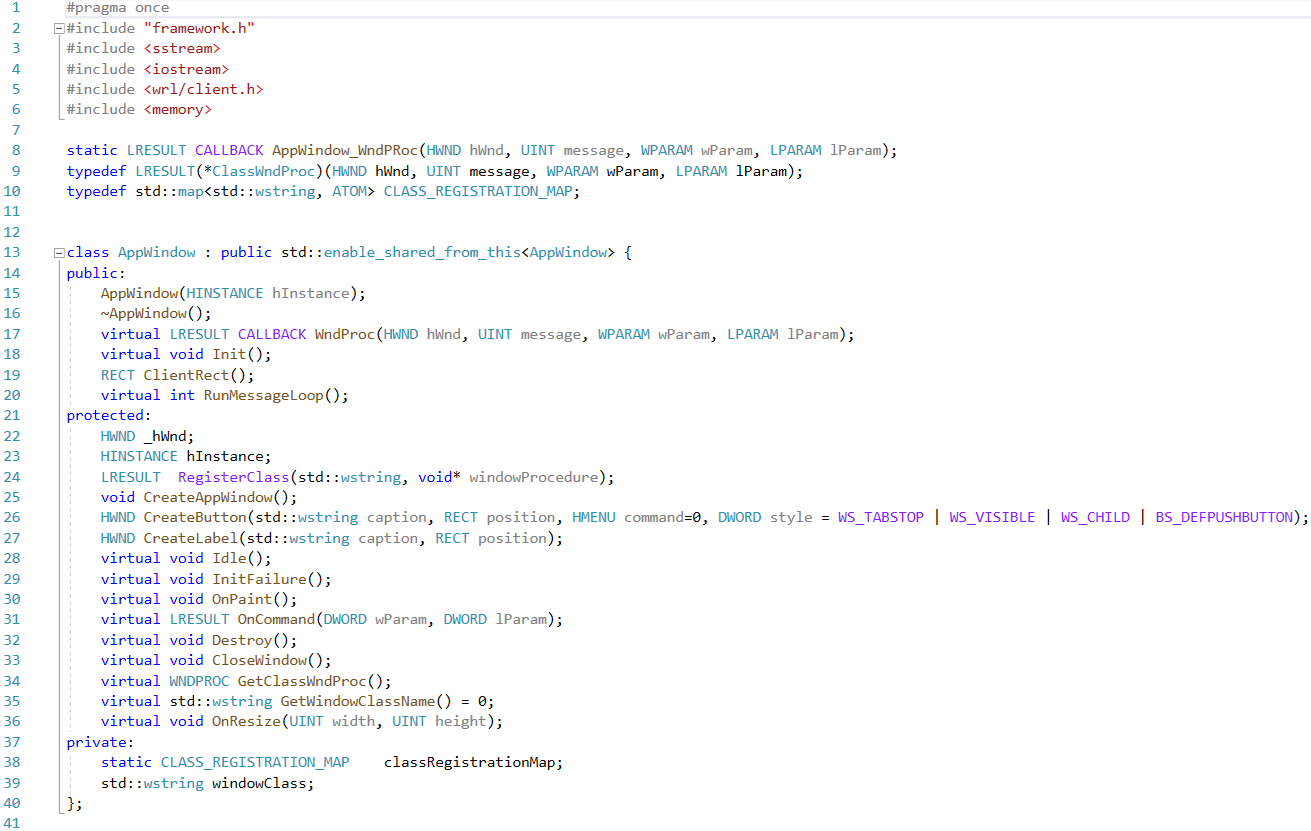
AppWindow_header
The AppWindow.h file

This class is abstract and cannot be directly initialized.  So, there first must be a derived class.  The only methods that the derived class must absolutely implement are the constructor and the method GetWindowsClassName().  The constructor must accept a HINSTANCE argument and pass it to the AppWindow base class constructor. GetWindowClassName() must return a unique string.  This string is going to be used for registering the window class.

DerivedWindow_h
Full implementation of a derived window

To make an application that runs, all that is left to do is create a derived application window, call its Init() method (which is where it actually creates its Window) and call its message pump.

derivedWindow_main_cpp

Running the application will result in a window showing a label and a button.  It does not do anything yet, which is what is desired.  The code samples to be posted in the future, require that there be an initialized window (which this provides).  The entirety of the code can be found on GitHub.

Relevant Github Commit

Latest Version

HRESULT and COM Exceptions

I have some posts queued that make use of the C++ exception classes that have been useful in my previous projects.  These classes were primarily used for logging. COM calls which return an HRESULT indicating the success or failure of the call.  These return values should be examined and action should be taken if there is a failure.  What type of action to take will depend on the scenario.  In some cases an application may fallback on alternative functionality.  In other cases the failure may be irrecoverable.  The worst thing to do is nothing at all.  An early failure could result in a problem that is not realized until later and require a painful debugging experience.

For the sample code that I share here, I will not implement full error handling to avoid distraction.  But to avoid undetected failures, I do not want to leave the values untouched.  In the sample code I will use an inline function named TOF (Throw On Failure).  TOF will throw an exception if there is a failed return value.  In most of the sample code presented here, the exception will not be caught.  When the exception is not caught, the program is designed to terminate.  The TOF function itself will return the HRESULT if successful.  The HRESULT is still available for further examination if needed.

The exception classes and the TOF function can be found on Github.

https://github.com/j2inet/CppAppBase/blob/master/src/common/Exception.h


Obtaining the Connection String for a Provisioned Windows IOT Device

Playing with the code that I was using to get data from my car and stream it to the cloud I did something that I knew was a no-no; I hard coded the connection string in the code. There’s a number of reasons to not do this*; it’s less secure as someone can potentially extract the connection string and use it for unauthorized access and if the connection string ever needs to change then code needs to be recompiled and redeployed.

When a Windows IOT device is provisioned there is a connection string that is managed by the device; your application can take advantage of this and need not worry about the details of how it is stored. To make use of this there are a few libraries that you need to add to your UWP project. These include the followings.

  • Microsoft.Azure.Devices
  • Microsoft.Azure.Devices.Client
  • Microsoft.Devices.Tpm

With the classes in these libraries you can obtain the ID of the device and then use that ID to request an Azure DeviceClient class that is initialized with the connection string that the device is managing.

Here’s the code to do this.

DeviceClient _deviceClient;

void InitClient()
{            
    TpmDevice tpm = new TpmDevice(0);
    string hostName = tpm.GetHostName();
    string deviceId = tpm.GetDeviceId();
    string sasToken = tpm.GetSASToken();            
    var client = DeviceClient.Create(
        hostName, 
        AuthenticationMethodFactory.CreateAuthenticationWithToken(deviceId, sasToken),
        TransportType.Mqtt
    );
}

What Does the Power Button Do?

The iIimpact of unobservable events has long been a subject over which humans have pondered.    Some questions are either well known or commonly shared.

  • If a tree falls in the forest and no one hears it then does it make a sound?
  • When I close the door on the fridge does the light go out?
  • Is Schrodinger’s cat dead or alive?
  • When I press the power button on my Windows Mobile phone do the programs stop running?

These are all questions will all be answered by the end of this blog post. Thanks to the availability of inexpensive electronics such as digital video and audio recorders we can show that falling tress make noises and that the lights in the fridge do go out.  Figuring out what happens when the power button is pressed on Windows Mobile was a little more difficult.

My first attempt at answering this question was based on programs that changed what they were displaying  over their execute cycles.  If the Windows Mobile device suspends when I press the power button then after pressing the button, waiting a few seconds, and pressing it again the program’s display should show the same thing that it did before I pressed the button.  If the device continues to run when I press the power button then after the test I should see something that is noticably different. I ran my test and concluded that the processor continued to run after the power button was pressed.  As it turned out my initial conclusion was wrong.

After performing much more research on the matter I found that my conclusion contradicticted other material I found such as the “Power to the Programmers” post on the Windows Mobile Team Blog. I performed my tests again and increased the amount of time that I left the device in its alleged suspended state.  After successive test I achieved enlightenment.   Pressing the power button on a Windows Mobile Professional device powers down the display and some other hardware, but the processor continues to run.  After a certain amount of time has passed unless a program has indicated a desire to do otherwise the device’s processor will halt until something wakes it up.  When the device is in this state it’s not off; the programs are still in memory.  Windows Mobile Standard devices are always on, there’s no questioning that.

In a forthcoming post I’ll cover the details of power control on Windows Mobile devices.

So the only question that leaves open is whether or not Schrodinger’s cat is alive. I will leave that question unanswerd and hope for the best for his cat.

Auto-launching an Application on Windows Mobile

I submitted an article to codeproject.com a little over a month ago about automatically starting an application base on an event or a schedule. I posted the content of the article here.  To get the source code visit http://www.codeproject.com/script/Articles/Article.aspx?aid=27917

Introduction

Figuring out how to make an application automatically start up had long been a mystery to me. The information was scattered and a bit of research was needed to collect all of. During my research I placed all of my notes in a various documents and have decided to organize them into a single document and share with all. The information presented here was tested on Windows Mobile 5 and Windows Mobile 6 devices but can also be applied to several versions of Windows CE (The OS from which Windows Mobile is derived).

It’s possible to achieve similar functionality by making your own executable that watches system changes through the SystemState class and responding accordingly, but that would cause your program to have a larger footprint.

About the Code

The first methods of automatically starting a program are centered in what I will call configuration tasks; making shortcuts, registry entries, or placing files in specific locations. For these methods I do not provide code examples. Later within this article I discuss methods of automatically launching applications that are setup through code. For these methods I include example code within the article and full source attached to the article.

The code examples rely on some Win32 functions that are called through P/Invoke. Both code examples refer to a project named Win32 which contains the references to these functions. Additionally Win32 also contain a structure and an enumeration needed to properly pass information to the WinAPI functions. To run the code examples you will need a Windows Mobile device (or emulator) and Visual Studio 2008.

Remember that on Windows Mobile devices you should prevent more than one instance of your program from existing in memory (if a second instance is started it should notify the first instance and then immediatly terminate).

What is meant be “auto-start?”

When I use the phrase auto-start I use it to refer to the launching of any program based on an event (other than the user clicking on the program’s icon). A program can be automatically started in one of four ways.

  • A program on a memory card runs as soon as the card is inserted
  • A program is scheduled to start at a predetermined time
  • A program is launched in response to a system change
  • A program launches at device power up

AutoRun from a Memory Card

The user inserting a memory card can cause an application to launch in one of two ways. The memory card could have a program on it that launches upon insertion of the Windows Mobile device could start a program that is already present in its main storage in response to the memory card being inserted. The later would be implemented by registering an application to start on a system change (discussed later).

When a memory card is inserted into a Windows Mobile / Windows CE device the OS automatically looks in a certain folder for a program named Autorun.exe. If that program is found then it is immediately run. The folder in which the OS looks is going to depend on what type of processor that the device has. For an overwhelming majority of Windows Mobile devices that folder will be “/2577”. Here is a table of the possible folder names for other Windows CE devices.

ProcessorFolder Name
ARM 7201824
Arm 8202080
ARM 9202336
ARM 7TDMI70001
Hitachi SH310003
Hitachi SH3E10004
Hitachi SH410005
Motorola 821821
SH3103
SH4104
Strongarm2577

f you already have an application on a memory card that you wanted to autorun.exe but you did not want to rename the executable or place it in this folder then you can always make a second executable whose purpose is to launch your first executable.

Startup Shortcut

A shortcut can be made to an application that you wish to startup automatically and placed in \Windows\StartUp. Use this method if you have a single executable that needs to be started that has no dependencies on other executables. The format of shortcuts on windows mobile devices is simple. It will always be in the form of 00#”<\program Files\path>” where 00 is replaced with the number of characters that appear after the ‘#’ sign, the ‘#’ is a delimiter, and then the complete path to the executable. The following is an example of a shortcut to Windows Media Player.

23#“\windows\wmplayer.exe”

You don’t have to manually create the shortcut though. There is a native API call SHCreateShortcut that will create a shortcut for you. The first argument is the full path to the shortcut to be created and the second arguement is the full path to the file to which the shortcut points.

Starting an Application at Bootup

For Windows Mobile devices the location for autostart entries is HKEY_LOCAL_MACHINE\Init. Unlike the startup entries on a desktop machine (which only require the path to the executable to start) the entries for Windows Mobile devices are a little more structured. There are two keys associated with an application that needs to start up automatically, a LaunchXX key and an optional DependXX key. The XX would be replaced with a number. This number is also called the sequence number The value of LaunchXX is a string value (REG_SZ) that contains the path to the executable to be started. The DependXX key is used to specify on what applications that the current application has dependencies (and thus in what order the applications must be launched). The DependXX key contains a list of word (2 bytes) values that contain the sequence number values of the required applications.

The following screenshot is of the registry on my Windows Mobile 5 phone. Launch21 refers to an application named “coldinit.” If we look at Depend21 we see that “coldinit.exe” has a dependency on an application identified by 0x14 (20 decimal). So “coldinit.exe” must be launched after the app identified in Launch20, “Device.exe.”

Screen shot of Windows Mobile Registry

Applications launched using this method must notify the application of successful startup by calling the SignalStarted(DWORD) function. This function is a native call. For C programs the header to this function is defined in Winbase.h and in the library Coredll.lib. Developers using managed code will need to P/Invoke this method. The functions only argument is the sequence number of the executable. The sequence number is passed to the application as its only command argument. Note that the sequence number is the only argument that the application will be able to receive through the command line arguments. Any other information that must be passed to the application should be passed through configuration files or registry keys.

Starting a Program at a Specified Time

The Windows CE / Windows Mobile OS contains functionality for automatically starting a program at a specified time. The functionality is available through a call to CeRunApAtTime from the CoreDLL library. As mentioned by Jim Wilson in many of his “How Do I” video post on MSDN, this function expects the start time to be specified in the WinAPI SystemTime structure instead of the DateTime structure (CeRunAppAtTime is an unmanaged function called using the platform invoke functionality). Converting a time from a DateTime to a SystemTime is not difficult; there are already WinAPI functions that do this for you. To make calling this function easier I have placed the following code in my Win32Helper class. I’ve also provided an overloaded function to allow the time to be passed as an offset from the current time with a TimeSpan object.

public static void RunAppAtTime(string applicationEvent, DateTime startTime) {     long fileTimeUTC = startTime.ToFileTime();     long fileTimeLocal = 0 ;     SystemTime systemStartTime = new SystemTime();     CoreDLL.FileTimeToLocalFileTime(ref fileTimeUTC, ref fileTimeLocal);     CoreDLL.FileTimeToSystemTime(ref fileTimeLocal, systemStartTime);     CoreDLL.CeRunAppAtTime(applicationEvent, systemStartTime); } public static void RunAppAtTime(      string applicationEvent,       TimeSpan timeDisplacement ) {     DateTime targetTime = DateTime.Now + timeDisplacement;     RunAppAtTime(applicationEvent, targetTime); }  

Where applicationEvent is the full path to the application to start and startTime is the time at which the application should be executed. There’s also an overloaded version of the method that accepts a TimeSpan object instead of a DateTime if you wanted to specify the start time relative to the current time.

If an application were attempting to schedule itself to be restarted at a later time it will need to be able to pass it’s complete path. I used reflection to find that path.

Module[] m = this.GetType().Assembly.GetModules(); target = m[0].FullyQualifiedName;
Screenshot of timed start program

Running the Program because of a System Change

There are a number of system changes that can be used to trigger the execution of a program. The WinAPI function CeRunAppAtEvent is used to associate a program with an event. Once associated that program will be launched every single time that the event occurs! So you must also remember to disassociate the program with the event when you no longer want it to automatically start.

I have created the enumeration in the Win32 class named WhichEvent that contains the ID numbers for the events that can be used to trigger program execution.

When a program is started because of a change in system state a single argument is passed to the program to indicate the state change that triggered the programs execution. (I don’t discuss the details of how to do that here). For a complete list of the possible arguments see the example cod in AutoStartArgumentString.cs.

Enumeration ElementDescription
NOTIFICATION_EVENT_NONEUsed to clear all events associated with a program
NOTIFICATION_EVENT_TIME_CHANGE
NOTIFICATION_EVENT_SYNC_ENDActiveSync synchronization has completed on the device
NOTIFICATION_EVENT_ON_AC_POWERThe unit’s charger is connected
NOTIFICATION_EVENT_OFF_AC_POWERThe unit’s charger is disconnected
NOTIFICATION_EVENT_NET_CONNECTThe device is connected to a network
NOTIFICATION_EVENT_NET_DISCONNECTThe device is disconnected from a network
NOTIFICATION_EVENT_DEVICE_CHANGEA memory card or other device was inserted or removed
NOTIFICATION_EVENT_IR_DISCOVEREDThe device has detected another infrared device
NOTIFICATION_EVENT_RS232_DETECTEDThe device has been connected to an RS232 device
NOTIFICATION_EVENT_RESTORE_ENDA full restore of the device has completed
NOTIFICATION_EVENT_WAKEUPThe device has come out of a suspended state
NOTIFICATION_EVENT_TZ_CHANGEThe time zone of the device has changed
NOTIFICATION_EVENT_MACHINE_NAME_CHANGEThe name of the device has changed

I have created a class simple named Core for declaring platform invoked methods from the CoreDLL.dll library and declared the CeRunApAtEvent function within it. The following schedules the the windows calculator to start when the device comes out of the suspended state.

CoreDLL.CeRunAppAtEvent(@"\Windows\Calc.exe", (int)WhichEvent.NOTIFICATION_EVENT_DEVICE_CHANGE);

After that call the windows calculator will start every single time that the device is woken up. To prevent the calculator from starting up a second call is necessary.

CoreDLL.CeRunAppAtEvent(@"\Windows\Calc.exe", (int)WhichEvent.NOTIFICATION_EVENT_NONE);

Included with this article is an example application that can be used to cause an application to launch for various events. Originally this program would only register a program to start upon wakeup. But I’ve extended the program so that it can also start programs in response to other events. Note that by changing the value in the call to CERunAppAtEvent that you can use the program cause an executable to launch for bcause of some other event (such as a memory card being inserted or ActiveSync completing its synchronization).

WakeupStart.png

When a program is autostarted a string is passed to it through the command line indicating the event that started it. I’ve included a program named ShowCommandLine with the source code that does nothing more than display the command line arguments that it received. From the screen shot below you can see the command line argument that was received when the program was started upon connecting to a network connection.

ShowCommandLine.png

Preventing Multiple Instances

Normally the .Net framework will take care of ensuring that multiple instances of your program are not running. This doesn’t always work for programs that are started because of a system event. Several system events can be fired in rapid succession or the same event can be fired twice (for some odd reason the wakeup event is usually fired twice). The first time I tried scheduling the ShowCommandLine program to start on wakeup and another event I ended up with several instances of it running.

MultiInstance.png

To get around this I create an event object (using P/Invoke) before loading the form. If several instances of the program are started in rapid succession then the creation of the event will fail, and we can use this failure to know that the this is not the first instance of the program and immediatly unload it.

static void Main() {
    IntPtr eventHandle = IntPtr.Zero;
    const string ApplicationEventName = "ShowCommandLineEvent";
    //We will use this as our handle to
    //to ensure only one instance of the
    //program is started
    try     {
         //Try to create the event.  If the creation fails then it is
         //because another instance of this application is already
         //running. If another instance exists then this instance
         //should immediatly terminate.
         eventHandle = CoreDLL.CreateEvent(IntPtr.Zero, true, false, ApplicationEventName);
         int lastError = Marshal.GetLastWin32Error();
         //MessageBox.Show(String.Format("event handle {0}",eventHandle));
         if (0 == lastError)         {
             Application.Run(new Form1());
         }
     }
     finally     {
         //When the application is no longer running it should release the event
         if (eventHandle != IntPtr.Zero)
             CoreDLL.CloseHandle(eventHandle);
     }
 } 

When multiple instances of a program are created in this manner you may want to send a notification to the first instance of the program so that it can respond to the event.

What’s Next?

This article is largly the result of research I am doing in preperation for software solution that I plan to design. In the next part of my research I will develop a solution for making the phone respond to other events not exposed directly through the the CeRunAppAtEvent function.

History

  • 19 July 2008 – Initial Publication
  • 31 July 2008 – Added reference to SHCreateShortcut (Thanks Zoomesh!)