Introduction to Direct 2D: DirectWrite

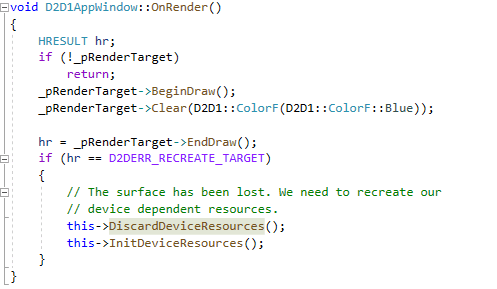
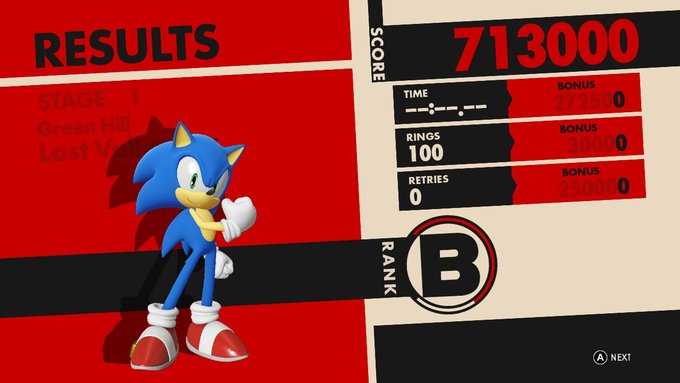
In my previous installment of this series I was rebuilding a video game interface.  The interface resembled my target, but did not have any text.  How can I render text with Direct2D?  The answer is: DirectWrite.

What is DirectWrite?

DirectWrite is a GPU accelerated text rendering API that runs on top of Direct2D.  It originally shipped with Windows 7 and (as of the publishing date of this article) receives updates from Microsoft in the Windows 10 updates.  It is a great solution for rendering text within a DXGI based program.  Surfaces are generally dependent on the device.  DirectWrite resources are device independent.  There is no need to recreate them if the surface is lost.

Text Format

There is no default text style.  When text is being rendered it must have a definite font, style, size, and weight.  All of these text attributes are packaged in IDWriteTextFormat.  If you have worked with CSS think of IDWriteTextFormat as being a style for text.  In this interface you select the font face, weight, size, and text alignment.

TOF(_pWriteFactory->CreateTextFormat(
	TEXT("Segoe UI"),	//font family
	NULL,				//font collection
	DWRITE_FONT_WEIGHT_EXTRA_BOLD,
	DWRITE_FONT_STYLE_NORMAL,
	DWRITE_FONT_STRETCH_NORMAL,
	40.0f,
	TEXT("en-us"),
	&_pDefaultFont
));

Drawing Text

I will discuss two ways to render a text string: DrawText and DrawTextLayout.  The easier method of rendering a text string is to use ID2D1RenderTarget::DrawText.  This method accepts a text format object and a bounding rectangle.  It renders the text string at the location specified by the bounding rectangle.  It also accepts optional arguments that affect text layout and metrics.  This is the easiest of the two methods for rendering text, but it does not support having mixed styles within the same text string.  For that you would need to use a text block rendered in IDWriteTextLayout with ID2D1RenderTarget::DrawTextLayout (discussed in the next section).  Text rendered with this method will appear center-aligned to the bounding rectangle in which it is placed.

std::wstring test = TEXT("TEST");
D2D1_RECT_F textLocation{20,200,800,800};
_pRenderTarget->DrawTextW(
	test.c_str(), test.size(), //The text string and length
	_pDefaultFont.Get(),  //The font and style description
        &textLocation,  //The location in which to render the text
	_pBackgroundBrush.Get(),  //The brush to use on the text
	D2D1_DRAW_TEXT_OPTIONS_NONE, 
	DWRITE_MEASURING_MODE_NATURAL
);

Text Layout

A text layout serves a similar function as a text block in that it is used for showing text.  The primary difference is that a text block has a one-to-one relationship with what is rendered on the screen and a text layout (through the IDWriteTextLayout interface) can be rendered several times.  If there were labels that were used repeatedly with the same text, they could be implemented by creating an IDWriteTextLayout object and rendering it several times.

//In InitDeviceIndependentResources()

std::wstring  stringResult = L"RESULT";
TOF(_pWriteFactory->CreateTextLayout(
	stringResult.c_str(),
	stringResult.size(),
	_pDefaultFont.Get(),
	400, 90, 
	&_pTextLayout
));

//In OnRender()
_pRenderTarget->DrawTextLayout({ 00,0 }, _pTextLayout.Get(), _pBackgroundBrush.Get());
ID2D1AppWindow_DWrite_TextLayout
The resulting text from the above code

Unlike text rendered with ID2D1RenderTarget::DrawText, text rendered with IDWriteTextLayout can have styling applied to specific ranges of letters within the text.  If you need to mix text styles, use IDWriteTextLayout instead of using ID2D1RenderTarget::DrawText.  Create a TextLayout initially using a text format that covers the majority of the text in your layout.  Where deviations to your selected default should apply, create a DWRITE_TEXT_RANGE instance.  DWRITE_TEXT_RANGE contains the index of the starting character for the new text styling and the number of characters to which it should be applied.  Here are some of the functions for adjusting text styling.

When creating the IDWriteTextLayout a width and a height for the text area are needed.  Content rendered within this rectangle will automatically be wrapped.

std::wstring  stringResult = L"RESULT";
TOF(_pWriteFactory->CreateTextLayout(
	stringResult.c_str(),
	stringResult.size(),
	_pDefaultFont.Get(),
	400, 90, 
	&_pTextLayout
));
DWRITE_TEXT_RANGE range{ 2,3 };
_pTextLayout->SetFontWeight(DWRITE_FONT_WEIGHT_EXTRA_LIGHT, range);

ID2D1AppWindow_DWrite_TextLayout_range

Applying DirectWrite to the Project Interface

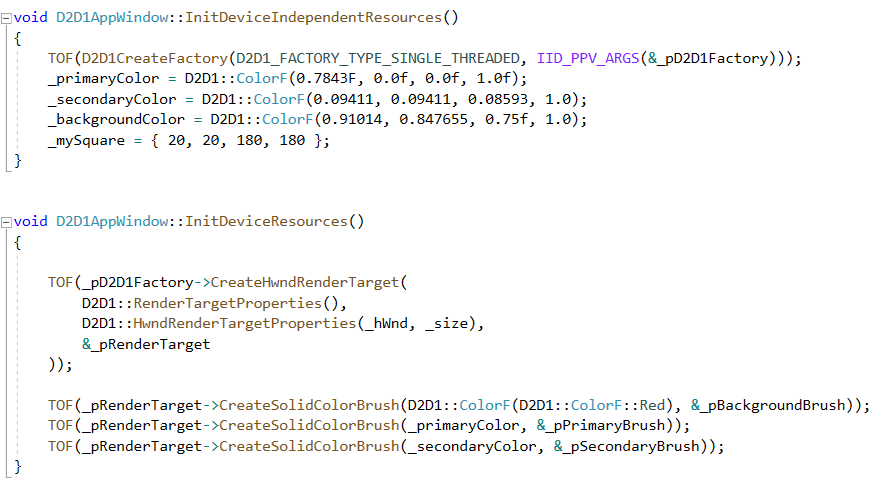
Where I left off, I had used Direct2D to render color to areas in which the interface will show information.

D2DAppWindow_sonicInterface

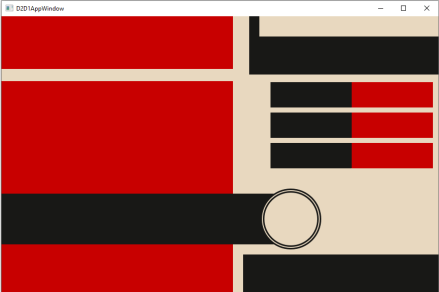
The next step is to apply text to the interface.  This interface will ultimately be used for performing batch processing of some media files.  The details and implementation of that processing are not shown here and are not important since this is only showing an interface.  The text populating the interface in this example is for demonstrative purposes only.

As shown in creating the interface, I am making a list of shape types to render.  In the call to OnRender() there is a case statement that will make the necessary calls depending on the next shape type in the list.  Between the last post and this one I changed my shape representation to have a shape base class and subclasses instead of having a single struct with the additional data needed packaged in unioned elements.

I am using  IDWriteTextLayout to render text instead of ID2D1RenderTarget::DrawText. Since DrawText centers the text within the bounding rectangle I could not get the layout to be what I wanted. Using IDwriteTextLayout in combination with layout options I was able to achieve the layout that I was looking for.

With the development of a hierarchy for the types of items that I am rendering, I am almost tempted at this point to just start defining a control hierarchy.  While that would have utility it may also distract from the concepts being shown here.  A control hierarchy may be written some other day.  For now the hierarchy I am using for shapes is shown is this code.

interface  IDispose {
	virtual void Dispose() = 0;
};

struct Shape: public IDispose {
	Shape() {}

	Shape(ShapeType shapeType, PaletteIndex paletteIndex)
	{
		this->shapeType = shapeType;
		this->paletteIndex = paletteIndex;
	}
	virtual void Dispose()
	{

	}
	std::wstring tag;
	ShapeType shapeType;
	PaletteIndex paletteIndex;
};

struct TextShape :public Shape {
	TextShape() {}
	TextShape(std::wstring text, D2D1_RECT_F location, TextStyle textStyle = TextStyle_Label, PaletteIndex palette = PaletteIndex_Primary, 
		DWRITE_TEXT_ALIGNMENT textAlignment = DWRITE_TEXT_ALIGNMENT_LEADING, 
		DWRITE_PARAGRAPH_ALIGNMENT paragraphAlignment = DWRITE_PARAGRAPH_ALIGNMENT_CENTER)
		:Shape(ShapeType_Text, palette)
	{
		this->text = text;
		this->location = location;
		this->textStyle = textStyle;
		this->paragraphAlignment = paragraphAlignment;
		this->textAlignment = textAlignment;
	}

	void Dispose() override 
	{
		this->textLayout = nullptr;
	}
	std::wstring text;
	D2D1_RECT_F location;
	TextStyle textStyle;
	ComPtr textLayout;
	DWRITE_PARAGRAPH_ALIGNMENT paragraphAlignment;
	DWRITE_TEXT_ALIGNMENT textAlignment;

};

struct RectangleShape : public Shape {
	RectangleShape() :Shape(ShapeType_Rectangle, PaletteIndex_Primary) {

	}
	RectangleShape(D2D1_RECT_F rect, PaletteIndex p) :
		Shape(ShapeType_Rectangle, p)
	{
		this->rect = rect;
	}
	D2D1_RECT_F rect;
};

struct EllipseShape : public Shape {
	EllipseShape():Shape(ShapeType_Ellipse, PaletteIndex_Primary)
	{}
	EllipseShape(D2D1_ELLIPSE ellipse, PaletteIndex p = PaletteIndex_Primary)
		:Shape(ShapeType_Ellipse, p)
	{
		this->ellipse = ellipse;
	}

	D2D1_ELLIPSE ellipse;
	
};

The OnRender() method has now been modified to reflect the new struct hierarchy and now has additional code for rendering text.

switch ((*current)->shapeType)
{
	case ShapeType::ShapeType_Rectangle: 
	{
		std::shared_ptr r = std::static_pointer_cast(*current);
		_pRenderTarget->FillRectangle(r->rect, brush.Get());
		break;
	}
	case ShapeType_Ellipse: 
	{
		std::shared_ptr e = std::static_pointer_cast(*current);
		_pRenderTarget->FillEllipse(e->ellipse, brush.Get()); 
		break;
	}
	case ShapeType_Text:
	{
		std::shared_ptr t = std::static_pointer_cast(*current);
		if (t->textLayout)
		{
			ComPtr format = _pDefaultFont;
			//_pRenderTarget->DrawTextW(t->text.c_str(), t->text.size(), format.Get(), t->location, brush.Get());
			D2D1_POINT_2F p = { t->location.left, t->location.top };
			_pRenderTarget->DrawTextLayout(p, t->textLayout.Get(), brush.Get());
		}
		break;
	}
	default:
		break;
}

And now the UI looks more complete.

D2D1_UI_With_Text

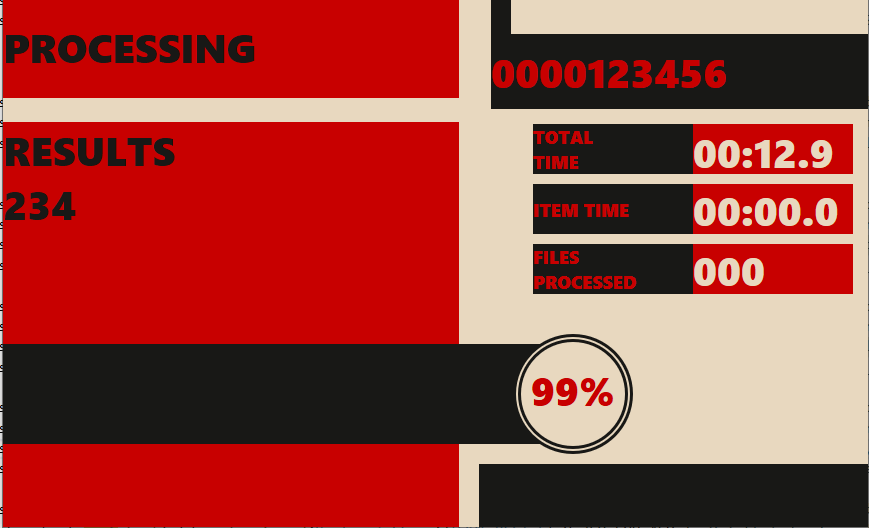
There are adjustments to be made with the margins on the text and positioning.  Those are going to be ignored until other items are in place.  One could spend hours making adjustments to positioning.  I am holding off on small adjustments until the much larger items are complete.

The complete source code can be found in the following commit on Github.

https://github.com/j2inet/CppAppBase/tree/5189359d50e7cdaee79194436563b45ccd30a88e

There are a few places in the UI where I would like to have vertically rendered text.  A 10 to 15 degree tilt has yet to be applied to the entire UI.  I would also like to be able to display preview images from the items being processed.  My next posts in this series will address: Displaying Images in Direct2D and Applying Transformations in Direct2D.

twitterLogofacebookLogo   youtubeLogo

Introduction to Direct2D:Part 1

DirectX is a family of APIs that provide functionality related to multimedia. Some of the APIs are focused on sound, some on input, and some on graphics. Today I want to present on of the graphical APIS based on the Direct X Graphics Infrastructure (DXGI) known as Direct2D. The Direct2D API is for rendering graphics in 2D (as suggested by the name). The API takes advantage of the features in the graphics card for accelerating the rendering.

When working with Direct2D you don’t create the objects directly. Instead you will use a factory method that creates the objects and returns interfaces to the object or you will use those returned interfaces to requested additional objects. The interfaces returned by the Direct2D APIs are COM pointers. COM, or Component Object Model is an interface for making components that interact with each other. The standard has existed since 1993. Despite being 30 years old it is important to Windows and used more than one might think within .NET.  There are books that cover how COM works. Some of them are old, but don’t let that make you think that the book’s information isn’t relevant. A full discussion of COM is outside of the scope of this post.

To get an initialized window with which to work I’ll be using the sample Win32/C++ code that I presented in the post. See that post for more information about how the base window works. In my derived class I’ll begin initializing Direct2D specific objects.

Adding Update and Render Methods

The AppWindow sample implements a message pump that uses PeekMessage instead of GetMessage. This allows the application to do other things instead of halting when there are no messages to be processed. When there are no messages a method named Idle() is called. This method will be repurposed for adding an update/render loop.

There will be 4 methods added: Update(), OnUpdate(), Render(), and OnRender(). Both OnUpdate() and OnReader()  are virtual; these methods contain code that could be completely replaced or overridden if this code were re-purposed for another application.  The other two methods, Update and Render, contain code that needs to be called on every update cycle and rendering cycle that I would not want affected when derived applications are overriding the rendering or the updating. The Update method also is querying the performance timer to calculate the amount of time that has passed since the last update. This information could be used to know how far to move an object in a scene on the next frame update or to calculate the FPS.

D2D1AppWindow_Idle_cpp

Initializing D2D

You’ll see two variations of the D2D Interfaces. One version is prefixed with D2D1 (note the numeral 1 at the end). The D2D1 interface was released with Windows 8 and is the one that I’ll be using here.  There’s two interfaces that we need to initialized. ID2D1Factory, which will be the object from which we directly or indirectly make the other D2D1 objects, and ID2D1HwndRenderTarget, which is an interface that we use for painting our scene onto the window object created by the application base.  As we create objects something to keep in mind is two classifications into which DXGI objects can be classified (this isn’t limited to Direct2D, but applicable to other DirectX graphical APIs). An object could be a Device Dependent resource or a Device Independent Resource. What’s the difference?

Device Dependent and Device Independent Resources

Device in this context refers to the video rendering device. This will usually be the video card but in some scenarios could be a purse software device or even refer to a resource that is hosted on another computer. To keep things simple let’s just view Device as being synonymous with video card or video adapter. Some resources allocate resources on the device (video adapter). But these resources could be lost at any moment if the state of the device changes (changing the resolution of the device will do this) or if the device gets disconnected (yes, a video adapter could be disconnected while the program is still running). If this occurs then none of the device dependent resources is valid.

Device Independent Resources do not allocate resources on the video card. These resources use RAM allocated to the CPU and are not affected by changes int he display configuration.

When a device is lost all of the device dependent resources must be released and recreated. In some programs a valid and simple way to do this is to simply terminate the program and start a new instance of the program. While an easy solution the program will loose any context of what the user was doing unless the program also saves state and restores this context. For scenarios in which I’ve used this solution the access to the computer hardware was restricted making the loss of a device an extremely low frequency event (something that might happen once a day at 3am in the morning while automated maintenance is doing something to the computer).

Examples of objects that are device independent resources include the ID2D1Factory object that is used for creating the other objects, Geometry objects used for describing shapes (objects that implement the ID2D1Geometry interface), and stroke style objects (ID2D1StrokeStyle).

Examples of Device Dependent Resources include ID2D1Device (which refer to the device that itself was lost), brush resources (implement IBrush), and ID2D1Layer (for creating rendering layers).

Object Creation

When initializing my D2D objects I have two methods in which the initialization occurs. The method InitDeviceResources() initialized the deveice dependent resources. InitDeviceIndependentResources()  creates the other resources. During a program’s lifecycle InitDeviceIndependentResources() will only be called once. InitDeviceResources() will be called at least once but could be called many other times.  To ensure that these resources are released there’s an additional method, DiscardDeviceResources(), that releases all of the device dependent resources. Since the ComPtr type is being used setting the pointer to nullptr will result in the resources being released.

D2DWindow_Init

The call to AppWindow::Init() results in the creation of the window. The initial implementations for InitDeviceIndependentResources() and InitDeviceResources() will create the ID2D1Factory object and create a RenderTarget for rendering to the screen.

d2dAppWindow_InitDeviceResources_cpp

The InitDeviceIndependentResources will create the D2D1Factory(). The other resources will be created in InitDeviceResources() and cleared in DiscardResources();

Loosing the Device

During the render phase of the application the various calls made result in commands being queued to be executed on the video card to render our scene.  The commands are not executed until we end our drawing (which actually ends adding commands to the queue). If the connection to the device were lost when we end our drawing the function call to EndDraw() returns a value that can be examined to detect that the device has disconnected.  If the returned value is D2DERR_RECREATE_TARGET the resources must be reinitialized.

d2dAppWindowDeviceLost_cpp

Rendering

In DXGI applications  drawing is performed using render target objects. There are several types of render targets. We will be using an ID2D1RenderTarget in this sample application.  We have a render target that renders to the application window. Render targets could also render to off screen surfaces, textures, or remote machines.

In the previous code sample a render target was already being used to clear the application window and fill it with the color blue. The general usage pattern will look like the following.

ID2D1RenderTarget* myRenderTarget;
myRenderTarget->BeginDraw();
//call draw functions here
myRenderTarget->EndDraw();

Let’s draw a square. There are three things that we need; a description of the square’s geometry, a brush to draw the square with, and a color to assign to the brush. If you’ve used Win32’s GDI (Graphical Device Interface) you’ve seen the term “Brush” used before in a similar sense. A Brush is a system resource that contains information on what color to use when drawing something. A brush could be for rendering a solid color or it could be used to use portions of a bitmap to fill a shape.

The struct D2D1_RECT_F is used to describe the square here (also available, D2D1_RECT_U and D2D1_RECT_L). This structure contains the elements left, top, right, and bottom. Any D2D1_RECT_F instances that are created reside within the CPU’s memory.  The color to be used with the brush is also assigned in a struct that only uses the CPUs memory. The type D2D1_COLOR_F  is used here, with the values red, green, blue, and alpha of type float.

For the brush there are GPU resources that will be consumed. It is a device dependent resource. We request that a brush be created and receive a pointer to its interface by calling ID2D1RenderTarget::CreateSolidColorBrush. The method arguments are the color that the brush should be and a pointer to the object that will receive the interface address.

d2d1AppWindow_CreateResources

To render the square the OnRender() method requires one or two additional calls. When rendering a geometry there are two types of methods available. One type will outline the geometry and the other is to fill the shape (which results in a solid shape). To render a geometry that has both a solid fill and an outline first use the fill method and then the draw method as I do below.

D2D1AppWindow_DrawSquare

There are a number of other geometries that ID2D1RenderTarget supports; Ellipses, rectangles, rounded rectangles, text, and other constructed geometries.

Resizing the Window

The square renders, but if you resize the window you’ll see a problem. As the window is shrunk on one axis or the other the square will shrink on that axis; the square will become a rectangle with uneven sides. Fixing this is easy enough. The RenderTarget must be updated to reflect the new window size. Since this sample application is derived from the CppAppBase that I presented in a previous post there exist a resize method that can be overridden to to update the render target. ID2D1RenderTarget::Resize accepts a D2D1_SIZE_U struct and updates the render target size accordingly.

void D2D1AppWindow::OnResize(UINT width, UINT height)
{
	this->_size = D2D1_SIZE_U{ width, height };
	if (_pRenderTarget)
	{
		_pRenderTarget->Resize(_size);
	}
}

There is still an annoying behaviour. While the window is being resize the screen is blank. Part of the reason for this is that the rendering only occurs when there are no messages to process and resizing generates messages. One of the messages generated while resizing is a WM_PAINT message; this is telling the application to redraw itself. If we call OnRender() in response to a WM_PAINT message this will handle the screen updates while resizing. The AppWindow base class has an OnPaint() method that is called when a WM_PAINT message comes through. Overriding this method and adding a call to OnRender() results in a window that doesn’t go blank when resizing.

void D2D1AppWindow::OnPaint()
{
	this->OnRender();
}

Rendering a Shape List

One could write code to individually render each one of the primitives needed to make up a more complex scene. For applications with complex scenes doing this is especially undesirable. Instead a better solution is have the primitives that must be called encoded within a file. If a change needs to be made to a scene the change would be made with the file instead of in code.

For the next sample I”m going to move halfway to such a solution. I’m making a list of primitives to be rendered and am populating the list from code. With a bit more work the data could be externalized. I’m using the list to start rebuilding an interface. I was playing a video game on my Nintendo Switch. The game had a screen that displayed between levels that shows how well someone did. I thought the interface was both simple and æsthetically pleasing.

ES4msOWUcAAzhAP

Creating something similar to this is my goal. It is composed of several rectangles, a few concentric circles, and text. Were the interface all the same type of geometry elements this could be defined with a simple list of attributes about the rectangles. Since there is more than one type of geometry the list elements must identify a geometry type. I’ve made a struct that has a field that identifies the shape type (Rectangle or Ellipse for now),  identifies which of the colors in my 3 color palette that the item should be, and has the information for the shape itself. The rectangle data and ellipse data are in a union to minimize the amount of memory used for each item.

enum   PaletteIndex {
	Primary = 0,
	Secondary = 1,
	Background = 2
};

enum ShapeType {
	ShapeType_Rectangle = 0, 
	ShapeType_Ellipse = 1
};

struct ColoredShape
{
	static ColoredShape MakeEllipse(D2D1_ELLIPSE e, PaletteIndex p)
	{
		ColoredShape c{ 0 };
		c.shapeType = ShapeType::ShapeType_Ellipse;
		c.ellipse = e;
		c.paletteIndex = p;
		return c;
	}

	static ColoredShape MakeRectangle(D2D1_RECT_F r, PaletteIndex p)
	{
		ColoredShape c{ 0 };
		c.shapeType = ShapeType::ShapeType_Rectangle;
		c.rect = r;
		c.paletteIndex = p;
		return c;
	}

	union  {
		D2D1_ELLIPSE ellipse;
		D2D1_RECT_F rect;
	};
	ShapeType shapeType;
	PaletteIndex paletteIndex;
};

The factory methods make it easier to initialize instances of the value. I’ve got a vector that holds these structs. It is populated with the data for each rectangle and ellipse to be rendered. The items will be rendered in the same order that they show in the list. If two items overlap the latter of the items to be rendered will be on top.

void D2D1AppWindow::InitDeviceIndependentResources()
{
	TOF(D2D1CreateFactory(D2D1_FACTORY_TYPE_SINGLE_THREADED, IID_PPV_ARGS(&_pD2D1Factory)));
	_primaryColor = D2D1::ColorF(0.7843F, 0.0f, 0.0f, 1.0f);
	_secondaryColor = D2D1::ColorF(0.09411, 0.09411, 0.08593, 1.0);
	_backgroundColor = D2D1::ColorF(0.91014, 0.847655, 0.75f, 1.0);
	_mySquare = { 20, 20, 30, 30 };

	
	_shapeList.push_back(ColoredShape::MakeRectangle({0,0,456,104 }, Primary));
	_shapeList.push_back(ColoredShape::MakeRectangle({ 0,128,456,550 }, Primary ));
	_shapeList.push_back(ColoredShape::MakeRectangle({ 488,0,508,110 }, Secondary ));
	_shapeList.push_back(ColoredShape::MakeRectangle({ 488,40,900,115 }, Secondary ));

	_shapeList.push_back(ColoredShape::MakeRectangle({ 530,130,850,180 }, Secondary));
	_shapeList.push_back(ColoredShape::MakeRectangle({ 690,130,850,180 }, Primary));

	_shapeList.push_back(ColoredShape::MakeRectangle({ 530,190,850,240 }, Secondary));
	_shapeList.push_back(ColoredShape::MakeRectangle({ 690,190,850,240 }, Primary));

	_shapeList.push_back(ColoredShape::MakeRectangle({ 530,250,850,300 }, Secondary));
	_shapeList.push_back(ColoredShape::MakeRectangle({ 690,250,850,300 }, Primary));

	_shapeList.push_back(ColoredShape::MakeRectangle({ 0,350,600,450 }, Secondary ));
	_shapeList.push_back(ColoredShape::MakeRectangle({ 0,350,600,450 }, Secondary));

	_shapeList.push_back(ColoredShape::MakeEllipse({ 570,400,60, 60 }, Secondary));
	_shapeList.push_back(ColoredShape::MakeEllipse({ 570,400,57, 57 }, Background));
	_shapeList.push_back(ColoredShape::MakeEllipse({ 570,400,55, 55 }, Secondary));
	_shapeList.push_back(ColoredShape::MakeEllipse({ 570,400,52, 52 }, Background));

	_shapeList.push_back(ColoredShape::MakeRectangle({ 476,470,870, 550 }, Secondary));
}

In the OnRender() method this list is iterated and each element is drawn.

void D2D1AppWindow::OnRender()
{
	HRESULT hr;
	if (!_pRenderTarget)
		return;
	_pRenderTarget->BeginDraw();
	_pRenderTarget->Clear(_backgroundColor);
	_pRenderTarget->FillRectangle(&_mySquare, _pPrimaryBrush.Get());
	_pRenderTarget->DrawRectangle(&_mySquare, _pSecondaryBrush.Get());

	for (auto current = _shapeList.begin(); current != _shapeList.end(); ++current)
	{
		ComPtr brush;
		switch (current->paletteIndex)
		{
		case Primary: brush = _pPrimaryBrush; break;
		case Secondary: brush = _pSecondaryBrush; break;
		case Background: brush = _pBackgroundBrush; break;
		default: brush = _pPrimaryBrush;
		}
		switch (current->shapeType)
		{
		case ShapeType::ShapeType_Rectangle:_pRenderTarget->FillRectangle(&current->rect, brush.Get()); break;
		case ShapeType::ShapeType_Ellipse:_pRenderTarget->FillEllipse(&current->ellipse, brush.Get()); break;
		}
		
	}
	
	hr = _pRenderTarget->EndDraw();
	if (hr == D2DERR_RECREATE_TARGET)
	{
		// The surface has been lost. We need to recreate our
		// device dependent resources. 
		this->DiscardDeviceResources();
		this->InitDeviceResources();
	}
}

Running the program gives me something that looks like it was inspired by the video game interface.

D2DAppWindow_sonicInterface

There are similarities, but there are also plenty of differences. Aside from the missing text in the video game interface the text is rotated slightly. With the way rectangles are defined now there’s no apparent way to render a rectangle that isn’t aligned with the X or Y axis. To move forward we need to know how we can apply transformations to the rendering and how to render text. I’ll continue there in the next part of this series.

The complete source code for the program can be found on github.

https://github.com/j2inet/CppAppBase