Chrome 74: What is New for Developers

chrome

Chrome  74 has been released. The most notable user facing feature is dark mode. It has a number of API updates for developers too. Some of those updates include the following (but there are more)

    • Private class Fields
    • Reduced Motion Experience
    • CSS Transition Event
    • Feature Policies
    • KV Storeage API
    • Buffering of client.postMessage()

Private Class Fields

Fields on classes can now be declared as private by prefixing them with #. Consider the # to be part of the members name. Members marked with this character are not accessible outside of the class.

Reduced Motion Experience

There are people that might experience motion sickness from web pages with lots of scrolling and parallax. A new media query was added so that an experience with less motion can be provided to users that are sensitive to it.

@media(prefers-reduced-motion:reduce)

CSS Transition Event

Other browsers have supported CSS transition events. Until now Chrome hasn’t been one of them. With the release of Chrome 74 transition events are now supported. The names of the events are

  • transitionrun
  • transitionstart
  • transitionended
  • transitioncancel

Feature Policies

Some APIs can be selectively enabled or disabled through a Feature-Policy header or through an allow attribute on an iframe. The list of features allowed can be queried with document.featurePolicy.allowedFeatures()

KV Storage API

Storage through localStorage is slow (it’s synchronous). While IndexedDB is asynchronous it’s a more complex API.  To provide a faster API that is easier to use Google has added support for the Key Values Storage API.  There is also a KV polyfill for browsers that do not support KV Storage.

Buffering of client.postMessage()

Messages sent via client.postMessage() are now buffered until a document is ready. a call to postMessage doesn’t dispatch until either DOMContentLoaded is fired, onmessage is set, or startMessages() is called.

Basic Hue Lighting Control: Part 2

This is the second part of a two-part post.  The first part can be found here.

At the end of the first part, I had gotten discovery of the bridge implemented and had performed the pairing of the bridge.  In this part, I will show you how to create a query for the state of the light groups and control them.

Querying Group State

I’m only allowing the modification of the state of groups of lights on the Hue.  First I need to query the bridge for what states exist.  The list of groups and the state of the group are available at `http://${this.ipAddress}/${this.userName}/groups`. Here the data in this.userName is the user name that was returned from the Hue bridge in the pairing process.  With this information I am able to create a new UI element for each group found.  I only show groups of type “room” from this response.  It is also possible that the user has grouped an arbitrary set of lights together in a group.  I don’t show these.

var hueDB = (function () {
    var db = {};
    var datastore = null;
    var version = 1;
    db.open = function (callback) {
        var request = indexedDB.open('hueDB', version);
        request.onupgradeneeded = function (e) {
            var db = e.target.result;
            e.target.transaction.onerror = db.onerror;
            var store = db.createObjectStore('bridge', { keyPath: 'bridgeID' });
        };
        request.onsuccess = function (e) {
            datastore = e.target.result;
            callback();
        };
    };

    db.getBridgeList = function () {
        return new Promise((resolve, reject) => {
            var transaction = datastore.transaction(['bridge'], 'readonly');
            transaction.onerror = function (e) {
                reject(e.error);
            };
            transaction.oncomplete = function (e) {
                console.log('transaction complete');
            };

            var objStore = transaction.objectStore('bridge');
            objStore.getAll().onsuccess = function (e) {
                console.log('bridge retrieval complete');
                resolve(e.target.result);
            };

            var bridgeList = [];


        });
    };

    db.addBridge = function (bridge) {
        console.log('adding bridge ', bridge);
        return new Promise((resolve, reject) => {
            var transaction = datastore.transaction(['bridge'], 'readwrite');
            transaction.onerror = function (e) {
                reject(e.error);
            };
            transaction.onsuccess = function (e) {
                console.log('item added');
            };
            var objStore = transaction.objectStore('bridge');
            var objectStoreRequest = objStore.add(bridge);
            objectStoreRequest.onsuccess = function (e) {
                resolve();
            };
        });
    };

    return db;
})();

Changing the State of a Light Group Attributes

There are several elements of a light group’s state that can be modified.  I’m only considering two: the brightness of the light group and whether or not the group of lights is turned on.  Both can be set with a PUT request to the bridge at the the URL http://${this.ipAddress}/${this.userName}/groups/${id}/action`.  This endpoint accepts a JSON payload.  Turning a group of lights on or off; changing the brightness; activating a scene to change the color; and many other options can be changed through this end point.  It is not necessary to specify all of the possible attributes when calling this endpoint.  If an attribute is not specified it will remain at its current state.  I have made a method named setGroupState that will be used by all other methods that make use of this endpoint.  The methods will differ in the payloads that they build and pass to this method.

    setGroupState(groupName, state) {
        var id = this.groupToGroupID(groupName);
        var reqBodyString = JSON.stringify(state);
        return new Promise((resolve, reject) => {
            fetch(`http://${this.ipAddress}/api/${this.userName}/groups/${id}/action`, {
                method: "PUT",
                headers: { "Content-Type": "application/json" },
                body: reqBodyString
            })
                .then(resp => resp.json())
                .then(jsonResp => {
                    resolve(jsonResp);
                })
                .catch(err => reject(err));
        });
    }

Of the many attributes that could be packaged in the payload are bri and on.  The on state sets whether or not the lights are turned on.  The bri attribute accepts a value in the range of 0 to 254.  Note that a value of 0 doesn’t mean off.  Zero is the value level assigned to the lowest level of illumination above off that the light will provide.

Activating Scenes

Scenes, or a collection of settings that applies to lights, can by associated with a predefined light group or with some arbitrary group of lights.  The Hue API labels scenes as either LightScene or GroupScene accordingly.  I am only working with groups scenes.  A list of all of the scenes defined on the bridge is retrievable through the the endpoint http://${this.ipAddress}/api/${this.userName}/scenes.

The object returned is a dictionary of the scene IDs and the attributes.  The scene ID is a string of what appears to be random characters.  It’s not user friendly and should only be used internally by the code and never presented to the user.   Here is a response showing only two scenes.

{
    "8AuCtLbIiEJJRNB": {
        "name": "Nightlight",
        "type": "GroupScene",
        "group": "1",
        "lights": [
            "2"
        ],
        "owner": "rF0JJPywETzJue2G8hJCn2tQ1PaUVeXvgB0Gq62h",
        "recycle": false,
        "locked": true,
        "appdata": {
            "version": 1,
            "data": "5b09D_r01_d07"
        },
        "picture": "",
        "lastupdated": "2017-01-16T23:35:24",
        "version": 2
    },
    "7y-J6Qyzpez8c2R": {
        "name": "Dimmed",
        "type": "GroupScene",
        "group": "1",
        "lights": [
            "2"
        ],
        "owner": "rF0JJPywETzJue2G8hJCn2tQ1PaUVeXvgB0Gq62h",
        "recycle": false,
        "locked": false,
        "appdata": {
            "version": 1,
            "data": "Nmgno_r01_d06"
        },
        "picture": "",
        "lastupdated": "2017-01-16T23:35:24",
        "version": 2
    }
}

To activate a scene on a group I use the same endpoint that is used for turning light groups on and off or setting their brightness level.  The JSON payload will have a single element named scene whose value is one of the cryptic looking scene identifiers above.

    activateScene(sceneID) {
        var scene;
        if(sceneID in this.sceneList) {
            var scene = this.sceneList[sceneID];
            var group = scene.group;
            var req = {scene:sceneID};
            return this.setGroupState(group,req );            
        }
    }

Application Startup

To hide some of the events that occur at startup the application has a splash screen. The splash screen is only momentarily present. During the time that it is momentarily shown the application will attempt to reconnect to the last bridge that it had connected to and will query for the available groups and scenes. This is just enough of a distraction to hide the time taken to do this additional setup.

switch
The Application Splash Screen

Installing and Running the Application

If you have downloaded the source code to your local drive, you can add the program to Chrome as an unpacked extension. In a browser instance open the URL chrome://extensions.  In the upper-left corner of this UI is a button labeled Load Unpacked.  Select this option.

unpacket
UI for loading unpacked Chrome extensions

You will be prompted to select a folder.  Navigate to the folder where you have unpacked the source code and select it.  After selecting it you will see the application in the list of installed extensions.

loadedextension

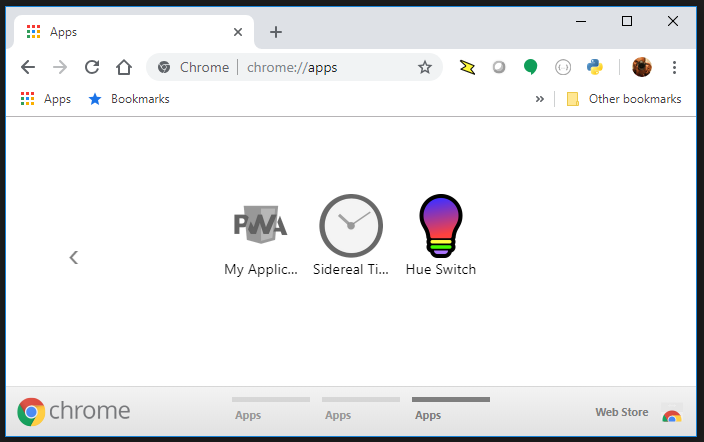
The application will now show up in the Chrome app launcher.  This may be exposed through the regular app launcher that is part of your operating system (such as the Program menu on Windows) and will also appear in Chrome itself.  Close to the address bar is a button labeled “Apps.”

applauncher
The application in the Chrome app launcher

Completing the Application

As I mentioned in the opening,  this is not meant to be a complete application.  It is only an operational starting point, creating something that is functional enough to start testing different functions in the Hue API.

I will close with mentioning some other potential improvements.  For a user running the application for the first time the setup process might be smoothed out by automatically trying to pair with the first bridge seen (if there is only one bridge seen) and prompting the user to press the link button.  This makes the setup process a two step process: start the application and press the link button on the bridge.  There could also be other people that are operating the Hue lighting at the same time that this application is running.  Periodically polling the state of the lights and light groups on the network and updating the UI accordingly would improve usability.  A user may also want to control individual lights within a group or have control over the light color.  For this a light selection UI would also need to be developed.

It took me about an evening to get this far in the development and it was something enjoyable to do during a brief pause between projects.  As such projects go, I’m not sure when I’ll get a change to return to it.  But I hope that in it’s current form that it will be of utility to you.

-30-


Basic Hue Lighting Control: Part 1

screenshot
Screenshot of Chrome application for controlling Hue lighting.

Continuing from the post I made on SSDP discovery with Chrome, I’m making an application that will do more than just discovery. For this post I’m going to show the starting point of a Chrome application for controlling your home Hue lighting. I’ve divided this into two parts. In this first part I’m showing the process of pairing with the bridge. In the second part I’ll control the lights.

The features that this application will implement will include bridge discovery and pairing; the power state of the light; and the brightness level of the light. There’s many other features that could still be implemented.  Given the full range of capabilities that the Hue kits support (changing color, timers, response to motion sensors, etc.) this will not be an application that utilizes the full capability of the Hue lighting sets.

Chrome Only

This application is designed to only run in Chrome. If you want to adapt it to run outside of Chrome, you can do so by first disabling SSDP discovery. (Other HTML application platforms might not support UDP for discovery.)

The other discovery methods (querying Hue’s discovery web service or asking the user to enter the IP address) can still work. A non-chrome target will also need to allow CORS to be ignored and allow communication without SSL.

What is Hue Lighting?

Hue Lighting is an automated lighting solution made by Philips. Generally the lighting kits are sold in a package that contains three LED based light bulbs and a bridge. The bridge is a device that connects to your home network with an Ethernet jack and communicates with the light bulbs.

Philips also makes free applications for iOS and Android for controlling the lights. For any Hue light the light’s brightness and whether or not it is turned on can be controlled through the applications. Some lights also allow the color temperature to be changed (adjusting the tint between red, yellow and blue). Some lights support RGB (Red, Green, Blue) parameters so that their colors can be changed.  These settings can be individually adjusted or settings for a collection of the lights can be defined together as a “scene.” When a scene is activated the state of all of the lights that make up the scene are updated. Scenes can be activated through special light switches, through an app, through a schedule, or in response to a Hue motion sensor detecting motion.

Discovery: Review and New Methods

The central piece of hardware for the Hue lighting is the Hue Bridge. At the time of this writing there are two versions of the bridge. For the functionality that this application will utilize, the differences between the two bridges will not matter. The messaging and interaction to both versions of the bridge will be the same. My UI will properly represent the bridge that the system discovers. The first version of the Hue Bridge is round. The second version of the Hue Bridge is square. In either case we must first find the bridge’s IP address before we can begin interaction.

phillipsbridge
Phillips Hue Bridge Version 1 (left) and Version 2 (right)

The Hue bridge can be discovered in multiple ways. It can be discovered using SSDP. The basics of SSDP discovery were previously discussed here. Please refer back to it if you need more detail than what is found in this brief overview.  Devices that support SSDP discovery join a multicast group on the network that they are connected to. These devices generally wait for a request for discovery to be received. An SSDP request is sent as an HTTP over UDP message and every SSDP device that receives it responds with some basic information about itself and a URL to where more information on the device can be found. Examples of some devices that support SSDP are network attached storage; set top boxes like Android TVs and Rokus; printers; and home automation kits.

Two other methods of discovering a bridge include asking the user to enter an IP address and asking for a list of IP addresses of bridges on your network through the Hue discovery service.  If you have a Hue bridge connected to your network right now you can see it’s IP address by visiting https://discovery.meethue.com/ . If you are on a shared network then you may also see IP addresses of other bridges on your network. It is also possible that not all bridges on your network are reachable.  This method is much easier to implement than SSDP based discovery. But on a network for which there is no Internet connection (whether by design or from an outage) this method will not work. The SSDP method is only dependent on the local network.

function discoverBridge() { 
    discovredHueBridgeList = [];
    fetch(' https://discovery.meethue.com')
        .then(response => response.json())
    .then(function (hueBridgeList) {
        console.info(hueBridgeList);
        hueBridgeList.forEach((item)=> {
         // each item processed here has a bridge IP address
         // and serial number exposed through item.id and 
         // item.internalipaddress
       }
     );
}

Once I have a bridge IP address I attempt to query it for more information. If communication succeeds, then I show a representation of the bridge with an icon that matches the version of the bridge that the user has. The UI layout has two images ( one named hueBridgev1 and the other hueBridgev2) I show the appropriate image and hide the other.

Pairing

Now that the bridges have been discovered, it is up to the user to select one with which to pair. After the user selects a bridge, she is instructed to press the pairing button on the bridge. While this instruction is displayed the application is repeatedly attempting to request a new user ID name from the bridge. This should be viewed more as an access token. The Hue documentation uses the term “user name” but the actual value is what appears to be a random sequence of characters. To request a user name a JSON payload with one member named devicetype is posted to the bridge. The value assigned to devicetype matters little. It is recommended that it be a string that is unique to your application. The payload is posted to http://%5Byour bridge IP address]/api. A failure response will result. This is expected. The application must repeatedly make this request and prompt the user to press the link button on the bridge.  The request will fail until the pairing button on the bridge is passed.

function pairBridge(ipAddress) {
   console.info('attempting pairing with address ', ipAddress);
   var req = { devicetype: "hue.j2i.net#browser" };
   var reqStr = JSON.stringify(req);
   var tryCount = 0;
   return new Promise(function(resolve, reject)  {
      var tryInterval = setInterval(function () {
      console.log('attempt ', tryCount);
      ++tryCount;
      if (tryCount > 60) {
        clearInterval(tryInterval);
         reject();
         return;
      }
      fetch(`http://${ipAddress}/api`, {
         method: "POST",
         headers: {
            "Content-Type": "application/json"
         },
         body: reqStr
      })
      .then(function(response)  {
         console.log('text:',response);
         return response.json();
      })
      .then(function(data)  {
          console.log(data);
          if (data.length > 0) {
             var success = data[0].success;
             var error = data[0].error;
             if (success) {
                console.log('username:', success.username);
                var bridge = {
                   ipAddress: ipAddress,
                   username: success.username
                };
                clearInterval(tryInterval);
                 resolve(bridge);
                  return;
               }
               else if (error) {
                  if (error.type === 101) {
                     console.log('the user has not pressed the link button');
                  }
               }
            }
         });
      }, 2000);
   });
}

Once the button is pressed the bridge will respond to the first pairing request it receives with a user name that the application can use. This user name must be saved and used for calls to most of the functionality that is present in the bridge. I save the bridge’s serial number, IP address, and the name that must be used for the various API calls to an indexedDB object store. The access information for multiple paired bridges could be stored in the object store at once. But the application will only be able to communicate with one bridge at a time.

Continued in Part II

SSDP Discovery in HTML

While implementing a few projects I decided to implement them in HTML since it would work on the broadest range of my devices of interest. My projects of interest needed to discover additional devices that are connected to my home network. I used
SSDP for discovery.
SSDPDiscovery

SSDP (Simple Service Discover Protocol ) is a UDP based protocol that is a part of UPnP for finding other devices and services on a network. It’s implemented by a number of devices including network attached storage devices, Smart TVs, and home automation systems. There are a lot of these devices that expose functionality through JSON calls. You can easily make interfaces to control these devices. However, since the standards for HTML and JavaScript don’t include a UDP interface, how to perform discovery isn’t immediately obvious. Alternatives to SSDP include having the user manually enter the IP address of the device of interest or scanning the network. The latter of those options can raise some security flags when performed on some corporate networks.

For the most part, the solution to this is platform dependent. There are various HTML based solutions that do allow you to communicate over UDP. For example, the BrightSign HTML5 Players support UDP through the use of roDatagramSocket. Chrome makes UDP communication available through chrome.udp.sockets. Web pages don’t have access to this interface (for good reason, as there is otherwise potential for this to be abused). Although web apps don’t have access, Chrome extensions do. Chrome Extensions won’t work in other browsers. But at the time of this writing Chrome accounts for 67% of the browser market share and Microsoft has announced that they will use Chromium as the foundation for their Edge browser. While this UDP socket implementation isn’t available in a wide range of browsers, it is largely available to a wide range of users since this is the browser of choice for most desktop users.

To run HTML code as an extension there are two additional elements that are needed: a manifest and a background script. The background script will create a window and load the starting HTML into it.

chrome.app.runtime.onLaunched.addListener(function() {
    chrome.app.window.create('index.html', {
        'outerBounds': {
        'width': 600,
        'height': 800
        }
    });
});

I won’t go into a lot of detail about what is in the manifest, but I will highlight its most important elements. The manifest is in JSON format. The initial scripts to be run are defined app.background.scripts. Other important elements are the permission element, without which the attempts to communicate over UDP or join a multicast group will fail and the manifest_version element. The other elements are intuitive.

        {
            "name": "SSDP Browser",
            "version": "0.1",
            "manifest_version": 2,
            "minimum_chrome_version": "27",
            "description": "Discovers SSDP devices on the network",
            "app": {
              "background": {
                "scripts": [
                  "./scripts/background.js"
                ]
              }
            },
          
            "icons": {
                "128": "./images/j2i-128.jpeg",
                "64": "./images/j2i-64.jpeg",
                "32": "./images/j2i-32.jpeg"
            },
          
            "permissions": [
              "http://*/",
              "storage",
              {
                "socket": ["udp-send-to", "udp-bind", "udp-multicast-membership"]
              }
            ]
          }    

Google already has a wrapper available as a code example chrome.udp.sockets that was published for using Multicast on a network. In it’s unaltered form the Google code sample assumes that text is encoded in the 16-bit character encoding of Unicode. SSDP uses 8-bit ASCII encoding. I’ve taken Google’s class and have made a small change to it to use ASCII instead of Unicode.

To perform the SSDP search the following steps are performed.

  1. Create a UDP port and connect it to the multicast group 239.255.255.250
  2. Send out an M-SEARCH query on port 1900
  3. wait for incoming responses originating from port 1900 on other devices
  4. Parse the response
  5. Stop listening after some time

The first item is mostly handled by the Google Multicast class. We only need to pass the port and address to it. The M-SEARCH query is a string. As for the last item, it isn’t definitive when responses will stop coming in. Some devices appear to occasionally advertise themselves to the network even if not requested. In theory you could keep getting responses. At some time I’d suggest just no longer listening. Five to ten seconds is usually more than enough time. There are variations in the M-SEARCH parameters but the following can be used to ask for all devices. There are other queries that can be used to filter for devices with specific functionality. The following is the string that I used; what is not immediately visible, is that after the last line of text there are two blank lines.

M-SEARCH * HTTP/1.1
HOST: 239.255.255.250:1900
MAN: "ssdp:discover"
MX: 3
ST: ssdp:all
USER-AGENT: Joel's SSDP Implementation
    

When a response comes in, the function that we assign to MulticastScoket.onDiagram will be called with a byte array containing the response, the IP address from which the response came, and the port number from which the response was sent (which will be 1900 for our current application). In the following code sample, I initiate a search and print the responses to the JavaScript console.

const SSDP_ADDRESS = '239.255.255.250';
const SSDP_PORT = 1900;
const SSDP_REQUEST_PAYLOAD =    "M-SEARCH * HTTP/1.1\r\n"+
                                "HOST: 239.255.255.250:1900\r\n"+
                                "MAN: \"ssdp:discover\"\r\n"+
                                "MX: 3\r\n"+
                                "ST: ssdp:all\r\n"+
                                "USER-AGENT: Joel's SSDP Implementation\r\n\r\n";

var searchSocket = null;

function beginSSDPDiscovery() { 
    if (searchSocket)
        return;
    $('.responseList').empty();
    searchSocket = new MulticastSocket({address:SSDP_ADDRESS, port:SSDP_PORT});
    searchSocket.onDiagram = function(arrayBuffer, remote_address, remote_port) {
        console.log('response from ', remote_address, " ", remote_port);
        var msg = searchSocket.arrayBufferToString8(arrayBuffer);
        console.log(msg);        
    }
    searchSocket.connect({call:function(c) {
        console.log('connect result',c);
        searchSocket.sendDiagram(SSDP_REQUEST_PAYLOAD,{call:()=>{console.log('success')}});
        setTimeout(endSSDPDiscovery, 5000);
    }});    
}

Not that parsing the response strings is difficult, by any means it would be more convenient if the response were a JSON object. I’ve made a function that will do a quick transform on the response so I can work with it like any other JSON object.

function discoveryStringToDiscoveryDictionary(str) {
    var lines = str.split('\r');
    var retVal = {}
    lines.forEach((l) => {
        var del = l.indexOf(':');
        if(del>1) {
            var key = l.substring(0,del).trim().toLowerCase();
            var value = l.substring(del+1).trim();
            retVal[key]=value;
        }
    });
    return retVal;
}    

After going through this transformation a Roku Streaming Media Player on my network returned the following response. (I’ve altered the serial number)

{
    cache-control: "max-age=3600",
    device-group.roku.com: "D1E000C778BFF26AD000",
    ext: "",
    location: "http://192.168.1.163:8060/",
    server: "Roku UPnP/1.0 Roku/9.0.0",
    st: "roku:ecp",
    usn: "uuid:roku:ecp:1XX000000000",
    wakeup: "MAC=08:05:81:17:9d:6d;Timeout=10"    ,
}

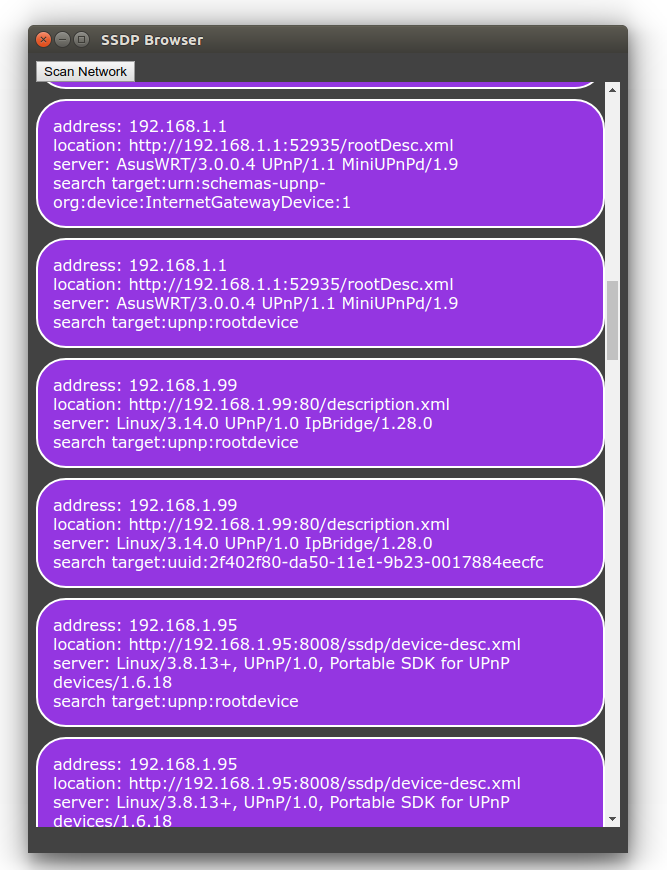
Enough code has been shared for the sample to be used, but rather than rely on the development JavaScript console,  I’ll change the sample to show the responses in the UI. To keep it simple I’ve defined the HTML structure that I will use for each result as a child element of a div element of the class palette. This element is hidden, but for each response I’ll clone the div element of the class ssdpDevice; will change some of the child members; and append it to a visible section of the page.

        
 <html>
    <head>
        <link rel="stylesheet" href="styles/style.css" />
        http://./scripts/jquery-3.3.1.min.js
        http://./scripts/MulticastSocket.js
        http://./scripts/app.js
    </head>
    <body>
Scan Network


</div>

address:
location:
server:
search target:

</div> </div>

</body> </html>


The altered function for that will now display the SSDP responses in the HTML is the following.

        function beginSSDPDiscovery() { 
            if (searchSocket)
                return;
            $('.responseList').empty();
            searchSocket = new MulticastSocket({address:SSDP_ADDRESS, port:SSDP_PORT});
            searchSocket.onDiagram = function(arrayBuffer, remote_address, remote_port) {
                console.log('response from ', remote_address, " ", remote_port);
                var msg = searchSocket.arrayBufferToString8(arrayBuffer);
                console.log(msg);
                discoveryData = discoveryStringToDiscoveryDictionary(msg);
                console.log(discoveryData);
        
                var template = $('.palette').find('.ssdpDevice').clone();
                $(template).find('.ipAddress').text(remote_address);
                $(template).find('.location').text(discoveryData.location);
                $(template).find('.server').text(discoveryData.server);
                $(template).find('.searchTarget').text(discoveryData.st)
                $('.responseList').append(template);
            }
            searchSocket.connect({call:function(c) {
                console.log('connect result',c);
                searchSocket.sendDiagram(SSDP_REQUEST_PAYLOAD,{call:()=>{console.log('success')}});
                setTimeout(endSSDPDiscovery, 5000);
            }});    
        }