Using WITS for Samsung/Tizen TV Development


One of the development scenarios that makes me cringe is an environment in which the steps and time from changing a line of code to seeing its effect is high. This usually happens in an environment with specialized hardware, limited licenses, or sensitive configurations leading to the development machine (as in the machine on which code is edited) is not suitable or capable of running the code that has been written.  There is sometimes some aspect of this in cross platform development. While emulators are often helpful in reducing this, they are not always a suitable solution since emulators don’t emulate 100% of the target platform’s functionality.

When developing for TVs running Tizen(which will be more than just Samsung TVs) Samsung has made available a tool to reduce the cycles from changing code to seeing it run through a tool called WITS.

Setting up WITS

To Setup WITS first you need to have already installed and configured Tizen Studio and Node. The system’s PATH variable must also include the path to tizen-studio/tools and tizen-studio/tools/ide/bin (you’ll need to complete those paths according to the location at which you’ve installed Tizen Studio).  You’ll also need to already have a certificate profile defined for your TV.

The files that you need for WITS are hosted on git. Clone the files onto your machine.

git clone https://github.com/Samsung/Wits.git

Enter the Wits folder and install the node dependencies

cd Wits
npm install

Next the folder there is a file named profileInfo.json. The contents of the file must be updated to point to your profiles.xml for your certificate and the name of the certificate profile to use. Windows users, note that when ever you enter a path for Wits you will need to use forward slashes (/), not back slashes (\).  For my installation the updated file looks like the following.

{
  "name": "TizenTVTest2",
  "path": "C:/shares/sdks/tizen/tizen-studio-data/profile/profiles.xml"
}


Configuring Wits to Use Your Project

Wits needs to know the location of your project. Open connectionInfo.json. There is an array element named baseAppPaths. Enter the path to your Tizen application here.  If you would like to make things convinent within this file also set the “ip” element to the IP address of the TV you are targeting. This isn’t necessary since you will be prompted for it when running a program. But it will default to the value that you enter here.

Running your Project

From the command prompt while in the Wits directory use npm to start the project

npm start

You will be prompted for a number of items. The default values for these items comes from the connectionInfo.json file that you modified in the previous section. You should be able to press enter without changing the values of any of these elements.

PS C:\shares\projects\j2inet\witsTest\Wits> npm start

> Wits@1.0.0 start C:\shares\projects\j2inet\witsTest\Wits
> node app.js

Start Wits............
? Input your Application Path : C:/shares/projects/j2inet/MastercardController/workspace/SystemInfo2
? Input your Application width (1920 or 1280) : 1920
? Input your TV Ip address(If using Emulator, input 0.0.0.0) : 10.11.86.62
? Input your port number : 8498
? Do you want to launch with chrome DevTools? : Yes


A few moments later you’ll see your project running on the TV.

Deploying File Changes

This is where Wits is extremely convenient. If you make a change to a file the application will automatically update on the TV. There’s nothing you need to do. Wits will watch the project for changes and react to them automatically!

Enabling Development Mode on Samsung Tizen TVs

The modern Samsung TVs run the Tizen operating system. You can develop for these just as you might develop for the Tizen based watches. The Tizen TVs are locked down more than the watch is.  To deploy to a Tizen TV you’ll need to both enable developer mode and will have to let the TV know from what address it will be receiving code. If it receives request from other addresses it won’t respond to them.

On the consumer displays there is no obvious way to enable developer mode. The option is hidden. If you open the apps browser (for seeing what other apps there are to install) you can open the developer mode menu by entering “12345” on the remote. A popup window will show from which you can select to turn developer mode “On.” If you are using one of the commercial displays (SSSP, or Samsung Smart Signage Platform) the method to enable developer mode is more obvious. If you open the TV’s menu there is an option called URL Launcher Settings. The developer mode option is within these settings.

On the consumer devices you’ll also be asked to enter the IP address of the machine from which the development will occur. This prevents other rouge devices on your network from doing anything to the TV.  Here you should enter the IP address of your development machine.

After these options are set the TV needs to be rebooted before the changes are fully applied. you can do this by holding the power button on the consumer TVs for two seconds, holding the power off button on a SSSP display for 2 seconds, or removing the power source from the TV and reapplying it.

After the TV boots developer mode is now enabled. However the mode being enabled doesn’t mean that all of the conditions for deploying code have been met. You will need to generate a distributor certificate also. Samsung has this page with instructions for generating a certificate. In following these directions you will need the the Device Unique ID (DUID). To get this you first need to connect to the TV. I prefer to use the sdb utility that comes with the Tizen SDK. It is located in tizen-studio/tools (adjust this path according to the location at which you installed Tizen Studio). The syntax for connecting is:

sdb connect

Sometimes I have to type the command twice before it takes effect. After the connection is successful open the Tizen Device Manager. You should see the TV connection within the UI. If you right-click on the connection you will have the option of selecting the TV’s DUID. Select this option and copy the DUID to the system clipboard. Keep the DUID on the system clipboard and when it is needed during the certificate generation it will automatically be pasted where it is needed.

If you at some point find that you need the TV extensions, don’t have them installed, and don’t see them in the the package manager you can install them using these instructions. https://developer.samsung.com/tv/develop/tools/tv-extension/download/

Creating a certificate based on the Device Uniuque ID (DUID) is slightly different for the two classes of displays. For the consumer displays a Samsung certificate should be created. For the commercial displays a Tizen certificate should be created. It can be a little confusing with Tizen being a Samsung creation. But you may be able to make better sense of it from another perspective. The Samsung certificate is associated with the Samsung App store. The consumer displays access the app store and the certificate rules for that are different than for apps that have no access to the App Store.

samsungremote

samsungtv

Creating a new Tizen Project for Samsung TVs

The objective of this entry while basic covers an easy mistake to make. It is a mistake that I have made. I’ve got a new Samsung Series 6 TV and I tried to deploy a new project to it. Errors were encountered, frustration levels were raised, but eventually I encountered success.

The Samsung TVs are more locked down than some of the other Tizen devices that I’ve worked with. The more recent ones are more locked down than some of the previous ones. When things go wrong this is what you might see.


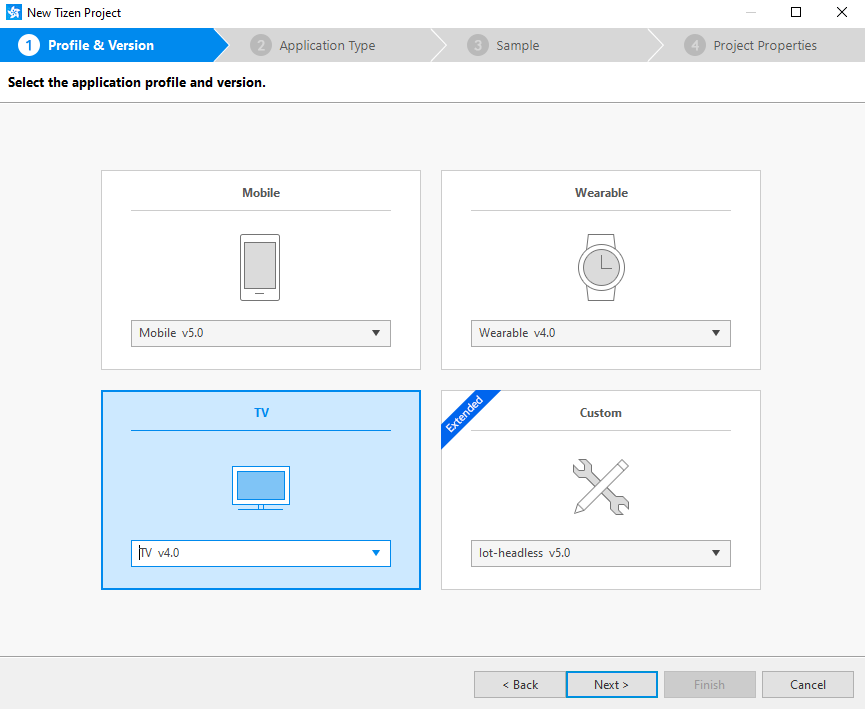
The TV I am using runs version 4 of the Tizen operating system. I make a new Tizen project and select to create the new project from the TV templates choosing Tizen 4 as the platform.

TizenNewProject

Attempts to debug the project created from this template fail. I get an error message stating:

Launching [your app name here] has encountered a problem
closed
   closed
     closed

The terminal output isn’t of much help.

Launching the Tizen application...
# If you want to see the detailed information,
# please set the logging level to DEBUG in Preferences and check the log file in 'C:\tizen-studio-data\ide\logs/ide-20191006_014055.log'.

[Initializing the launch environment...]
RDS: Off
Target information: UN43NU6900
Application information: Id(07DOxO8iKR.SystemInfo3), Package Name(07DOxO8iKR), Project Name([your app name here])
Unexpected stop progress...
(0.337 sec)

So what gives?  There are two ways to address this that are essentially two paths to the same destination. The manual solution involves editing a couple of configuration options in the files config.xml and .tproject.

The file .tproject is not visible in the Tizen IDE. But you can still open it through file -> open. This file is an XML file. There is an element named that has a sub-element . I changed the value here to tv-samsung-540. The other change in config.xml is on an element of the form . This needs to be changed to .

Why are these changes necessary? I don’t have full confirmation on this, but I believe it has to do with differences between a generic Tizen device and Samsung Tizen devices. At the time of this writing I know of no physical implementations of any non-Samsung TV Tizen devices. But it does exist as a specification.

The other solution would be performed at the creation of the project. When creating a new project do not select from the TV project templates. Instead select the Custom project templates. Within these templates there is a TV template subtype. If you choose this project type then you will start off with the configuration files mentioned above having the values that are needed.

As the Tizen operating system and the development environment are updated year to year more readers will read this entry after a new Tizen version has been released than before. It is likely that the exact values that you include here will be different than what I have used. You may need to update the values accordingly. But hopefully this will point you in the right direction.

Listing Applications on a Tizen Device

In a Tizen project I was working on I found that Tizen Web alone wasn’t enough to help me accomplish my goal. For some of the functionality that I needed a native application would be needed (more on that in another blog post). Rather than completely write the application in native code I was going to use HTML for the UI and a native service for other functionality. This is a Tizen Hybrid application.

The Tizen documentation wasn’t quite clear to me on what identifier to use when trying to launch a service packaged with an HTML application. It mentions using the App ID. This didn’t work for me. I only figured out the right name to use when I tried listing all of the applications and services on the device.

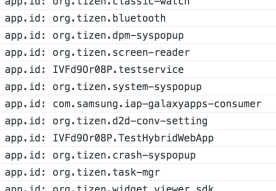
Getting a list of the applications and services is done through tizen.application.getAppsInfo. This function takes as a parameter a callback. The call back is given a list of the applications installed on the device. For my purposes I was only interested in the id member of the objects that were passed back.


tizen.application.getAppsInfo(
    function onListInstalledApps(applications) {
        console.log("List of Applications:");
        applications.forEach(
          function(app) {
    		console.log(`  app.id: ${app.id}`);
        });
    });

Once I saw the output of this it was easy to identify the problem I encountered with launching the service.

Screen Shot 2019-05-24 at 10.38.17 AM
Output of app listing code

According to the Tizen documentation when launching a service the ID string used is composed of the package ID and the app ID of the service. The package ID can be found in the confix.xml for the web application.  In the following you can see the package ID is “IVFd9Or08P”.

Screen Shot 2019-05-24 at 4.34.54 PM

The app ID can be found in then tizen-manifest.xml for the service project.

Screen Shot 2019-05-24 at 4.37.53 PM

The app ID here is “org.sample.service.” If you look in the output from the code sample for listing installed applications you will see that the service shows up as IVFd9Or08P.testservice. It is using the entry from the “exec” field instead of the appid field. I’m not sure why the documentation points to the appid only. But I’m happy to have figured out this problem.