
My interest in the Azure Kinect DK has increased since I was able to get my hands on one of the devices. Because of the Azure branding, I expected it to only be a streaming device for getting data into the Azure Cloud for processing. My expectation was wrong. While the device is supported by Azure branded services, it is a fully implemented device with local functionality of its own. In this post I will only give a brief introduction to the Azure Kinect DK. In the future, I will go deeper into the code.
The Azure Kinect DK comes with the camera itself, a USB-C to USB-A cable, and an external power supply. When connected to a computer that supports USB-C Power Delivery, only the USB-C cable is needed. The SDK for the Azure Kinect DK is available from Microsoft for free.
It works on Ubuntu Linux 18.04 in addition to working on Windows! To install the tools on Linux you can do the following.
sudo apt install k4a-tools
Physical Build
The Azure Kinect DK has a solid feel to the build. The body of the Kinect itself is an anodized aluminum. The back end of the Kinect is covered with a plastic sleeve that slides off to show additional mounting options. In addition to the standard quarter-inch screw mount that is commonly found on cameras, removing the sleeve on the underside of the the Azure Kinect DK exposes screw mounts on the side. The distance between the screw holes and the screw size is labeled. (The spacing of these holes can also be found on the Azure Kinect specifications page)

Field of View
There are three cameras on the device. An item being within the field of view (FoV) of one of the cameras does not indicate that it is within the FoV of all three of them. There are two depth sensing cameras: one with a narrow FoV and another with a wide FoV. There is also a color (RGB) camera. The following diagram is from Microsoft’s site showing the three fields of view of the cameras.
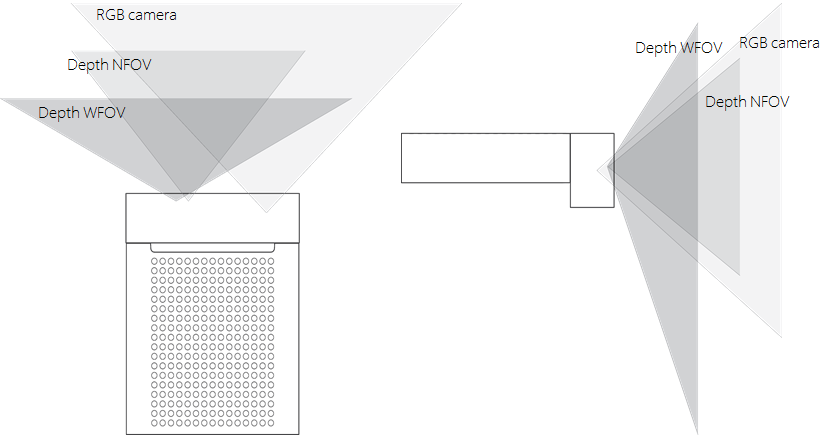
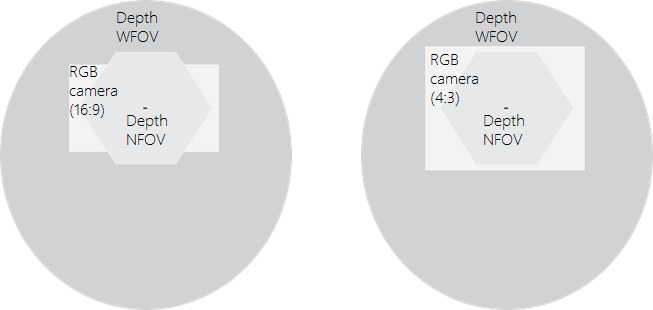
I thought that the following image was especially useful in showing the differences in the FoV. If the unit were facing a wall straight on from 2,000 meters this is the overlapping area of what each camera would be able to see. Note that the RGB camera can work in two aspect ratios 16:9 and 4:3.
Sensors
The Kinect has a number of sensors within it. The most obvious ones are in the cameras (RGB camera and depth camera). There is also a microphone array on the top of the Kinect. It is composed of 7 microphones. The computer sees it as a regular USB audio device.
Another sensor, and one that I did not expect, is the motion sensor. There is a 6-degrees of freedom sensor within it that samples at a rate of 1.6 KHz, though it only reports updates to the host at a rate of 208 Hz. The IMU is based on the LDM6DSMUS. The sensor is mounted within the unit, close to but not quite to the center of the unit.

Recording Data
Like the previous versions of the Kinect, with this version you can record a data stream from it to be played back later. Recording is done from a command line and allows the frame rate to be specified. The only thing the command line utility will not record is the signals to the microphones. The resulting file is an MKV file where the sensor data is within some of the other streams. I was successful at viewing the RGB stream in some third party video players. The Azure Kinect DK contains a utility that can be used to open these files and play them back.
Body Tracking
For body tracking a developer’s program grabs a sample from the camera and passes it through the Azure Kinect Tracker. The Tracker is a software component that can run either on the CPU or take advantage of the computational capabilities of the system’s GPU. After trying it out myself, I strongly encourage using the GPU. I am currently using a MacBook running Windows. With CPU based body tracking I wasn’t seeing the results that I was looking for. When I connected a NVIDIA GTX 1080 in an eGPU case I started to get body tracking rates of 20-25 FPS with two people in the scene.

Capturing Data
I would describe the Azure Kinect DK as a C++ first kit. Most of the documentation that I have found on it is in C++. Microsoft did release a .NET SDK for the device also. But I have often had to refer to the C++ documentation to get information that I need. The .NET SDK is close enough to the C++ APIs for the C++ documentation to be sufficiently applicable. A lot of the APIs were intuitive.
The SDK is 64-bit only. You may need to take into consideration when using it with other software components that may only be available in 32-bit. I have found it is easiest to add the needed software components to a project using the NuGet package manager. To only grab information from the Azure Kinect’s sensors the only package needed is Microsoft.Azure.Kinect.Sensor ( https://github.com/Microsoft/Azure-Kinect-Sensor-SDK ). If you plan on using the body tracking SDK then use the package Microsoft.Azure.Kinect.BodyTracking.Dependencies.cuDNN. There are other packages that are needed, but by adding this one the other dependencies will also be selected.
A system could be connected to multiple Azure Kinects. To know the number of available Kinects on a system, use the static method Device.GetInstalledCount(). To open a device, use the static method Device.Open(uint index). An open device does not immediately start generating data. To start retrieving data the device must be started with a DeviceConfiguration. The DeviceConfiguration sets the FPS and pixel formats for the camera.
DeviceConfiguration dc = new DeviceConfiguration();
dc.CameraFPS = FPS.FPS30;
dc.ColorResolution = ColorResolution.R1080p;
dc.ColorFormat = ImageFormat.ColorBGRA32;
dc.DepthMode = DepthMode.NFOV_2x2Binned;
With the device configuration a device is opened through the static method Device.Open(DeviceConfiguration). Calling StartCameras(DeviceConfiguration) puts the device in a state for retrieving data. Once the camera is started the device’s IMU can also be started to retrieve orientation data ( use StartImu() ).
The color image, depth image, and IR image are retrieved through a single function call. The GetCapture() method on the opened devices returns a Capture object that contains all of these images along with the device’s temperature. The device’s GetImuSample() returns information from the devices accelerometer and gyrometer. The images are returned in a structure that provides an array of bytes (for the image data) and other values that describe the organization of the image bytes.
Tracking People
To retrieve the information on the position of people within a capture a Tracker is necessary. A capture is added to the tracker’s queue and the queue outputs the positions of people within the scene. For the creation of a tracker a device’s calibration data and a tracker configuration are needed. A TrackerConfiguration object specifies whether to use the GPU or CPU for for processing. When using the GPU a specific GPU can be selected through the tracker configuration. The TrackerConfiguration also holds the orientation of the Kinect. In addition to the default positioning (the position it would be in if it were mounted on top of a tripod) the Kinect could be rotated to portrait mode or be positioned upside down.
TrackerConfiguration tc = new TrackerConfiguration();
tc.ProcessingMode = TrackerProcessingMode.Gpu;
tc.SensorOrientation = SensorOrientation.Default;
Tracker tracker = Tracker.Create(dev.GetCalibration(), tc);
Add a capture from a device into the tracker. Calling the PopResult() method will return the result (if it is ready). If the results are not ready within some length of time this method will throw an exception. The method accepts a TimeSpan object and a boolean value. The TimeSpan sets a new timeout value for waiting. The boolean, if set to true, will cause the method to throw an exception if a result is not available within the timeout period. If this value is set to false, then a null value is returned when a result is not ready, instead of an exception being thrown.
tracker.EnqueueCapture(ku.Capture);
//...
tracker.PopResult()
That provides enough information to collection information from an Azure. But once collected what can be done with it? In the next post on the Azure Kinect DK I will demonstrate how to use it to enhance user experiences and explore other modes of interaction that are made available through it.

Get the Azure Kinect DK on Amazon
![]()
![]()


Hi, I am buying a Kinect Azure, and am thankful for the info. But – how did you make work that Nvidia with the MacBookPro? which model of MBP and OS do you have? I want to replicate the setting…
Hi thanks for sharing thiss