I’ve used a Pi Pico before. But it has been a while, and I decided to jump back into it in furtherance of some other project I want to do. I’m specifically using a Pico W on a Freenove breakout board. The nice thing about this board is that all the GPIOs have status LEDs that lets you monitor the state of each GPIO visually. For those that might have immediate concern, the LEDs are connected to the GPIO via hex inverters instead of directly. This minimizes the interaction that they may have with devices that you connect to them.
Blinking the Light
About the first program that one might try with any micro controller is to blink a light. I accomplished that part without issue. But for those that are newer to this, I’ll cover in detail. Though I won’t cover the steps of setting up the SDK.
I’ve made a folder for my project. Since I plan to evolve this project to work with an infrared detector, I called my project folder irdetect. I’ve made two files in this folder.
CMakeList.txt– the build configuration file for the projectmain.cpp– the source code for the project
For the CMakeList.txt file, I’ve specified that I’m using the C++ 23 standard. This configuration also informs the make process that main.cpp is the source file, and that the target executable name will be irdetect.
cmake_minimum_required(VERSION 3.13)

include(pico_sdk_import.cmake)

project(test_project C CXX ASM)
set(CMAKE_C_STANDARD 11)
set(CMAKE_CXX_STANDARD 23) #Latest C__ Standard available
pico_sdk_init()

add_executable(irdetect
   main.cpp
)

pico_enable_stdio_usb(irdetect 1)
pico_enable_stdio_uart(irdetect 1)
pico_add_extra_outputs(irdetect)
The initial source code for blinking a LED is alternating the state of a random GPIO pin. Since I’m using a breakout board with LEDs for all the pins, I am not restricted to one pin. For the pin I selected, it is necessary to call gpio_init() for the pin, and then set its direction to output through gpio_set_dir(). If you don’t do this, then attempts to write to the pen will fail (speaking from experience!).
#include <stdio.h>
#include "pico/stdlib.h"
#include "hardware/gpio.h"
#include "pico/binary_info.h"
#include "pico/cyw43_arch.h"


const uint LED_DELAY_MS = 250; //quarter second
#ifdef PICO_DEFAULT_LED_PIN
const uint LED_PIN = PICO_DEFAULT_LED_PIN;
#else
const uint LED_PIN = 15;
#endif


// Initialize the GPIO for the LED
void pico_led_init(void) {
	gpio_init(LED_PIN);
	gpio_set_dir(LED_PIN, GPIO_OUT);
}

// Turn the LED on or off
void pico_set_led(bool led_on) {
	gpio_put(LED_PIN, led_on);
}

int main()
{
	stdio_init_all();
	pico_led_init();

	while(true)
	{
		pico_set_led(true);
		sleep_ms(LED_DELAY_MS);
		pico_set_led(false);
		sleep_ms(LED_DELAY_MS);
	}
	return 0;
}
To compile this, I made a subfolder named build inside of my project folder. I’m using a Pico W. When I compile the code, I specify the Pico board that I’m using.
cd build
cmake .. -DPICO_BOARD=pico_w
make
Some output flies by on the screen, after which build files have been deposited into the folder. the one of interest is irdetect.u2f. I need to flash the Pico with this. The process is extremely easy. Hold down the reset button on the Pico while connecting it to the Pi. It will show up as a mass storage device. Copying the file to the device will cause it to flash and then reboot. The device is automatically mounted to the file system. In my case, this is to the path /media/j2inet/RPI-RP2
cp irdetect.u2f /media/j2inet/RPI-RP2
I tried this out, and the light blinks. I’m glad output works, but now to try input.
Reading From a Pin
I want the program to now start off blinking a light until it detects an input. When it does, I want it to switch to a different mode where the output reflects the input. In the updated source I initialize an addition pin and use gpio_set_dir to set the pin as an input pin. I set an additional pin to output as a convenience. I need a positive line to drive the input high. I could use the voltage pin with a resistor, but I found it more convenient to set another GPIO to high and use it as my positive source for now.
#include <stdio.h>
#include "pico/stdlib.h"
#include "hardware/gpio.h"
#include "pico/binary_info.h"
#include "pico/cyw43_arch.h"


const uint LED_DELAY_MS = 50;
#ifdef PICO_DEFAULT_LED_PIN
const uint LED_PIN = PICO_DEFAULT_LED_PIN;
#else
const uint LED_PIN = 15;
#endif
const uint IR_READ_PIN = 14;
const uint IR_DETECTOR_ENABLE_PIN = 13;


// Initialize the GPIO for the LED
void pico_led_init(void) {
        gpio_init(LED_PIN);
        gpio_set_dir(LED_PIN, GPIO_OUT);

        gpio_init(IR_READ_PIN);
        gpio_set_dir(IR_READ_PIN, GPIO_IN);

        gpio_init(IR_DETECTOR_ENABLE_PIN);
        gpio_set_dir(IR_DETECTOR_ENABLE_PIN, GPIO_OUT);
}

// Turn the LED on or off
void pico_set_led(bool led_on) {
        gpio_put(LED_PIN, led_on);
}

int main()
{
        stdio_init_all();
        pico_led_init();
        bool irDetected = false;
        gpio_put(IR_DETECTOR_ENABLE_PIN, true);
        while(!irDetected)
        {
                irDetected = gpio_get(IR_READ_PIN);
                pico_set_led(true);
                sleep_ms(LED_DELAY_MS);
                pico_set_led(false);
                sleep_ms(LED_DELAY_MS);
        }

        while(true)
        {
                bool p = gpio_get(IR_READ_PIN);
                gpio_put(LED_PIN, p);
                sleep_us(10);
        }
        return 0;
}
When I run this program and manually set the pin to high with a resistor tied to an input, it works fine. My results were not the same when I tried using an IR detector.
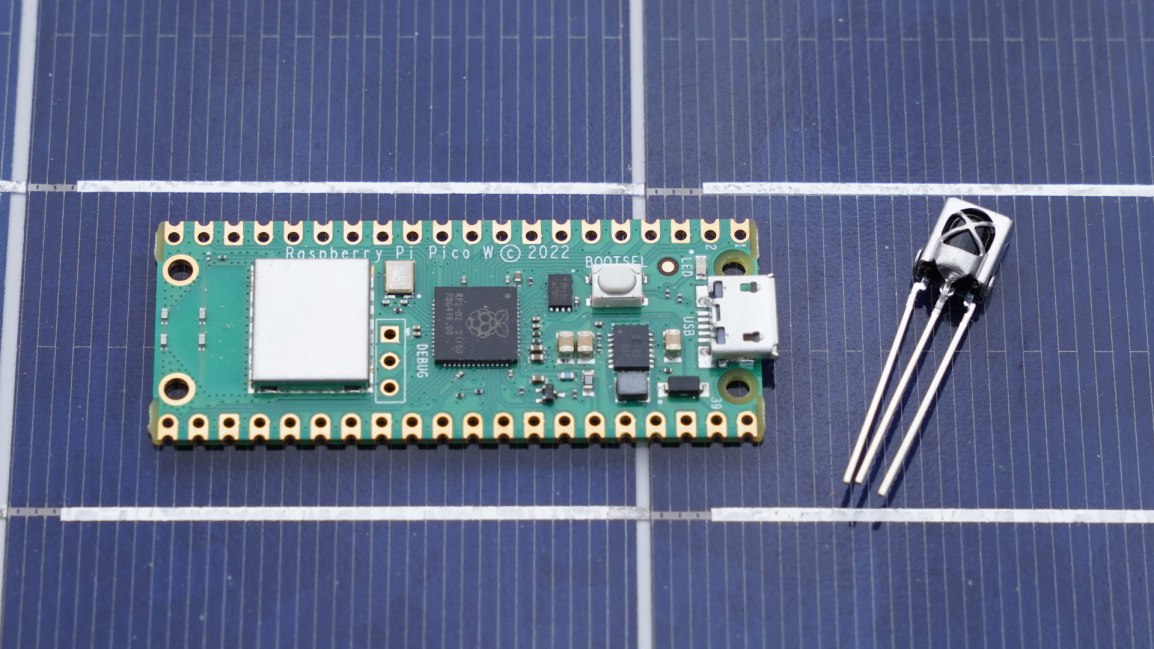
Adding an IR Detector
I have two IR detectors. One is an infrared photoresistor diode. This component has a high resistance until it is struck with infrared light. When it is, it becomes low resistance. Placing that component in the circuit, I see the output pin go from low to high when I illuminate the diode with an IR flashlight or aim a remote control at it. Cool.
I tried again with a VS138B. This is a three pin IC. Two of the pins supply it with power. The third pin is an output pin. This IC has a IR detector, but instead of detecting the presence of IR light, it detects the presence of a pulsating IR signal provided that the pulsing is within a certain frequency band. The IC is primarily for detecting signals sent on a 38KHz carrier. I connected this to my Pico and tried it out. The result was no response. I can’t find my logic probe, but I have an osciloscope. Attaching it to the output pin, I detected no signal. What gives?
This is where I searched on the Internet to find the likely problem and solutions. I found other people with similar circuits and problems, but no solutions. I then remembered reading something else about the internal pull-up resistors in Arduinos. I grabbed a resistor and connected my input pin to a pin with a high signal and tried again. It worked! The VS138B signals by pulling the output pin to a low voltage. I went to Bluesky and posted about my experience.

https://bsky.app/profile/j2i.net/post/3lgar7brqfs2n
Someone quickly pointed out to me that there are pull-up resistors in the Pi Pico. I just must turn them on with a function call.
I updated my code, and it works! When I attach the detector to the scope, I also see the signal now.
Now that I can read, the next step is to start decoding a remote signal. Note that there are already libraries for doing this. I won’t be using one (yet) since my primary interest here is diving a bit further into the Pico. But I do encourage the use of a third-party library if you are aiming to just get something working with as little effort as possible.
Code Repository
While you could copy the code from above, if you want to grab the code for this, it is on GitHub at the URL https://github.com/j2inet/irdetect/. Note that with time, the code might transition to something that no longer resembles what was mentioned in this post.
Posts may contain products with affiliate links. When you make purchases using these links, we receive a small commission at no extra cost to you. Thank you for your support.
Mastodon: @j2inet@masto.ai
Instagram: @j2inet
Facebook: @j2inet
YouTube: @j2inet
Telegram: j2inet
Bluesky: @j2i.net

