If you need to delete a directory in Windows, the function RemoveDirectory is useful if the directory is empty. If the folder is not empty, you don’t need to implement recursive logic. The shell API function SHFileOperation is likely the function that you want to use. To use this function include the header <shellapi.h>. The SHFileOperation can perform various file operations, but the one we are most interested in is deletion. For those of you looking for something quick to copy-and-paste, here is the code.
Other code that you may encounter might use pointer data types to perform this same task. I tend minimize managing memory myself. Instead of using pointers to characters as strings, I used types from the standard library. std::wstring and std::vector<WCHAR> are used instead. When pointers to data types are needed, std::wstring::c_str() and std::vector<WCHAR>::data() can be used to supply them. The function I provide here accepts the full path to the folder to be deleted as a std::wstring. That path is copied to the std::vector<WCHAR>. In addition to the text data being copied, two nulls are copied to the end of the data. This is a requirement of the SHFileOperation function for our purpose. Appending a L'\0\0' to the end of the std::wstring does not result in those null characters being present when we use std::wstring::c_str() to get a WCHAR pointer to the data.
A SHFILEOPSTRUCT structure must be populated with the parameters needed for the operation that we would like to perform. Setting it to { 0 } at initialization will set all of the fields in the structure to zero. This is great for structures where zero or null values are what one wants to set as the default values. The fields that we do populate are
hwnd – The handle to the owner window. This can be set to NULL.
wFunc – Set to a value for the operation that we want to perform. FO_DELETE is the value to use for deletion.
pFrom – Set to the double – null terminated string containing the path to the folder to be delete
lpszProgressTitle – Set to a title to show in a UI window that shows the progress of the operation
fFlags – flags for various operations. The operations selected here include
FOF_NOCONFIRMATION – don’t ask the user for confirmation
FOF_NOERRORUI – don’t show an error UI if the operation fails
FOF_SILENT – don’t show the UI.
In testing this, my results have generally been success or 0x7c (for invalid name). The invalid name return value was encountered when a directory had already been deleted (in which case the value passed really was not a valid identifier for a directory!).
Posts may contain products with affiliate links. When you make purchases using these links, we receive a small commission at no extra cost to you. Thank you for your support.
When creating an application, if we want our own application to be the topmost window, many UI APIs have a call or setting that we can alter to ensure that is how our window displays. For a client, we were asked to make a third-party application that always appeared on top of other windows. Contacting the application vendor, we found that there was no way to do this within the range of settings that we have access to. Nor was there likely to be a method available on our timelines. This isn’t a serious problem though; we can use some Win32 APIs to alter the window settings ourselves.
This is something that is only to be done as a last resort. Manipulating the internal settings of another application can come with risks. When doing something like this, it should be done with a significant amount of testing. To accomplish this task, we only need to get a handle of the window that we wish to affect and call SetWindowPos with the argument HWND_TOPMOST. That’s the easy part. The less obvious part is how does get their hands on the handle of another window. The FindWindows API can be used to get the handle of a Window based either on the window title or the window class name. For the Notepad application on Windows 10, the name of the window class is simply Notepad. We could also get access to a Notepad window if we use the text string that shows up in its title bar. For flexibility, put this functionality into an application or have it use FindWindow up to 2 times so that I can attempt to find the window by the class name or the title. The value to be used here is passed as a command line parameter. In C++, we end up with an application that has the following source code. The application calls these Windows API in a loop. This allows it to have an effect if the target application hasn’t presented a window or if the application closes and reopens.
// AlwaysOnTop.cpp : This file contains the 'main' function. Program execution begins and ends there.
//
#include <iostream>
#include <Windows.h>

void ShowInstructions()
{
    std::wcout << L"Usage:\rn"
        L"AlwaysOnTop.exe[window - name]\r\n"
        L"[window - name] should be either the\r\n"
        L"window or the name of the window class. " << std::endl;
}

int wmain(int argc, wchar_t** argv)
{
    HWND windowHandle = nullptr;
    std::wstring windowName ;
    if (argc < 2) {
        ShowInstructions();
        return -1;
    }

    windowName = std::wstring(argv[1]);

    while (true)
    {
        windowHandle = NULL;
        while (windowHandle == NULL)
        {
            windowHandle = FindWindow(windowName.c_str(), nullptr);
            if (windowHandle == nullptr)
            {
                windowHandle = FindWindow(nullptr, windowName.c_str());
            }
            if (windowHandle == nullptr)
            {
                Sleep(3500);
            }
        }
        std::wcout << "Window handle found for " <<windowName << " }. \r\nSetting to top most window";
        while (true) {

            SetWindowPos(windowHandle, HWND_TOPMOST, 0, 0, 0, 0, SWP_NOMOVE | SWP_NOSIZE);
            SetForegroundWindow(windowHandle);
            Sleep(7500);
        }
    }
}
I’ve found that native executables tend to set off alarms for a security application that we use. The security application isn’t as sensitive to .Net executables. I have the source code in .Net also. It calls the same Windows APIs in the same order.
using System.Runtime.InteropServices;

namespace AlwaysOnTop.Net
{
    internal class Program
    {
        [DllImport("user32.dll", SetLastError = true)]
        private static extern IntPtr FindWindow(string lpClassName, string lpWindowName);

        [DllImport("user32.dll", SetLastError = true)]
        private static extern bool SetWindowPos(IntPtr hWnd, IntPtr hWndInsertAfter, int X, int Y, int cx, int cy, uint uFlags);


        [DllImport("user32.dll")]
        static extern IntPtr SetFocus(IntPtr hWnd);

        [DllImport("User32.dll")]
        static extern int SetForegroundWindow(IntPtr hWnd);

        // Constants for nCmdShow
        const int SW_HIDE = 0;
        const int SW_SHOW = 5;
        const uint SWP_NOSIZE = 0x0001;
        const uint SWP_NOZORDER = 0x0004;
        const uint SWP_NOMOVE = 0x002;
        const int HWND_TOPMOST = -1;
        static readonly IntPtr HWND_TOP = IntPtr.Zero;


        static void ShowInstructions()
        {
            Console.WriteLine(
@"Usage:

AlwaysOnTop.Net.exe [window-name]

[window-name] should be either the
window name or window class.
"
            );
        }

        static void Main(string[] args)
        {
            if(args.Length < 1)
            {
                ShowInstructions();
                return;
            }
            string windowName = args[0];


            IntPtr windowHandle = IntPtr.Zero;

            while(true)
            {
                while (windowHandle == IntPtr.Zero)
                {
                    windowHandle = FindWindow(windowName, null);
                    if (windowHandle == IntPtr.Zero)
                    {
                        windowHandle = FindWindow(null, windowName);
                    }
                    if(windowHandle == null)
                    {
                        Thread.Sleep(3500);
                    }
                }
                Console.WriteLine($"Window handle found for {windowName}. \r\nSetting to top most window");
                while(true){

                    SetWindowPos(windowHandle,  HWND_TOPMOST, 0, 0, 0, 0, SWP_NOMOVE | SWP_NOSIZE);
                    SetForegroundWindow(windowHandle);
                    Thread.Sleep(7500);
                }
            }
        }
    }
}
For applications where the class of the top-most window is not known, what do we do? I threw together one other application to get that information. With this other application, I would start the application whose information I want to acquire, then run my command line utility, saving the CSV text that it outputs. The name of the application is ListAllWindows.exe (descriptive!). The Win32 function EnumWindows enumerates all top-level windows and passes a handle to them to a callback function. In the callback, I save the window handle. With a window handle, I can call GetWindowClass() function to get the class name as a WCHAR array. This gets packaged as a std::wstring (those are safer).
In the second column of this CSV, the names of the Window classes show along with the path to the executable that they belong to. Oftentimes, an application may have more than one top-level window. Figuring out which don’t to use comes down to experimentation. Be prepared to start the program several times.
Posts may contain products with affiliate links. When you make purchases using these links, we receive a small commission at no extra cost to you. Thank you for your support.
In a previous post, I mentioned that I was re-introducing myself to development for the Pi Pico. The Pico is a microcontroller, often compared to an Arduino, that can be programmed from a Linux, Mac, or Windows machine. The Pico is based on the RP2040 chip. This is an ARM based Cortex-M0 dual core processor, generally running between 125 and 133 MHz. It has 264 KB of SRAM, 2 MB of flash memory, 26 general purpose IO pins, some of which support additional functionality. The other functionality overlaid on these pins includes
2 UART pins
2 SPI controllers
2 I2C controllers
16 PWM channels
There are several development boards that use the RP2040. Collectively, I generically refer to all of these as Pico. It is a bit easier to say then “RP2040 based board.”
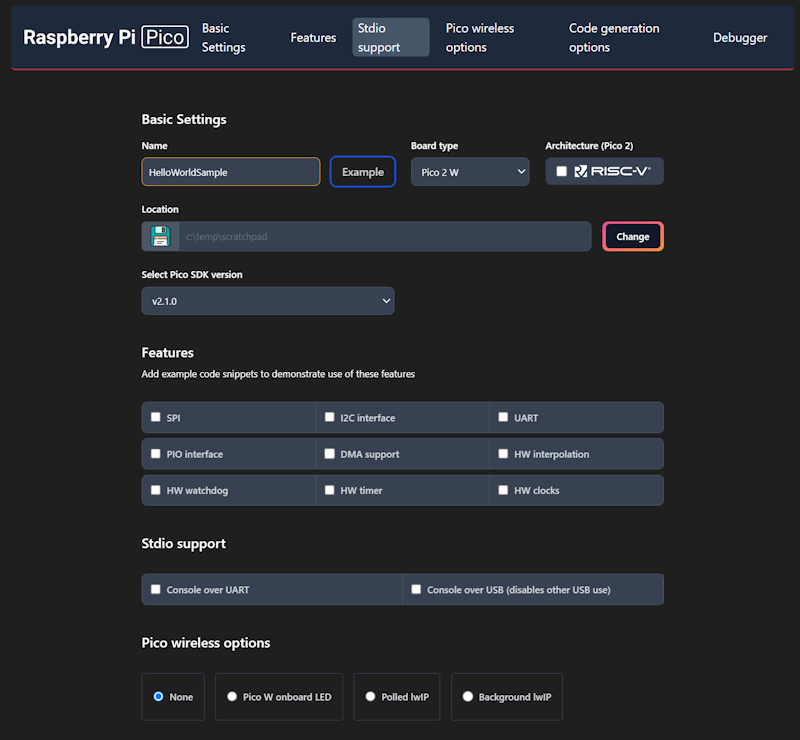
I already had a few machines setup for development for the Raspberry Pi Pico. While that procedure still works, as do those development machines, I was recently reintroducing myself to Pico development. I started with a clean installation and went to the currently published instructions for setup. The more recent instructions are a lot easier to follow; there are less dependencies on manually setting paths and downloading files. The easier process is made possible through a Visual Studio Code plugin. This extension, which is still labeled as a zero version at the time that I am making this post (0.17.3) adds project generation and sample code along with scripts and automations for common tasks. To get started, just Install the Raspberry Pi Pico Visual Studio Code Extension. Once it is installed, you’ll have a new icon on the left pane of VS Code for Pico related tasks.
The first time you do anything with this icon, expect it to be slow. It installs the other build tools that it needs on-demand. I prefer to use the C++ build tools. Most of what I write here will be focused on that. I’ll start with creating a new C++ project. Double-clicking on “New C/C++ Project” from the Pico tools panel gets the process started.
This will only be a “Hello World” program. We will have the Pico print a message to a serial port in a loop. The new project window lets us specify our target hardware, including which hardware features that we plan to use. Selecting a feature will result in the build file for the project linking to necessary libraries for that feature and adding a small code sample that access that feature. Select a folder in which the project folder will be created, enter a project name, and check the box labeled “Console over USB.” After selecting these options, click on the “Create” button.
This is the part that takes a while the first time. A notification will show in VS Code stating that it is installing the SDK and generating the project. The wait is only a few minutes. While this is executing, it is a good time to grab a cup of coffee.
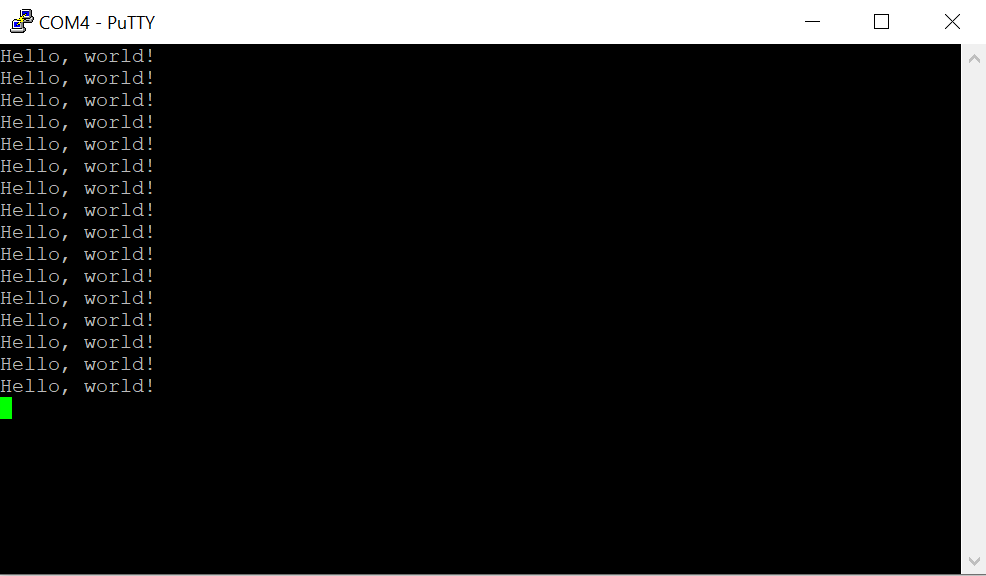
When you get back, you’ll see VS Code welcome you with a new project. The default new project prints “Hello, world!\n” in a loop with a 1 second delay. Grab your USB cable and a Pico. We can immediately start running this program to see if the build chain works. On the Pico, there’s a button. Connect your USB cable to your computer, then connect the Pico, making sure you are holding down this button as you connect it. The Pico will show up on your computer as a writable drive. After you’ve done this, take note of which serial ports show up on your computer. In my case, I’m using Windows, which shows that Com1 is the only serial port. In VS Code, you now have several tasks for your project that you can execute. Double-click on Run Project (USB). The code will compile, deploy to the Pico, and the Pico will reboot and start running the code.
Check to see what serial ports exist on your computer now. For me, there is a new port named Com4. Using PuTTY, I open Com4 at a baud rate of 115,200. The printed text starts to show there.
Using the USB UART for output is generally convenient, but at time you may want to use the USB for other features. The USB output is enabled or disabled in part through a couple of lines in the CMakeList.txt file.
The 1 and 0 can be interpreted as meaning enable and disable. Swap these values and run the project again by disconnecting the Pico, reattach while pressing the button, and then selecting the Run Project (USB) option from VS Code. When you run the code this time, the output is being transmitted over GPIO pins 0 and 1. But how do we read this?
FTDI USB
FTDI is the name of an integrated circuit manufacturer. For microcontroller interfacing, you might often see people refer to “FTDI USB” cables. These are USB devices that have 3 or 4 pins for connecting to other serial devices. These are generally cheaply available. The pins that we care about will be labeled GND (Ground), TX (Transmit), and RX (Receive). The transmit pin on one end of a serial exchange connects to the receive end on the other, and vice versa. On the Pico, the default pins used for uart0 (the name of our serial port) are GP0 for TX and GP1 for RX. When connecting an FTDI device, connect the FTDI’s RX to the Pico’s TX on GPO, then the FTDI’s TX to the Pico’s RX (on GP1), and finally the FTDI’s ground to the Pico’s ground.
GPIO – Setting a Pin
Many, Pico’s have a LED attached to one of the pins that is immediately available for test programs. While many do, not all do. On the Pi Pico and Pi Pico 2, GPIO 25 is connected to a LED. On the Pi Pico W, the LED is connected to the WiFi radio and not the RP2040 directly. For uniformity, I’ll drive an external LED. I’ve taken a LED and have it connected in series with a resistor. 220Ω should be a sufficient value for the resistor. I’m connecting the longer wire of the LED to GP5 and the shorter pin to ground.
In the code, the pin number is assigned to a #define. This is common, as it makes the code more flexible for others that may be using a different pin assignment. Before we can start writing to the pin, we need to gall an initialize function for the pin number named gpio_init(). After the initialization, we need to set the pin to be either in input or output mode. Since we are going to be controlling a LED, this needs to be output mode. This is done with a call to gpio_set_dir() (meaning “set direction”) passing the pin number as the first argument, and the direct (GPIO_IN or GPIO_OUT) as the second argument. For writing, we use GPIO_OUT. With the pin set to output, we can drive the pin to a high or low state by calling gpio_put(). The pin number is passed in the first argument, and a value indicating whether it should be in a high or low state in the second argument. A zero value is considered low, while a non-zero value is considered high. To make it apparent that the LED is being driven by our control of the pin (and not that we just happened to wire the LED to a pin that is always high) we will turn the light on and off once per second. In a loop, we will turn the light on, wait half a second, turn the light off, and wait again.
When we run the code now, we should see the light blink.
Up Next: Programmable IO – The Processor within the Processor
While the GPIO system can be manipulated by the main processor core, there are also smaller processors on the silicon that exist just for controlling the GPIO. These processors have a much smaller reduced set but are great for writing deterministic code that controls the pins. This system of sub-processors and the pins that they control are known as “Programmable IO.” They are programmed using assembler. There’s much to say about PIO. In the next post that I make on the Pico, I’ll walk you through an introduction to the PIO system.
Posts may contain products with affiliate links. When you make purchases using these links, we receive a small commission at no extra cost to you. Thank you for your support.
In exploring aspects of Java Card programming, I’ve been using some of my older bank cards. A question that came to mind is how does one identify the issuer of a card. I didn’t see that information explicitly encoded into the information that I could retrieve from the card. I did find the information. It is implicitly there. It can be inferred from the first few numbers of the account number that the card returns. Generally at least the first 6 numbers are needed to identify the bank. Though there are a few banks that only need 4 digits, and a few that need as much as 8 to identify. These prefixes are called Bank Identification Numbers (BIN).
There are a few reasons why someone might want to identify the card issuer. There have been promotionals from agreements between vendors and banks where the vendor gives a discount or early access to those that purchase with a card from a specific bank. There are also some banks associated with higher rates of charge-backs. One might want to take additional precautions in those instances. Card issuers also tend to be associated with a specific country. A card number could be used for establishing presence within some country.
Inferring the issuer is just a matter of finding the entry in a list of prefixes that matches the prefix of the account number in question. I’ve made two code examples available for doing this. One is written in C#, the other in C++. You can find them both in GitHub at this URL: https://github.com/j2inet/binLookup. For both code examples, I’ve included a list of prefixes and banks in embedded resources. This minimizes the number of files that must be as the executable is moved around. It also prevents a casual user from doing something that may be damaging to the data.
I’ve searched, but I’ve not found that there exists a unified updated list of Bank Identification Numbers. The source from which I acquired these said that he found them in the WayBackMachine that attributed the entry to an old, now deleted Wikipedia article. This information is only in furtherance of a code exmple, and is not to be relied upon for anything beyond example.
Posts may contain products with affiliate links. When you make purchases using these links, we receive a small commission at no extra cost to you. Thank you for your support.
I opened an old Direct3D program and tried recompiling it, only get the error LNK2001 Unresolved external symbol WKPDID_D3DDebugObjectName. This is obviously an error from a definition for an element missing. I checked the source code and I saw that the object of interest was defined in d3dcommon.h. Confusing at first, but I finally realized that for the object to be resolved by the linker I needed to include dxguid.lib in the project. There are a few ways to link to a library. I prefer to explicitly link in source code instead of linking in the project settings. In one of my sources files, I only needed to include the following.
#pragma comment(lib, "dxguid.lib")
I only need this file linked when I am compiling in debug mode. A conditional compilation statement wrapped around this will take care of making it conditionally linked.
With that change, the program compiles and the error has gone away!
For those curious, the D3D program in question is something I have appended in the C++ Application Base Class project. One day I intend to make a base class for a D3D program base class to go along with the D2D base class. The beginnings of my experimentation for it are within that project.
Posts may contain products with affiliate links. When you make purchases using these links, we receive a small commission at no extra cost to you. Thank you for your support.
Some organizations and entities (including the White House) have advised against using C/C++ and use memory safe languages with memory safe features instead. While I can understand the motivation for such encouragement, realistically complete abandonment of the language isn’t practical. Managing low-level resources in other languages can both be cumbersome and doesn’t necessarily insulate someone from resource leaks. There are not always higher-level libraries available for functionality that one wishes to use; they may have to build a library themselves and embrace management of those low level resources. But that said, when writing code in C++, one can use safer approaches to doing so. One approach is to use std::shared_ptr<T> instead of using pointers directly.
Shared pointers implement reference counters and will delete the underlying memory once that reference count reaches zero. This is a feature that is often common in some other high level languages. Instead of using the new and delete commands to allocate and release memory, one could use std::make_shared. For other blocks of data for which you might have manually allocated memory, you could use other standard template library classes, such as using a std::vector instead of an array.
Sometimes a resource in question was allocated by the operating system. It may be up to the developer to manage the release or deletion of the object. These can still be managed with std::shared_ptrs<T> objects. Let’s take a look at a simple program that reads a program into a buffer,
There first thing I see that can be replaced is a call to the new and delete that could be removed. I’ll replace the use of this buffer with a vector<T>. Since I am using a vector, I don’t need to explicitly allocate and deallocate memory. Instead, I can specify how much memory is needed in its declaration. When the std::vector falls out of scope, it will be deallocated automatically. I do make use of a pointer to the vector’s memory. It is accessible through the method std::vector<T>::data(). The ReadFile method needs a pointer to the memory in which it will deposit its data. That’s provided by way of this method.
There is also a HANDLE variable used for managing the file. It is named hFile. I’ve written on wrapping these in unique pointers before. You can read about that here. In that post, I implemented a Functor that contains the definition for how the handle is to be deleted. Rather than manually ensure I associate the functor with the shared pointer, I had also made a function that would handle that for me to ensure it is done the same way every time. This can also be used with a std::shared_ptr<T>. Though you should generally only do this if you really need to share the resource with more than one object. On a unique pointer, the deleter is part of the object type. On a shared pointer, the deleter is not part of the type, but is stored in instance data for the pointer. I’ll replace my usage of CreateFile (the Win32 function) with wrapper function that returns the handle as a std::shared_ptr. That wrapper function looks like this.
In the following, you can see the new implementation of my main() method. Notice that in the ReadFile method for the std::shared_ptr<T> that I am calling its get() method to pass the HANDLE value to the function. I’m nolonger explicitly invoking the call to CloseHandle(). Instead, when the main() method returns, the deleter will be invoked indirectly. If you set a breakpoint on it you’ll see when this happens.
You’ll see use of this soon in an upcoming post on SmartCards. The code examples for it make Windows API calls to the Smart Card functions. I’ll be making use of shared pointers with deleters for managing the resources in that project.
Posts may contain products with affiliate links. When you make purchases using these links, we receive a small commission at no extra cost to you. Thank you for your support.
Though I feel like it has become a bit of a niche language, I enjoy coding with C++. It was one of the earliest languages I learned while in grade school. In one of the projects I’m playing with now, I need to iterate though a map. I find the ways in which this has evolved over C++ versions to be interesting and wanted to show them for comparison. I’m using Visual C++ 2022 for my IDE. It supports up to C++ 20. Though it defaults to C++ 14.
Chaning the C++ Version
To try out the code that I’m showing here, you’ll need to know how to change the C++ version for your compiler. I’ll show how to do that with Visual C++. If you are using a different compiler, you’ll need to check your references. In a C++ project, right-click on the project from the Solutions Explorer and select “Properties.” From the tree of options on the left select Configuration Properties->C/C++->Language. On the right side, the option called C++ Language Standard will let you change the version. The options there at the time that I’m writing this are C++ 14 Standard, C++ 17 Standard, and C++ 20 Standard.
Examples on How to Iterate
A traditional way that you will see for iterating involves using the an iterator object for a map. If you look in existing C++ source code, you are likely to encounter this method since it has been available for a long time and is still supported in newer C++ versions. This follows the same pattern you will see for iterating through other Standard Template collections. Though its recognizable to those that use the Standard Template Library in general, it does use pointers which have some risks associated with them. Note that I am using the C++ 11 auto keyword for the compiler to infer the type and make this code more flexible.
for (auto map_iterator = shaderMap.being(); map_iterator != shaderMap.end(); map_iterator++)
{
     auto key = map_iterator->first;
     auto value = map_iterator->second;
}
A safer method would avoid the use of pointers all together. With this next version we get an object on which we can directly read the values. I use references to the item. In optimized compilers the reference ends up being purely notational and doesn’t result in an operation. I also think this looks cleaner than the previous example.
The last version that I’ll show works in C++ 17 and above. This makes use of structured bindings. In the for-loop declaration, we can name the fields that we wish to reference and have variables for accessing them. This is the method that I prefer. It generally looks cleaner.
for (auto const& [key, blob] : shaderMap)
{

}
Why not just show the “best” version?
Best is a bit subjective, and even then, it might not be available to every project. You might have a codebase that is using some other than the most recent version of the C++ language. Even if your environment does support changing the language, I wouldn’t select arbitrarily doing so. Though the language versions generally maintain backwards compatibility, changing the language is making a sweeping change where, for a complex project, could have unknown effects. If there is a productivity reason for making the change and the time/resources are available for fully testing the application, then proceeding might be worth considering for you. But I discourage giving into temptation to use the newest version only because it is newer.
Shared pointers are objects in C++ that manage pointers. As a pointer to an object is passed around, copied, or deleted a shared pointer keeps track of how many references there are to the object that it refers to. When all references to the object are destroyed or go out of scope, the shared pointer will delete the object and free its memory. This has the effect of smart pointers in C++ acting almost like a managed memory environment. The burden on the developer to managming emory is pleasantly diminished.
The standard template library offers, among others, the class std::shared_ptr for creating shared pointers. There are some other classes, such as std::unique_ptr with special behaviours (in this case, ensuring that only one reference to the object exists). std::shared_ptr also lets the developer specify a custom delete for the object; if there is some specific behaviour needed for when an object is being deallocated, this feature could be used to support that. These are the signatures for some of the constructors that allow custom deleters
template< class Y, class Deleter> shared_ptr( Y* ptr, Deleter d );
template< class Deleter> shared_ptr( std::nullptr_t ptr, Deleter d );
template< class Y, class Deleter, class Alloc > shared_ptr( Y* ptr, Deleter d, Alloc alloc );
template< class Deleter, class Alloc> shared_ptr( std::nullptr_t ptr, Deleter d, Alloc alloc );
template< class Y, class Deleter> shared_ptr( std::unique_ptr<Y, Deleter>&& r );
Structures like this are not limited to being used only for pointers. They can be used for other resources too. My interest was in using them to manage handles for Windows objects, specificly handles. Handles are values that identify a system resource, such as a file. Their value is not for a memory address, but is a generally opaque numeric identifier. Think of it as an ID number. When the object that a handle refers to is nolonger needed, it should be freed with a call to CloseHandle().
I was working with a program written in C/C++ for Windows and writing a function to load the contents of a file. This is the original function.
Well, that’s not actually the original. In the original, I forgot to make the call to CloseHandle(). Forgetting to do this could lead to resource leaks in the program or the file not being available for writing later because a read handle is still open. For my end goal, this won’t be the only file that I use, nor will files be the only type of handles. I wanted to manage these in a safer way. Here, I use the std::unique_ptr to manage handles. I’ll make a custom deleter that will close a handle.
My custom deleter is implemented as a functor. A functor is a type of object that can be used as a function. Often these are used in callback operations. Functors, unlike typical functions, can also have state. In C++ functors are generally constructed by defining the operator() for the object. operator() can take any number of arguments. For my purposes, it only needs one argument. That’s the HANDLE to be closed. A HANDLE can have two values that indicate it isn’t referencing a value object. There is a constant, INVALID_HANDLE_VALUE (whose literal value is -1) and 0. To ensure CloseHandle() isn’t called on an invalid value, I need to check that the value passed is not either of these values and only call CloseHandle() if neither of these values was passed.
Since there will only ever be one object accessing my file handles, I’ll be using std::unique_ptr for my file handles. With the above declaration I could begin using std::unique_ptr objects immediately.
auto myFileHandle = std::unique_ptr<void, HANDLECloser>(hFile);
That’s a lot to type though. In the interest of brevity, let’s make a declaration so that we can invoke that with less keystrokes.
using HANDLE_unique_ptr = std::unique_ptr<void, HANDLECloser);
With that in place, the previous call to initialize a unique pointer could be shortened to the following.
auto myFileHandle = HANDLE_unique_ptr(hFile);
That’s a bit more concise. Let’s add one more thing. Generally, I would be using this with the Win32 CreateFile function. Let’s make a CreateFileHandle() function that takes the same parameters as CreateFile but returns our std::unique_ptr for our file handle.
There are some other good bits of code in the project from which I took this code that I plan to share in the common weeks. Some parts are simple but useful, other parts are more complex. Come back in a couple of weeks for the next bit that I have to share.
Posts may contain products with affiliate links. When you make purchases using these links, we receive a small commission at no extra cost to you. Thank you for your support.
Note Added 2025 March 10 – These instructions no longer work. Google has dropped support for using MSVC. It is still possible to build on Windows using Clang. But this presents new challenges, such as linking CLang binaries to MSVC binaries. More information on this change can be found in a Google Group discussion here.
Note Added 2024 September 3 – I tried to follow my own instructions on a whim today and found that some parts of the instructions don’t work. I made my way through them with adjustments to get to success.
I decided to compile the Google V8 JavaScript engine. Why? So that I could include it in another program. Google doesn’t distribute the binaries for V8, but they do make the source code available. Compiling it is, in my opinion, a bit complex. This isn’t a criticism. There are a lot of options for how V8 can be built. Rather than making available the permutations of these options for each version of V8, one could just set options themselves and build it for their platform of interest.
But Isn’t There Already Documentation on How to Do This?
There does exists documentation from Google on compiling Chrome. But there are variations from those instructions and what must actually be done. I found myself searching the Internet for a number of other issues that I encountered and made notes on what I had to do to get around compilation problems. The documentation comes close to what’s needed, but isn’t without error and deviation.
Setting Up Your Environment
Before touching the v8 source code, ensure that you have installed Microsoft Visual Studio. I am using Microsoft Visual Studio 2022 Community Edition. There are some additional components that must be installed. In an attempt to make this setup process as scriptable as possible, I’ve have a batch file that will have the Visual Studio Installer add the necessary components. If a component is already installed, no action is taken. Though the Google V8 instructions also offer a command to type to accomplish the same thing, this is where I encountered my first variation from their instructions. Their instructions assume that the name of the Visual Studio Installer command to be setup.exe (it probably was on a previous version of Visual Studio) where my installer is named vs_installer.exe. There were also additional parameters that I had to pass, possibly because I have more than one version of Visual Studio installed (Community Edition 2022, Preview Community Edition 2022, and a 2019 version).
You may need to make adjustments if your installer is located in a different path.
While those components are installing, let’s get the code downloaded and put int place. I did the download and unpacking from powershell. All of the commands that follow were stored in a power shell script. Scripting the process makes it more repeatable and is easier to document (since the scripts are also a record of what was done). You do not have to use the same file paths that I do. But if you change them, you will need to make adjustments to the instructions when one of these paths is used.
I generally avoid placing folders directly in the root. The one exception to that being a folder I make called c:\shares. There’s a structure that I conform to when placing this folder on Windows machines. For this structure, Google’s code will be placed in subdirectories of c:\shares\projects\google. In the following script you’ll see that path used.
After this script completes running, Visual Studio should have the necessary components and the V8/Chrome development tools are downloaded and in place.
There are some environment variables on which the build process is dependent. These variables could be set within batch files, could be set to be part of the environment for an instance of the command terminal, or set at the system level. I chose to set them at the system level. This was not my first approach. I set them at more local levels initially. But several times when I needed to open a new command terminal, I forgot to apply them, and just found it easier to set them globally.
From here on, we will be using the command prompt, and not PowerShell. This is because some of the commands that are part of Google’s tools are batch files that only run properly in the command prompt.
From the command terminal, run the command gclient. This will initialize the Google Tools. Next, navigate to the folder in which you want the v8 code to download. For me, this will be c:\shares\projects\google. The download process will automatically make a subfolder named v8. Run the following command.
fetch --nohistory v8
This command can take a while to complete. After it completes you will have a new directory named v8 that contains the source code. Navigate to that directory.
cd v8
The online documentation that I see from Google for v8 is for version 9. I wanted to compiled version 12.0.174.
git checkout 12.0.174
Update 2025 March 7
Reviewing the instructions now, I find that the above command fails. It may be necessary to fetch the labels for the versions with the following commands to get version 13.6.9.
git fetch --tags
git checkout 13.6.9
Today I am trying to only rebuild v8 for Windows. Eventually I’ll rebuild it for ARM64 also. Run the following commands. It will make the build directories and configurations for different targets.
The build arguments for each environment are in a file named args.gn. Let’s update the configuration for the x64 debug build. To open the build configuration, type the following.
notepad out.gn\x64.debug\args.gn
This will open the configuration in notepad. Replace the contents with the following.
Chances are the only difference between the above and the initial version of the file are from the line v8_monolithic onwards. Save the file. You are ready to start your build. To kick off the build, use the following command.
ninja -C out.gn\x64.debug v8_monolith
Update 2024 September 3 – Compiling this now, I’m encountering a different error. It appears the compilier I’m using takes issues with some of the nested #if directives in the source code. There was in in src/execution/frames.h around line 1274 that was problematic. It involved a line concerning enabling V8 Drumbrake. Nope, I don’t know what that is. This was for a call to DCHECK, which is not used in production builds. I just removed it. I encountered similar errors in src/diagnostics/objects-debug.cc, src\wasm\wasm-objects.cc,
This will also take a while to run, but this will fail. There is a third party component that will fail concerning a line in a file named fmtable.cpp. You’ll have to alter a function to fix the problem. Open the file in the path .\v8\third_party\icu\source\i18n\fmtable.cpp. Around line 59, you will find the following code.
Save the file, and run the build command again. While that’s running, go find something else to do. Have a meal, fly a kite, read a book. You’ve got time. When you return, the build should have been successful.
Hello World
Now, let’s make a hellow world program. Google already has a v8 hellow would example that we can use to see that our build was successful. We will use it for now, as I’ve not discussed anything about the v8 object library yet. Open Microsoft Visual Studio and create a new C++ Console application. Replace te code in the cpp file that it provides with Google’s code.
// Copyright 2015 the V8 project authors. All rights reserved.
// Use of this source code is governed by a BSD-style license that can be
// found in the LICENSE file.

#include <stdio.h>
#include <stdlib.h>
#include <string.h>

#include "libplatform/libplatform.h"
#include "v8-context.h"
#include "v8-initialization.h"
#include "v8-isolate.h"
#include "v8-local-handle.h"
#include "v8-primitive.h"
#include "v8-script.h"

int main(int argc, char* argv[]) {
    // Initialize V8.
    v8::V8::InitializeICUDefaultLocation(argv[0]);
    v8::V8::InitializeExternalStartupData(argv[0]);
    std::unique_ptr<v8::Platform> platform = v8::platform::NewDefaultPlatform();
    v8::V8::InitializePlatform(platform.get());
    v8::V8::Initialize();

    // Create a new Isolate and make it the current one.
    v8::Isolate::CreateParams create_params;
    create_params.array_buffer_allocator =
        v8::ArrayBuffer::Allocator::NewDefaultAllocator();
    v8::Isolate* isolate = v8::Isolate::New(create_params);
    {
        v8::Isolate::Scope isolate_scope(isolate);

        // Create a stack-allocated handle scope.
        v8::HandleScope handle_scope(isolate);

        // Create a new context.
        v8::Local<v8::Context> context = v8::Context::New(isolate);

        // Enter the context for compiling and running the hello world script.
        v8::Context::Scope context_scope(context);

        {
            // Create a string containing the JavaScript source code.
            v8::Local<v8::String> source =
                v8::String::NewFromUtf8Literal(isolate, "'Hello' + ', World!'");

            // Compile the source code.
            v8::Local<v8::Script> script =
                v8::Script::Compile(context, source).ToLocalChecked();

            // Run the script to get the result.
            v8::Local<v8::Value> result = script->Run(context).ToLocalChecked();

            // Convert the result to an UTF8 string and print it.
            v8::String::Utf8Value utf8(isolate, result);
            printf("%s\n", *utf8);
        }

        {
            // Use the JavaScript API to generate a WebAssembly module.
            //
            // |bytes| contains the binary format for the following module:
            //
            //     (func (export "add") (param i32 i32) (result i32)
            //       get_local 0
            //       get_local 1
            //       i32.add)
            //
            const char csource[] = R"(
        let bytes = new Uint8Array([
          0x00, 0x61, 0x73, 0x6d, 0x01, 0x00, 0x00, 0x00, 0x01, 0x07, 0x01,
          0x60, 0x02, 0x7f, 0x7f, 0x01, 0x7f, 0x03, 0x02, 0x01, 0x00, 0x07,
          0x07, 0x01, 0x03, 0x61, 0x64, 0x64, 0x00, 0x00, 0x0a, 0x09, 0x01,
          0x07, 0x00, 0x20, 0x00, 0x20, 0x01, 0x6a, 0x0b
        ]);
        let module = new WebAssembly.Module(bytes);
        let instance = new WebAssembly.Instance(module);
        instance.exports.add(3, 4);
      )";

            // Create a string containing the JavaScript source code.
            v8::Local<v8::String> source =
                v8::String::NewFromUtf8Literal(isolate, csource);

            // Compile the source code.
            v8::Local<v8::Script> script =
                v8::Script::Compile(context, source).ToLocalChecked();

            // Run the script to get the result.
            v8::Local<v8::Value> result = script->Run(context).ToLocalChecked();

            // Convert the result to a uint32 and print it.
            uint32_t number = result->Uint32Value(context).ToChecked();
            printf("3 + 4 = %u\n", number);
        }
    }

    // Dispose the isolate and tear down V8.
    isolate->Dispose();
    v8::V8::Dispose();
    v8::V8::DisposePlatform();
    delete create_params.array_buffer_allocator;
    return 0;
}
If you try to build this now, it will fail. You need to do some configuration. Here is a quick list of the configuration changes. If you don’t understand what to do with these, that’s find. I’ll will walk you through applying them.
Right-click on the project file and select “Properties.” From the pane on the left, select VC++ Directories. In the drop-down on the top, select All Configurations. On the right there is a field named Include. Select it, and add the full path to your v8\include directory. For me, this will be c:\shares\projects\google\v8\include. If you build in a different path, it will be different for you. After adding the value, select Apply. You will generally want to press Apply after each field that you’ve changed.
Change the Configuration drop-down at the top to Debug. In the Library Directories entry, add the full path to your v8\out.gn\x64.debug\obj folder and click Apple. Change the Configuration dropdown to Release and in Library Directories add the full path to your v8\out\gn\x64.release\obj folder.
From the pane on the left, expand C/C++ and select Code Generation. On the right, set the Debug value for Runtime Library to /MTd and set the Release value for the field to /Mt.
Change the Configurations option to All and set add the following values to Preprocessors
Keep the Configurations option on ALL. Expand Linker and select Input. For Additional Dependencies enter v8_monolith.lib;dbghelp.lib;Winmm.lib;
With that entered, press Okay. You should now be able to run the program. It will pass some values to the JavaScript engine to execute and print out the values.
What’s Next
My next set of objectives is to demonstrate how to project a C++ object into JavaScript. I also want to start thinning out the size of these files. On a machine that is using the v8 binaries, the entire build tools are not needed. At the end of the above process the b8 folder has 12 gigs of files. If you copy out only the build files and headers needed for other projects, the file size is reduced to 3 gigs. Further reductions could occur through changing some of the compilation options.
I’ve enjoyed my experiments with making my own WiFi based location system. I’ll be writing on it more, but before I do I wanted to turn some attention to the WiFi scanning itself. This is fairly easy to do on both Windows and Android. I won’t be discussing iOS because at the time of this writing, iOS doesn’t allow user applications to perform WiFi scanning (the devices do it themselves and support WiFi based location, but do not expose the lower level functionality to the developers). In this first post I discuss WiFi scanning on Windows.
WiFi Scanning on Windows
Windows in my opinion was the easiest system on which to perform the scanning. An application initiates the scan and the operating system takes care of most of the rest. Is the application tries to retrieve the information a bit later, it’s there. While some might be tempted to request a scan, add a delay, and then retrieve the results, don’t do this. There a number of reasons why, including you can’t really know how long the scan will actually take. Windows also allows a callback function to be registered to receive notifications on operations. It is better to register a callback to be notified when the WiFi scanning is complete. You can see the full source code for how to perform the scanning here. Most of the rest of this is an explanation of the code.
Wireless operations start with requesting a HANDLE that is used to track request and operations. The Windows function WlanOpenHandle() will return this handle. Hold onto it until your application is either closing or nolonger needs to perform wireless operations. When you are done with the HANDLE, release it with WlanCloseHandle().
Once you have your HANDLE, use it to register a notification callback with WlanRegisterNotification. When you want to unregister a callback, call this same function again passing NULL in place of the callback function.
    if (ERROR_SUCCESS == WlanOpenHandle(2, nullptr, &version, &context.wlanHandle))
    {
        result = WlanRegisterNotification(context.wlanHandle, WLAN_NOTIFICATION_SOURCE_ACM,
                                          TRUE, (WLAN_NOTIFICATION_CALLBACK)WlanNotificationCallback,
                                          &context, NULL, NULL);
        ...
        // Other wireless operations go here.
        ...
         WlanRegisterNotification(context.wlanHandle, WLAN_NOTIFICATION_SOURCE_ACM,
                                  TRUE, NULL, NULL, NULL, NULL);
         WlanCloseHandle(context.wlanHandle, NULL);
    }
Enumerating the Wireless Adapters
I’ll talk in detail about the implementation of the callback function in a moment. A device could have 0 or more wireless adapters. We could request a wireless scan on each of the adapters. For my sample program, it will perform a scan on each adapter one at a time. We can get a list of all the wireless adapters in a single call. The function accepts the address of a variable that will hold a pointer to the returned data. The call to WLanEnumInterfaces takes care of allocating the memory for this information. When we are done with it, we need to deallocate the memory ourselves with a call wo WlanFreeMemory. Enumerating through the array, each element has a property named isState. If the state is equal to the constant wlan_interface_state_connected then the wireless adapter is connected to a network. I’m only scanning when an adapter is being used and connected to a network. My reasons for this is that I ended up using this in diagnostics of some connectivity problems on some remote machines and I was only interested in the adapters being used.
The actual scanning is performed in the call to WlanScan. After the call, I reset a Windows Event object (created earlier in the program, but unused until now) and then wait for the object to have a signaled state with the function WaitForSingleObject. If you are familiar with Windows synchronization objects, then take note this is how I am coordinating code in the main thread with the callback.
For those not familiar, the call to WaitForSingleObject will cause the code to block until some other thread calls SetEvent on the same object. The callback that I registered will call SetEvent after it has received and process the scan information. This frees the main code to continue its processing.
Receiving the Response
I’m primary interested in printing out some attributes about each access point that is found in a format that is CSV friendly. If the notification received is for a WLAN_NOTIFICATION_SOURCE_ACM event, then that means that the scan information is available. A call to WlanGetNetworkBssList returns the information in a structure in memory allocated for us. After we get done processing this information, we need to release the memory with WlanFreeMemory(). Most of what I do with the information is direct printing of the values. I do have a function to format the BSSID information as a colon delimited string of hexadecimal digits. Information on the capabilities for the access points is stored in bit fields, which I extract and print as string. After iterating through each item in the returned information and printing the comma delimited fields, I call SetEvent so that the main thread can continue executing.
That’s everything that is needed to scan for WiFi information on Windows. If you would like to see the full source code for a console program that performs these steps, I have it posted on GitHub here.
The information is printed to standard output where it can be viewed. When I need to save it, I direct standard output to a file. Many utilities support this format. I’ve used Excel, Sheets, and SQL Server Bulk Insert for processing this information.
I’m working on an explanation for how to use the same functionality on Android. That will come to this space in a couple of weeks with working code being made available on GitHub.
Posts may contain products with affiliate links. When you make purchases using these links, we receive a small commission at no extra cost to you. Thank you for your support.