There are a lot of systems dedicated to safety in place for air travel. Recently, one of those systems, NOTAMS, went offline with the cause being attributed to a corrupted database file. It was a system for warning pilots about local hazards, and the loss of that system was sufficient reason to stop planes from taking off for a couple of hours. The many systems that are in place for air vehicles can be interesting, and I want to write about one of those systems that you can directly monitor, ADS-B (Automatic Data Surveillance Broadcast). Through this system, airplanes broadcast their location and heading so that other planes and ground stations can track them. This information is broadcast in the open and anyone can view it. Other aircraft use the data to help avoid collisions. It helps avoid the blind spots associated with radar, providing accurate information throughout it’s range. This information is also often used by plane spotters (a bit like birdwatching, but for planes).
Anyone can receive ADS-B information. Consumer-priced receiving equipment is available for under 100 USD. On one’s own, one can receive information from aircraft from well over 100 miles away. But many of these products also work with services that allow people with receivers to cooperate to receive a more complete and further range of data. I have a couple of receivers running that use RadarBox.

Hardware Selection
You’ll generally find ADS-B receivers using one of two frequencies. 978 MHz and 1090 MHz. For RadarBox, the equipment for these two frequencies is color coded with 978 MHz being red and 1090 MHz blue. Of these two frequencies, the 1090 MHz system is in greater use. There’s not much debate to be had, 1090 MHz will be the frequency to get unless you’ve got some compelling and specific need for 978 MHz. The 978 MHz frequency is for aircraft that operate exclusively below 5,500 meters (~18,000 feet). Aircraft that operate at higher altitudes use the 1090 MHz frequency.
Having performed setup for both units, I can tell you that setup for the 1090 MHz unit was much easier. When I performed the steps on the 978 MHz unit, there were some errors in the process. On both Pis on which I performed the steps I had freshly installed the 64-bit PI OS and performed updates first. The 978 MHz setup was a lot more involved. The 1090 MHz setup was primary running some scripts and not having to figure any problems out.
Create an Account
Go to Radarbox.com. In the upper-right area you’ll see a link to login. If you are prompted to select a subscript level, stick with the free level. After completing the setup for the Pi your account will automatically be upgraded to a business account (a privilege level that normally cost 40 USD per month).

Setup
Assuming you are using a computer that you already own, the setup expense is getting an antenna and a USB ADS-B receiver. You can purchase these in a kit together for 65 to 70 USD. Connecting the hardware together is intuitive; the antenna connects to the threaded adapter on the USB. For the antenna placement, I chose a place that was up high to minimize the amount of potential obstacles attenuating the signal strength. I installed the antenna in my attic. While the system comes with u-shaped bolts for securing the antenna, I instead used zip ties and some foam to secure it on one of the beams in the attic. I didn’t install the Pis in the attic though. In the summer the temperature in the attic can become tremendously hot, and I don’t think they would survive well. Instead, I used a space through which network cable was being routed so that the connector for the antenna was in the living area of the house.
You’ll need to know the elevation at which you’ve installed the antenna in meters. This information will be necessary during the registration step.
I performed all of the steps for setup over SSH from a Mac. Installation is performed through downloading and running some scripts. The instructions can be found at https://www.radarbox.com/raspberry-pi. The directions that I post here are derived from those. The directions have a decision point on whether you are going to use receiver dongle or have it pull information from some other program. I assume you will be use the dongle. If you are, there are only 4 commands that you need to run.
sudo bash -c "$(wget -O - http://apt.rb24.com/inst_rbfeeder.sh)"
sudo apt-get install mlat-client -y
sudo systemctl restart rbfeeder
sudo rbfeeder --showkey
The first two lines will install the software services . The third line will start the service. After the service is running, you’ll need the unique key that was generated for your device. This fourth command shows the key. You can also view the key in /etc/rbfeeder.ini. Copy this key, you’ll need it to register the device.
Registration
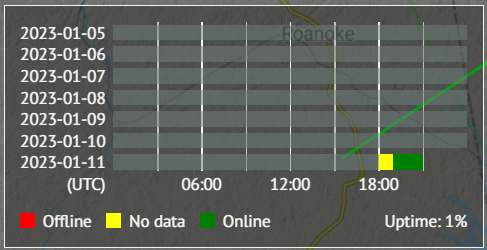
To register the device navigate to https://www.radarbox.com/raspberry-pi/claim. After logging into your account you’ll see a text box allowing you to past an identifying key with a button to “Claim” your device. After claiming, you’ll be prompted for the location information. Enter the address at which you have your device positioned to show a map of the area. Move the map around until it is centered on the precise area in which you’ve installed the antenna. You’ll be asked to enter the elevation of the antenna too. This is the elevation is the meters above ground. RadarBox will already account for the elevation of the address that you’ve entered. Once all the information is entered, the claiming process is complete. Let the system run on its own for about 20 minutes. Later, open a browser on any computer and log into your account on radarbox.com. Once logged in, if you click on the account button . In the menu that opens there will be a group for “Stations.” Selecting that will show all of your registered devices.

Select your station. In the lower-left corner you’ll see a graph showing the status of your unit over time. Green blocks will show during times where your unit was receiving and relaying data. After your device is sending data, you’ll get a notice on a following login saying that your account has been upgraded to the Business level.
API Access
Since most of my audience is developer focused, I wanted to speak a bit about the APIs. Unlike the use of the RadarBox UI, access to the API is not free. Even some of the services that offer “free API access” keep the calls I think to be more interesting as premium (requiring payment) access. Access to the RadarBox APIs is completely independent of contributing to the data collection. The API calls consume “credits.” RadarBox sells the credits through various subscription levels, with the credits costing less-per-dollar for the highest subscription level. The least expensive subscription gives 10,000 credits for 112 USD/month. This works out to 0.012 USD per credit. When you first open a RadarBox account, you get 100 credits to start with at no cost.
There are SDKs for the API available for a variety of environments and languages, including Python, Java, TypeScript/JavaScript, C#, Swift, and more. The documentation for the API can be found at https://www.radarbox.com/api/documentation. The documentation is interactive; you can make API calls from the browser. But you’ll need an access token to make calls. To get an access token navigate to https://www.radarbox.com/api/dashboard and select the button to make a token. Note that the API calls that you make are rate limited. On the documentation page in the top-left of the page is an area where you can enter your token. The test calls that you make from the documentation will use this token.

To ensure that the token was working, I tried a low-cost call; I searched for information by airport code. The only parameter that this call needs is an ICAO airport code. For Atlanta, this code he KATL. The response provides information about the airport, including its name, both the ICAO and IATA code (most people in the USA will be more familiar with the IATA code), the name, and information on all of the airport’s runways.

The response for all of the calls contain a field that indicate how many credits are left. There are two API calls related to billing that cost 0 credits; you can inquire your usage statistics without accumulating some expense for having checked on it. I would suggest using that API call first if you are trying to test if your token works to avoid unnecessarily burning credits.
As with other APIs that cost actual money per call, you would probably want to put in place some measures of protection to minimize unnecessary calls. For example, if you were making a mobile app that used this functionality, instead of making calls directly to the RadarBox API, you could make a web service that caches responses for various amounts of time and have your application call that. Some information, such as information on the locations of airports and the runways, won’t change much; the last time my local airport changed in some meaningful way was in 2006 when it added a fifth runway. Information from a call such as that may be worth keeping cached until manually forced to refresh. But for some information, such as the location of a specific plane, since the information is updated frequently it may be worth caching for only a few seconds.
With all that said, let’s make a quick application that will make a call related to why what turned my mind to this. One of the API calls retrieves NOTAMS information for an airport nearby. To minimize API calls, I made a single call from the RadarBox documentation page and saved the response. Most of this program was written using the static response and then updated to make an actual API call.
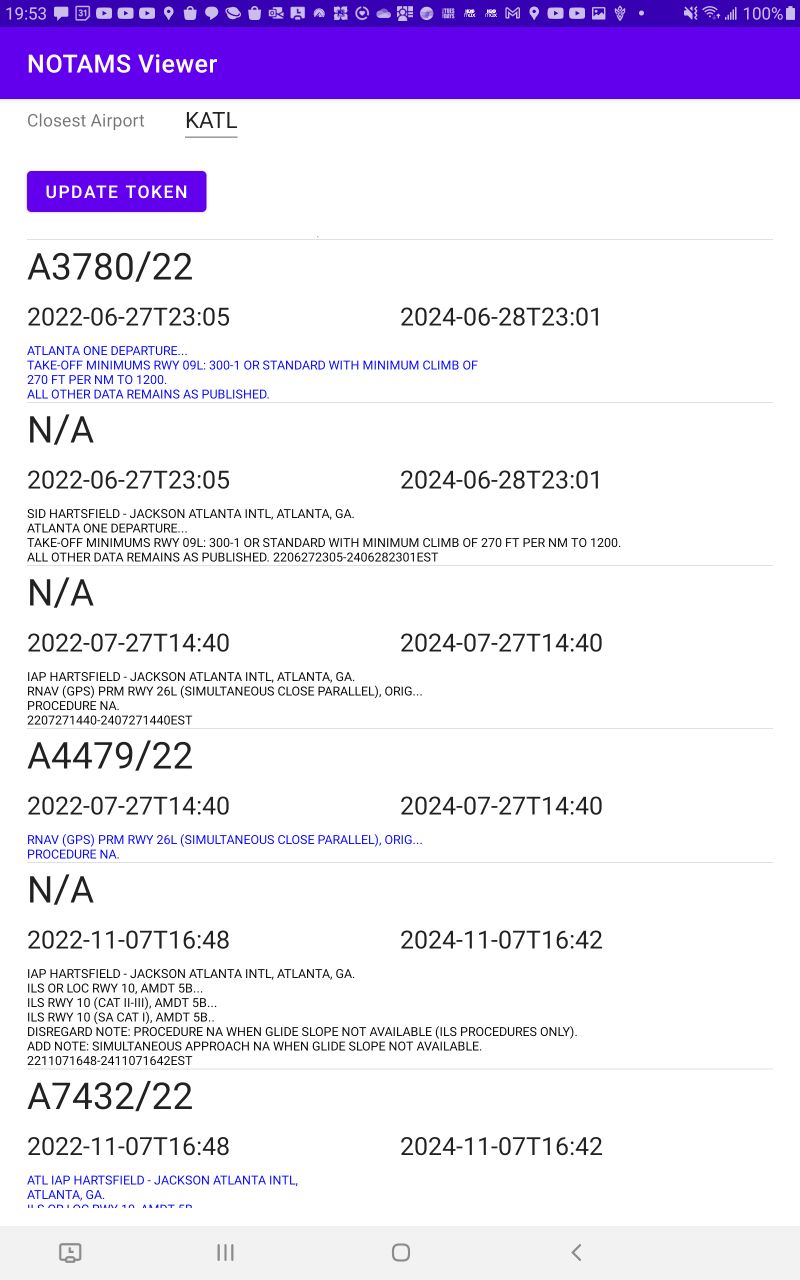
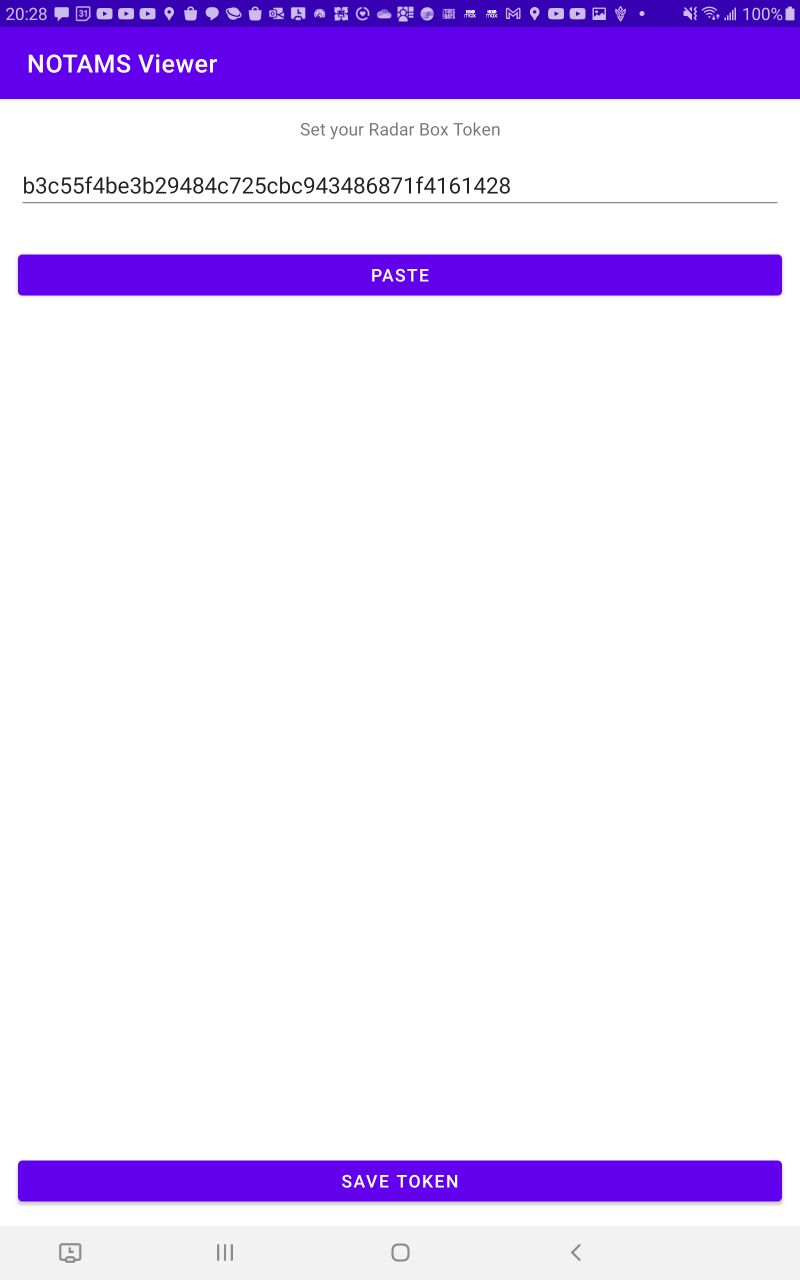
The program needs a token for making its API calls. The token is not hard-coded into the program. Instead, when the program is first run it will prompt for a token to be entered. Since this value is likely being copied and pasted. the UI provides a paste button to avoid the gestures for selecting the text box, opening the clipboard, and then selecting the paste operation.
For determining the closest airport, I found a list of all the major airports in the world and their coordinates. Using the equation that was in a recent post, I checked the distance between the users position and the airports to find the one with the smallest distance.
fun findClosestAirport(latitude:Double, longitude:Double):airportCode? {
    var distance = DistanceCalculator.EarthRadiusInMeters
    var ac:airportCode? = null
    val d = DistanceCalculator()
    airportCodes.forEach {
        var newDistance = d.CalcDistance(
            this.latitude, this.longitude,
            it.coordinates.latitude, it.coordinates.longitude,
            DistanceCalculator.EarthRadiusInMeters
        );
        if(newDistance < distance &&  it.iata_code != null) {
            distance = newDistance
            ac = it
        }
    }
    if(ac != null) closestAirportTextEdit.setText("K${ac.iata_code}")

    return ac;
}
There’s an SDK available for using RadarBox. But I didn’t use that. Instead, I just made the call directly. Since I only needed one SDK call I was fine calling it directly. The URL prefix to use for all of the API calls is https://api.radarbox.com/. To read the NOTAM notifications, the path is /v2/airspace/${airportCode}/notams. The response comes back formatted in JSON. Parsing the response from a JSON string to some objects is only a few lines of executable code and a few data class definitions. Here is one of the data classes.
@Serializable
data class notam(
    val id:String? = null,
    val number:Int,
    val notamClass:String? = null,
    val affectedFir:String? = null,
    val year:String,
    val type:String? = null,
    @Serializable(with = DateSerializer::class) val effectiveStart: LocalDateTime? = null,
    //val effectiveStart:String,
    @Serializable(with = DateSerializer::class) val effectiveEnd:LocalDateTime? = null,
    val icaoLocation:String,
    @Serializable(with = DateSerializer::class) val issued:LocalDateTime,
    //val issued:String,
    val location:String,
    val text:String,
    val minimumFlightLevel:String? = null,
    val maximumFlightLevel:String? = null,
    val radius:String? = null,
    var translations:List<translation>
    )  {
}
I used OkHttp for making my HTTP request. The target URL and a Bearer token header are needed for the request. When the response is returned, I deserialize it. I also filter out any results that have an effective date that makes the notice nolonger applicable. In running the code I found that less than 0.3% of the notifications that I received had expired. Filtering them out was completely optional.
    fun updateNotamsFromRadarbox(airportCode:String):Call {
        val requestUrl = "https://api.radarbox.com/v2/airspace/${airportCode}/notams"
        val client = OkHttpClient();
        val request = Request.Builder()
            .url(requestUrl).addHeader("Authorization", "Bearer $radarBoxToken")
            .build()
        val call = client.newCall(request)
        call.enqueue(object:Callback {
           override fun onResponse(call: Call, response:Response) {
                val responseString = response.body?.string()
               if(responseString != null) {
                   var notamsResponse = Json.decodeFromString(notamResponse.serializer(),responseString)
                   var now:LocalDateTime = LocalDateTime.now()
                   var filteredNotams = notamsResponse.apiNotams.filter { i -> ((i.effectiveStart==null)||(i.effectiveStart<now))&&((i.effectiveEnd==null)||(i.effectiveEnd>now))  }
                   showNotams(filteredNotams)
               }
           }
            override fun onFailure(call: Call, e: IOException) {
                Log.e(TAG,e.message.toString())
            }
        });
        return call;
    }
The results come back on another thread. Before updating a ListViewAdapter with the results, I have to make sure that the code is executing on the right thread.
fun showNotams(notamList:List<notam>) {
    runOnUiThread {
        notamLVA = notamsListViewAdapter(this, ArrayList(notamList))
        val notamLV = findViewById<ListView>(R.id.currentwarnings_notamlva)
        notamLV.adapter = notamLVA
    }
}
If you want to see the code for this, you can find it on GitHub ( https://github.com/j2inet/notams ).
Posts may contain products with affiliate links. When you make purchases using these links, we receive a small commission at no extra cost to you. Thank you for your support.
Mastodon: @j2inet@masto.ai
Instagram: @j2inet
Facebook: @j2inet
YouTube: @j2inet
Telegram: j2inet
Twitter: @j2inet


