I’m working with some data that needs to be hashed in both C# and JavaScript. Usually converting an algorithm across languages is pretty trivial. But in JavaScript the regular numeric type is a double-precision 64-bit number. While this sounds sufficiently large, when used as an integer this only provides 53-bits of precision. As you might imagine, using a 53-bit numeric type on one system and 64-bit on another would result in differences in outcome. This would make hased data between these two functions incompatible with each other. To avoid these potential problems, I needed to use a different type. I used BIGINT.
A potential issue with BIGINT is that it can accommodate extremely large values. This isn’t usually a problem, but I need to have identical behaviour for the hash function to have identical results across the languages. Fixing this is simple though. I only need to perform the bitwise AND operation to truncate any bits in the BIGINT beyond position 64. The hast function I’m using was originally found on StackOverflow. This might not be the final Hash function that I use, but for now it works.
A key thing to note in the JavaScript implementation is the n suffix on the numbers. This ensures that they are all using the BIGINT type. Also take note of the bitwise operation with the number 0xFFFFFFFFn. This ensures that the number is truncated and acting like a 64-bit integer.
//
function hashString(s) {
    const A =  54059n ;
    const B = 76963n ;
    const C = 86969n;
    const FIRSTH = 37n;
   var h = FIRSTH;
   for ( var i=0;i<s.length;++i) {
        var c = BigInt(s.charCodeAt(i));
        h = ((h * A) ^ (((c) *B))) & 0xFFFFFFFFFFFFFFFFn;
   }
   return h;
}
The C++ implementation (used for the Arduino ) follows. Using native types in C there’s nothing special that needs to be done.
#define A 54059   /* a prime */
#define B 76963   /* another prime */
#define C 86969   /* yet another prime */
#define FIRSTH 37 /* also prime */
unsigned long hash_str(String s) {
  unsigned long h = FIRSTH;
  for (auto i = 0; i < s.length(); ++i) {
    h = ((h * A) ^ (s[i] * B)) & 0xFFFFFFFFFFFFFFFF;
    //s++;
  }
  return h;
}
The difference between the C# and C++ versions o the code are only notational. They both handle 64-bit integers just fine with no special tricks needed.
ulong hashString(String s) {
    const ulong A =  54059ul ;
    const ulong B = 76963ul ;
    const ulong C = 86969ul;
    const ulong FIRSTH = 37ul;
   var h = FIRSTH;
   var stringBytes = Encoding.ASCII.GetBytes(s);
   for ( var i=0;i<stringBytes.Length;++i) {
        var c = stringBytes[i];
        h = ((h * A) ^ (((c) *B))) & 0xFFFFFFFFFFFFFFFFul;
   }
   return h;
}
The differences for Kotlin are also notational, but significantly different from the C# and C++ in how the bitwise operators are expressed.
    fun hashString(s:String): ULong {
        val A:ULong =  54059u ;
        val B:ULong = 76963u ;
        val C:ULong = 86969u;
        val FIRSTH:ULong = 37u;
        var h = FIRSTH;
        var stringBytes = s.toByteArray()
        for ( i in 0..stringBytes.size-1) {
            var c = stringBytes[i].toULong();
            h = ((h * A) xor (((c) * B))) and 0xFFFFFFFFFFFFFFFFu;
        }
        return h;
    }
After having written this post, I was working in SQL Server. I was going to save some of this hashed data within SQL Server and decided to try with implementing a hash function there. Everything started out the same, but I ran into a notable problem. I encountered arithmetic overflow issues with declaring the mask 0xFFFFFFFFFFFFFFFF. This mask isn’t strictly necessary, but I’ve placed it there should I happen to use one of these implementations to hash to a smaller data type. I was using the BIGINT data type. But that data type only provides 63-bits of precision, not 64. Knowing that now I could just use a smaller mask to have a hash function that works identically across environments. If you’d like to try it out, the SQL Server implementation follows here.
CREATE FUNCTION HashString
(
	@SourceString as VARCHAR(15)
)
RETURNS BIGINT
AS
BEGIN
    DECLARE @A BIGINT =  54059
    DECLARE @B BIGINT = 76963
    DECLARE @C BIGINT = 86969
    DECLARE @FIRSTH BIGINT = 37
	DECLARE @StrLEn BIGINT = LEN(@SourceString)
	DECLARE @Index BIGINT = 1
	DECLARE @MASK BIGINT = 0xFFFFFFFFFFFF
	DECLARE @Letter CHAR
	DECLARE @LetterCode BIGINT
	DECLARE @H BIGINT = @FIRSTH
	WHILE @Index <= @StrLEn
	BEGIN
		SET @Letter = SUBSTRING(@SourceString, @Index, 1)
		SET @LetterCode = UNICODE(@Letter)
		SET @H = ((@H * @A) ^ (@LetterCode * @B)) & @MASK
		SET @Index = @Index + 1
	END
	return  @H;
END
GO
Posts may contain products with affiliate links. When you make purchases using these links, we receive a small commission at no extra cost to you. Thank you for your support.
There’s an equation I’ve often found useful and have generally used it for calculating the distance between geographical coordinates. Most recently, I used the equation in a program for a 360 interactive video player to find the distance between an area that a user selected and some point of interest. Fundamentally it is an equation measuring distances on a sphere and has many uses.
I was adjusting the source code to be used in an Android application, and thought that the code might be useful to others. I am reposting it here. I tend to work in SI units, but you could use this for miles, yards, inches, or another unit if you have the radius of the sphere of interest. The constants defined in the class provide the radius of the rarth in miles, kilometers, and meters. One of these values (or your own custom value) must be passed to have the results returned to be scaled for those units.
class DistanceCalculator {
     companion object {
         public val EarthRadiusInMiles = 3956.0;
         public val EarthRadiusInKilometers = 6367.0;
         public val EarthRadiusInMeters = EarthRadiusInKilometers*1000;
     }

     fun ToRadian(`val`: Double): Double {
         return `val` * (Math.PI / 180)
     }

     fun ToDegree(`val`: Double): Double {
         return `val` * 180 / Math.PI
     }

     fun DiffRadian(val1: Double, val2: Double): Double {
         return ToRadian(val2) - ToRadian(val1)
     }

     public fun CalcDistance(p1: coordinate, p2: coordinate): Double {
         return CalcDistance(
             p1.latitude,
             p1.longitude,
             p2.latitude,
             p2.longitude,
             EarthRadiusInKilometers
         )
     }

     fun Bearing(p1: coordinate, p2: coordinate): Double? {
         return Bearing(p1.latitude, p1.longitude, p2.latitude, p2.longitude)
     }

    fun Bearing(lat1: Double, lng1: Double, lat2: Double, lng2: Double): Double? {
        run {
            val dLat = lat2 - lat2
            var dLon = lng2 - lng1
            val dPhi: Double = Math.log( Math.tan(lat2 / 2 + Math.PI / 4) / Math.tan(lat1 / 2 + Math.PI / 4) )
            val q: Double =
                if (Math.abs(dLat) > 0) dLat / dPhi else Math.cos(lat1)
            if (Math.abs(dLon) > Math.PI) {
                dLon = if (dLon > 0) -(2 * Math.PI - dLon) else 2 * Math.PI + dLon
            }
            //var d = Math.Sqrt(dLat * dLat + q * q * dLon * dLon) * R;
            return ToDegree(Math.atan2(dLon, dPhi))
        }
    }

    public fun CalcDistance(
         lat1: Double,
         lng1: Double,
         lat2: Double,
         lng2: Double,
         radius: Double
     ): Double {
         return radius * 2 * Math.asin(
             Math.min(
                 1.0, Math.sqrt(
                     Math.pow(
                         Math.sin(
                             DiffRadian(lat1, lat2) / 2.0
                         ), 2.0
                     )
                             + Math.cos(ToRadian(lat1)) * Math.cos(ToRadian(lat2)) * Math.pow(
                         Math.sin(
                             DiffRadian(lng1, lng2) / 2.0
                         ), 2.0
                     )
                 )
             )
         )
     }
 }
Posts may contain products with affiliate links. When you make purchases using these links, we receive a small commission at no extra cost to you. Thank you for your support.
Part 1 of this post was about WiFi scanning on Windows. You can find it here.
Scanning on Android isn’t hard, but there are obstacles. In what is documented as being in the interest of saving battery life, WiFi scanning is throttled on more recent devices to be limited to 4 scans within a 2 minute period. On some of my older devices this limit is not present. While I found that I could turn off the default throttling setting in the developer settings, the more recent devices was still much more limited in how often it could scan. For my purposes (building a personal collection of coordinates and WiFi access points for an embedded device) this has the effect of lowering the number of samples that can be collected with my more recent device.
Because location can be inferred from WiFi information, Android protects WiFi scanning behind the location permission. Even if the application has no interest in location information, it must have the location permission to scan for WiFi information. I do have interest in location information. I want to save the location at which the access points were observed. The permissions that I specify in the manifest include the following.
In addition to the manifest declarations, the application must explicitly ask the user for permission to track location. Once the application has location permissions, it can start tracking location and performing WiFi scans.
For the location updates, I have asked for new location information if the user’s location has changed by three meters (nine feet) and if at least 10 seconds has passed. I am interest in getting multiple samples of access points from different positions to better localize them. I ask for high precision for the location information. The device will most likely use GPS based positioning, but may use any location source.
    @SuppressLint("MissingPermission")
    fun getLocationUpdates() {
        val locationRequest = LocationRequest.create()?.apply {
            interval = 10_000
            fastestInterval = 10_000
            smallestDisplacement = 3.0f
            priority = LocationRequest.PRIORITY_HIGH_ACCURACY
        }

        locationCallback = object : LocationCallback() {
            override fun onLocationResult(locationResult: LocationResult) {

                locationResult ?: return
                for (location in locationResult.locations){
                    currentLocation = location
                    // Update UI with location data
                    // ...
                }
            }
        }
        locationRequest?.let {
            fusedLocationClient.requestLocationUpdates(
                it,
                locationCallback,
                Looper.getMainLooper())
        }
    }
To scan for Wifi, I’ll need the wifiManager class and I’ll need an IntentFilter. The WifiManager instance is used to ensure that WiFi is turned on and to request the WiFi scan. The IntentFilter
   lateinit var wifiManager:WifiManager
    val intentFilter = IntentFilter().also {
        it.addAction(WifiManager.SCAN_RESULTS_AVAILABLE_ACTION)
    }
I instantiate the WifiManager in the activity’s onCreate method. After getting an instance I ensure that WiFi is turned on.
The WifiReceiver class above is a class I’ve made that derives from BroadcastReceiver. I must implement a BroadcastReceiver with an onReceive() method. After the OS has scanned for available WiFi, it will notify our app of the availability of the results through this instance. When the results are available, they can be read from WiFiManager.scanResults. I’m only saving results if I have location information too. If I don’t have location information, the results are discarded. If results are available, I save them to a data class that I’ve called ScanItem. This class only serves to hold the values. Populated instances of ScanItem are passed to another class for being persisted to a database.
        override fun onReceive(p0: Context?, intent: Intent?) {
            var action:String? = intent?.action
            if(mainActivity.currentLocation!=null) {
                val currentLocation = mainActivity.currentLocation!!;
                var result = wifiManager.scanResults
                Log.d(TAG, "results received");

                val scanResultList: List<ScanItem> = ArrayList<ScanItem>(result.size)

                for (r in result) {
                    var item = ScanItem(r.BSSID)
                    item.apply {
                        sessionID = SessionID
                        clientID = mainActivity.clientID
                        latitude = currentLocation.latitude
                        longitude = currentLocation.longitude
                        if (currentLocation.hasAccuracy()) {
                            horizontalAccuracy = currentLocation.accuracy
                        }
                        if (currentLocation.hasVerticalAccuracy()) {
                            verticalAccuracy = currentLocation.verticalAccuracyMeters
                        }
                        altitude = currentLocation.altitude.toFloat()
                        BSSID = r.BSSID
                        SSID = r.SSID
                        level = r.level
                        //http://w1.fi/cgit/hostap/tree/wpa_supplicant/ctrl_iface.c?id=7b42862ac87f333b0efb0f0bae822dcdf606bc69#n2169
                        capabilities = r.capabilities
                        frequency = r.frequency
                        datetime = currentLocation.time
                        locationLabel = mainActivity.locationLabel
                    }
                    mainActivity.scanItemDataHelper.insert(item)
                }
                mainActivity.currentLocation = null
                mainActivity.addNewEntryCount(result.size)
                Toast.makeText(mainActivity, "scan Saved", Toast.LENGTH_SHORT).show();
            }
            wifiManager.startScan()
        }
    }
As soon as I’ve saved all the results, I clear the location and start a new scan. What I’ve done here only works for me because I have disabled scan throttling on my device. By default, more recent Android devices only allow 4 scans within two minutes. It might have been better if I had scheduled the scans to be requested on an interval. But I went with a quick-and-dirty solution since I was implementing this just before getting on the road. I needed to drive a few hundred miles over a few days and I wanted to maximize on the opportunity to collect data.
I was able to reduce a significant data set from several days of scanning to a collection of hashes for the WiFi ID along with a latitude and longitude. My source dataset may contain an access point multiple times, as they are usually visible from multiple locations. In reducing the dataset, for each WiFi ID I got the average of its location (though I removed vehicle Wifi from my dataset. I found Wifi from Tesla’s, VW, and “Tanya’s iPhone” from vehicles on the same path as me for several miles) and exported a 32-bit hash of the WiFi ID, the latitude, and longitude (12-bytes per access point). Using a hash instead of the actual data let’s me reduce the storage size.
I’ve had success in using this to get an embedded device to determine its location. I’ll write more about this in another post. Until then, if you want a brief description of what that involved, you can find it here.
Posts may contain products with affiliate links. When you make purchases using these links, we receive a small commission at no extra cost to you. Thank you for your support.
There are a lot of systems dedicated to safety in place for air travel. Recently, one of those systems, NOTAMS, went offline with the cause being attributed to a corrupted database file. It was a system for warning pilots about local hazards, and the loss of that system was sufficient reason to stop planes from taking off for a couple of hours. The many systems that are in place for air vehicles can be interesting, and I want to write about one of those systems that you can directly monitor, ADS-B (Automatic Data Surveillance Broadcast). Through this system, airplanes broadcast their location and heading so that other planes and ground stations can track them. This information is broadcast in the open and anyone can view it. Other aircraft use the data to help avoid collisions. It helps avoid the blind spots associated with radar, providing accurate information throughout it’s range. This information is also often used by plane spotters (a bit like birdwatching, but for planes).
Anyone can receive ADS-B information. Consumer-priced receiving equipment is available for under 100 USD. On one’s own, one can receive information from aircraft from well over 100 miles away. But many of these products also work with services that allow people with receivers to cooperate to receive a more complete and further range of data. I have a couple of receivers running that use RadarBox.
Screenshot of Radarbox Flight Tracking
Hardware Selection
You’ll generally find ADS-B receivers using one of two frequencies. 978 MHz and 1090 MHz. For RadarBox, the equipment for these two frequencies is color coded with 978 MHz being red and 1090 MHz blue. Of these two frequencies, the 1090 MHz system is in greater use. There’s not much debate to be had, 1090 MHz will be the frequency to get unless you’ve got some compelling and specific need for 978 MHz. The 978 MHz frequency is for aircraft that operate exclusively below 5,500 meters (~18,000 feet). Aircraft that operate at higher altitudes use the 1090 MHz frequency.
Having performed setup for both units, I can tell you that setup for the 1090 MHz unit was much easier. When I performed the steps on the 978 MHz unit, there were some errors in the process. On both Pis on which I performed the steps I had freshly installed the 64-bit PI OS and performed updates first. The 978 MHz setup was a lot more involved. The 1090 MHz setup was primary running some scripts and not having to figure any problems out.
Create an Account
Go to Radarbox.com. In the upper-right area you’ll see a link to login. If you are prompted to select a subscript level, stick with the free level. After completing the setup for the Pi your account will automatically be upgraded to a business account (a privilege level that normally cost 40 USD per month).
Setup
Assuming you are using a computer that you already own, the setup expense is getting an antenna and a USB ADS-B receiver. You can purchase these in a kit together for 65 to 70 USD. Connecting the hardware together is intuitive; the antenna connects to the threaded adapter on the USB. For the antenna placement, I chose a place that was up high to minimize the amount of potential obstacles attenuating the signal strength. I installed the antenna in my attic. While the system comes with u-shaped bolts for securing the antenna, I instead used zip ties and some foam to secure it on one of the beams in the attic. I didn’t install the Pis in the attic though. In the summer the temperature in the attic can become tremendously hot, and I don’t think they would survive well. Instead, I used a space through which network cable was being routed so that the connector for the antenna was in the living area of the house.
You’ll need to know the elevation at which you’ve installed the antenna in meters. This information will be necessary during the registration step.
I performed all of the steps for setup over SSH from a Mac. Installation is performed through downloading and running some scripts. The instructions can be found at https://www.radarbox.com/raspberry-pi. The directions that I post here are derived from those. The directions have a decision point on whether you are going to use receiver dongle or have it pull information from some other program. I assume you will be use the dongle. If you are, there are only 4 commands that you need to run.
The first two lines will install the software services . The third line will start the service. After the service is running, you’ll need the unique key that was generated for your device. This fourth command shows the key. You can also view the key in /etc/rbfeeder.ini. Copy this key, you’ll need it to register the device.
Registration
To register the device navigate to https://www.radarbox.com/raspberry-pi/claim. After logging into your account you’ll see a text box allowing you to past an identifying key with a button to “Claim” your device. After claiming, you’ll be prompted for the location information. Enter the address at which you have your device positioned to show a map of the area. Move the map around until it is centered on the precise area in which you’ve installed the antenna. You’ll be asked to enter the elevation of the antenna too. This is the elevation is the meters above ground. RadarBox will already account for the elevation of the address that you’ve entered. Once all the information is entered, the claiming process is complete. Let the system run on its own for about 20 minutes. Later, open a browser on any computer and log into your account on radarbox.com. Once logged in, if you click on the account button . In the menu that opens there will be a group for “Stations.” Selecting that will show all of your registered devices.
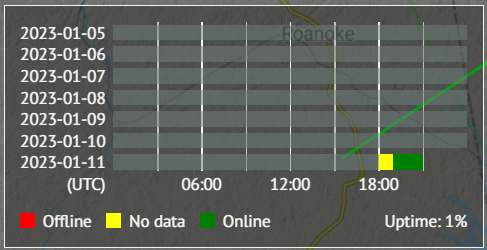
Select your station. In the lower-left corner you’ll see a graph showing the status of your unit over time. Green blocks will show during times where your unit was receiving and relaying data. After your device is sending data, you’ll get a notice on a following login saying that your account has been upgraded to the Business level.
API Access
Since most of my audience is developer focused, I wanted to speak a bit about the APIs. Unlike the use of the RadarBox UI, access to the API is not free. Even some of the services that offer “free API access” keep the calls I think to be more interesting as premium (requiring payment) access. Access to the RadarBox APIs is completely independent of contributing to the data collection. The API calls consume “credits.” RadarBox sells the credits through various subscription levels, with the credits costing less-per-dollar for the highest subscription level. The least expensive subscription gives 10,000 credits for 112 USD/month. This works out to 0.012 USD per credit. When you first open a RadarBox account, you get 100 credits to start with at no cost.
There are SDKs for the API available for a variety of environments and languages, including Python, Java, TypeScript/JavaScript, C#, Swift, and more. The documentation for the API can be found at https://www.radarbox.com/api/documentation. The documentation is interactive; you can make API calls from the browser. But you’ll need an access token to make calls. To get an access token navigate to https://www.radarbox.com/api/dashboard and select the button to make a token. Note that the API calls that you make are rate limited. On the documentation page in the top-left of the page is an area where you can enter your token. The test calls that you make from the documentation will use this token.
To ensure that the token was working, I tried a low-cost call; I searched for information by airport code. The only parameter that this call needs is an ICAO airport code. For Atlanta, this code he KATL. The response provides information about the airport, including its name, both the ICAO and IATA code (most people in the USA will be more familiar with the IATA code), the name, and information on all of the airport’s runways.
The response for all of the calls contain a field that indicate how many credits are left. There are two API calls related to billing that cost 0 credits; you can inquire your usage statistics without accumulating some expense for having checked on it. I would suggest using that API call first if you are trying to test if your token works to avoid unnecessarily burning credits.
As with other APIs that cost actual money per call, you would probably want to put in place some measures of protection to minimize unnecessary calls. For example, if you were making a mobile app that used this functionality, instead of making calls directly to the RadarBox API, you could make a web service that caches responses for various amounts of time and have your application call that. Some information, such as information on the locations of airports and the runways, won’t change much; the last time my local airport changed in some meaningful way was in 2006 when it added a fifth runway. Information from a call such as that may be worth keeping cached until manually forced to refresh. But for some information, such as the location of a specific plane, since the information is updated frequently it may be worth caching for only a few seconds.
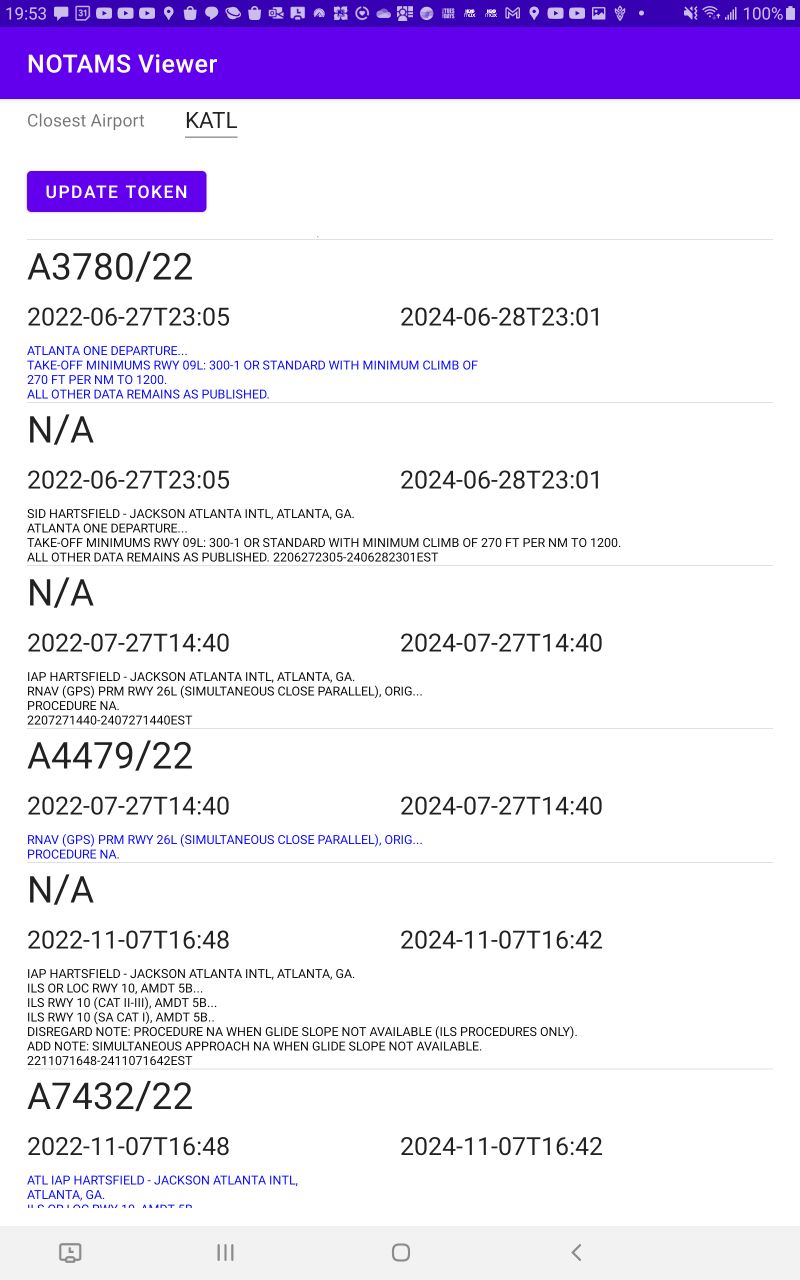
With all that said, let’s make a quick application that will make a call related to why what turned my mind to this. One of the API calls retrieves NOTAMS information for an airport nearby. To minimize API calls, I made a single call from the RadarBox documentation page and saved the response. Most of this program was written using the static response and then updated to make an actual API call.
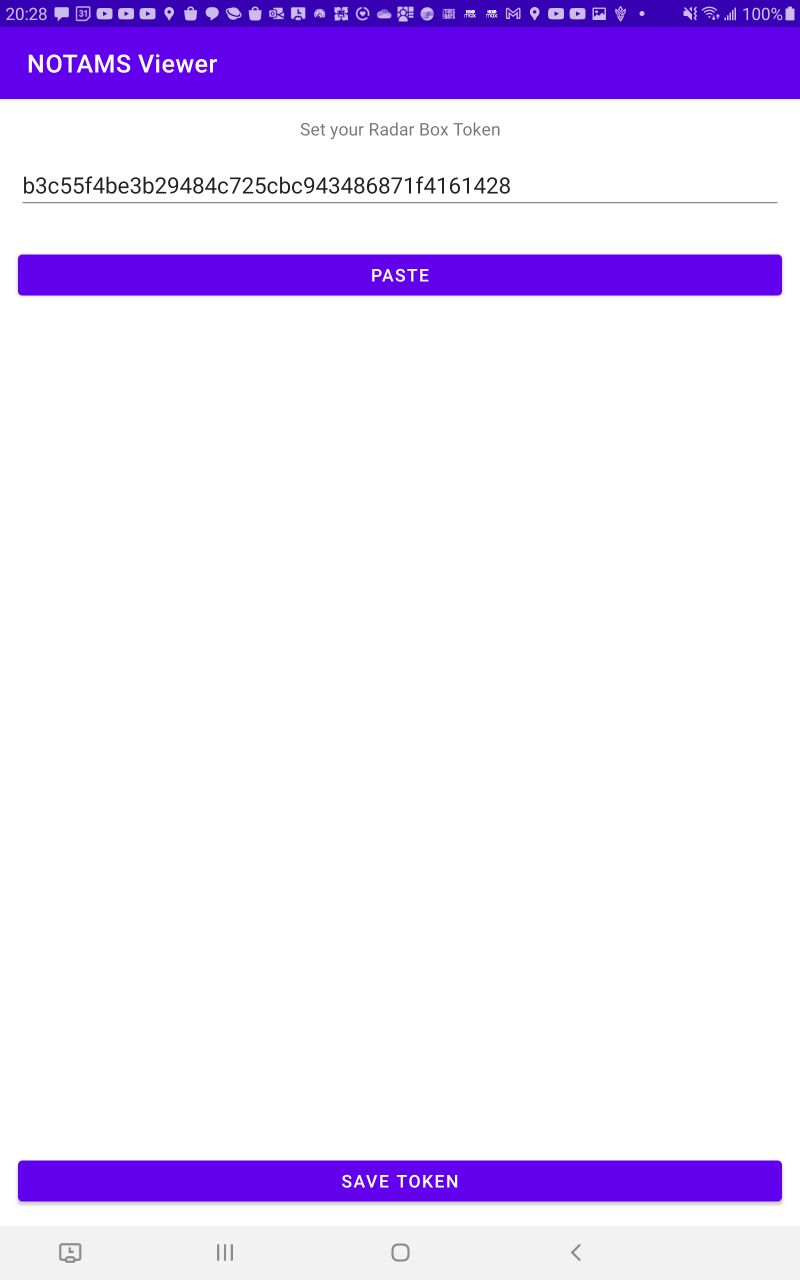
The program needs a token for making its API calls. The token is not hard-coded into the program. Instead, when the program is first run it will prompt for a token to be entered. Since this value is likely being copied and pasted. the UI provides a paste button to avoid the gestures for selecting the text box, opening the clipboard, and then selecting the paste operation.
For determining the closest airport, I found a list of all the major airports in the world and their coordinates. Using the equation that was in a recent post, I checked the distance between the users position and the airports to find the one with the smallest distance.
fun findClosestAirport(latitude:Double, longitude:Double):airportCode? {
    var distance = DistanceCalculator.EarthRadiusInMeters
    var ac:airportCode? = null
    val d = DistanceCalculator()
    airportCodes.forEach {
        var newDistance = d.CalcDistance(
            this.latitude, this.longitude,
            it.coordinates.latitude, it.coordinates.longitude,
            DistanceCalculator.EarthRadiusInMeters
        );
        if(newDistance < distance &&  it.iata_code != null) {
            distance = newDistance
            ac = it
        }
    }
    if(ac != null) closestAirportTextEdit.setText("K${ac.iata_code}")

    return ac;
}
There’s an SDK available for using RadarBox. But I didn’t use that. Instead, I just made the call directly. Since I only needed one SDK call I was fine calling it directly. The URL prefix to use for all of the API calls is https://api.radarbox.com/. To read the NOTAM notifications, the path is /v2/airspace/${airportCode}/notams. The response comes back formatted in JSON. Parsing the response from a JSON string to some objects is only a few lines of executable code and a few data class definitions. Here is one of the data classes.
@Serializable
data class notam(
    val id:String? = null,
    val number:Int,
    val notamClass:String? = null,
    val affectedFir:String? = null,
    val year:String,
    val type:String? = null,
    @Serializable(with = DateSerializer::class) val effectiveStart: LocalDateTime? = null,
    //val effectiveStart:String,
    @Serializable(with = DateSerializer::class) val effectiveEnd:LocalDateTime? = null,
    val icaoLocation:String,
    @Serializable(with = DateSerializer::class) val issued:LocalDateTime,
    //val issued:String,
    val location:String,
    val text:String,
    val minimumFlightLevel:String? = null,
    val maximumFlightLevel:String? = null,
    val radius:String? = null,
    var translations:List<translation>
    )  {
}
I used OkHttp for making my HTTP request. The target URL and a Bearer token header are needed for the request. When the response is returned, I deserialize it. I also filter out any results that have an effective date that makes the notice nolonger applicable. In running the code I found that less than 0.3% of the notifications that I received had expired. Filtering them out was completely optional.
    fun updateNotamsFromRadarbox(airportCode:String):Call {
        val requestUrl = "https://api.radarbox.com/v2/airspace/${airportCode}/notams"
        val client = OkHttpClient();
        val request = Request.Builder()
            .url(requestUrl).addHeader("Authorization", "Bearer $radarBoxToken")
            .build()
        val call = client.newCall(request)
        call.enqueue(object:Callback {
           override fun onResponse(call: Call, response:Response) {
                val responseString = response.body?.string()
               if(responseString != null) {
                   var notamsResponse = Json.decodeFromString(notamResponse.serializer(),responseString)
                   var now:LocalDateTime = LocalDateTime.now()
                   var filteredNotams = notamsResponse.apiNotams.filter { i -> ((i.effectiveStart==null)||(i.effectiveStart<now))&&((i.effectiveEnd==null)||(i.effectiveEnd>now))  }
                   showNotams(filteredNotams)
               }
           }
            override fun onFailure(call: Call, e: IOException) {
                Log.e(TAG,e.message.toString())
            }
        });
        return call;
    }
The results come back on another thread. Before updating a ListViewAdapter with the results, I have to make sure that the code is executing on the right thread.
fun showNotams(notamList:List<notam>) {
    runOnUiThread {
        notamLVA = notamsListViewAdapter(this, ArrayList(notamList))
        val notamLV = findViewById<ListView>(R.id.currentwarnings_notamlva)
        notamLV.adapter = notamLVA
    }
}
Posts may contain products with affiliate links. When you make purchases using these links, we receive a small commission at no extra cost to you. Thank you for your support.
On short notice I received an assignment to put together a quick, functional prototype for an application. The prototype only needed to demonstrate that some bit of functionality was possible. I wanted to be able to update some of the assets that were used by the application without doing a redeploy. Part of the reason for this is that the application was going to be demonstrated by someone in another city, and I wouldn’t be able to do any last minute updates myself through a redeploy. I managed to put together a system that allowed me to make content updates on a website that the demonstration device could download when the application was run. I’m sharing that solution here.
A few things to keep in mind though. Since this was for a prototype that had to be put together rapidly, there are some implementation details that I would probably not do in a real application; such as performing the downloads using a thread instead of a coroutine.
To make this work, the application by design loads assets from the file system. The assets that it uses are packaged with the application. On first run, the app will pull those assets from its package and write them to the file system. The application that I am demonstrating here loads a list of images and captions for those images and displays them on the screen. For the asset collection that is baked into the application, I only have one image and one caption.
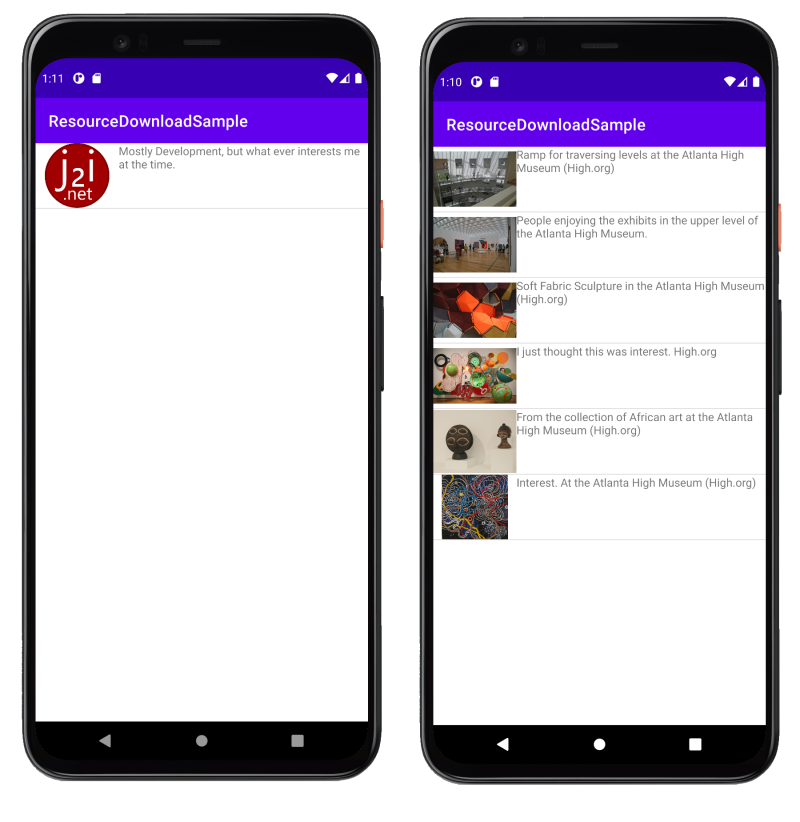
To demonstrate, I’ve created a new sample application (as I can’t share the prototype that I made) that list the images that it has on the screen. For the initial, this is a list of a single image. If you would like to see the complete code, you can clone it from https://github.com/j2inet/AndroidContentDownloadSample.git. When the application is run, it downloads an alternative content set. The images I used were taken in the High Museum of Art in Atlanta.
The application at first run and a run after the content download has completed
There are a few folder locations that I’ll use for managing files. A complete content set will be present at the root of the application’s file. There will be a subfolder that will hold partially downloaded files when they are sourced from the internet. Once a file is completely downloaded, it will be moved to a different temporary folder. If the application is disrupted while downloading, anything that is in the partial download folder is considered incomplete and will be deleted. A file that is present in the completed folder is assumed to have all of it’s data and will not be downloaded again the next time the application starts. Once all files within a content set are downloaded, they are moved to the root of the application files system. This is the function that is used to ensure that the necessary folders are present.
companion object {
    public val TAG = "ContentUpdater"
    val STAGING_FOLDER = "staging"
    val COMPLETE_FOLDER = "completed"
}

fun ensureFoldersExists() {
   val applicationFilesFolder = context.filesDir.absoluteFile;
    val stagingFolderPath = Paths.get(applicationFilesFolder.absolutePath, STAGING_FOLDER)
    val stagingFolder:File =  stagingFolderPath.toFile()
    if(!stagingFolder.exists()) {
        stagingFolder.mkdir()
    }
    val downloadSetPath = Paths.get(applicationFilesFolder.absolutePath, COMPLETE_FOLDER)
    val completedFolder:File = downloadSetPath.toFile()
    if(!completedFolder.exists()) {
        completedFolder.mkdir()
    }
}
To package the assets, I added an “assets” folder to my Android project. By default the Android Studio project does not have an assets folder. To add one, within Android Studio, select File -> New -> Folder -> Assets Folder. Android Studio will place the Assets folder in the right place. Place the files that you want to be able to update within this folder in your project. Most of the files that I placed in this folder are specific to the application that I was working on and can largely be viewed as arbitrary. The one file that absolutely must be present for this system to work is an additional file I made named updates.json. The file 3 vital categories of data.
The most important category of content are the names of the files that make up the content. The code is going to use these names to know what assets to pull out of the application package. The other two important items are the asset version number and the update URL for grabbing updates. We will look at those items in a moment.
We want the code to check the file system to see if updates.json has already been extracted and written. If it is not present, then the code will copy it out of the package and place it in the file system. If it is already present, then it will not be overwritten. The file is never overwritten during this check because the files that is there on the filesystem could be a more recent version than what was packaged with the application. After the application has ensured that this file is present, it reads through the properties for each asset. Each asset is composed of a url (that indicates where the resource can be found) and a name (which will be used for the file name when the file is extracted). In the above, all of the files have an empty string for the URL. If the URL is not blank, then the file is assumed to be part of the application package. The routine for pulling out an asset and writing it to the file is based on something that is fairly routine. It accepts the name of the file and a flag indicating whether it should be overwritten if the file is already present. You might recall seeing a form of this function in the previous entry that I made on this blog.
private fun assetFilePath(context: Context, assetName: String, overwrite:Boolean = false): String? {
    val file = File(context.filesDir, assetName)
    if (!overwrite && file.exists() && file.length() > 0) {
        return file.absolutePath
    }
    try {
        context.assets.open(assetName).use { inputStream ->
            FileOutputStream(file).use { os ->
                val buffer = ByteArray(4 * 1024)
                var read: Int
                while (inputStream.read(buffer).also { read = it } != -1) {
                    os.write(buffer, 0, read)
                }
                os.flush()
            }
            return file.absolutePath
        }
    } catch (e: IOException) {
        Log.e(TAG, "Error process asset $assetName to file path")
    }
    return null
}
To ensure that the assetFilePath function is called on each file that must be pulled from the application, I’ve written the function extractAssetsFromApplication. This function is generously commented. I’ll let the comments explain what the function does.
fun extractAssetsFromApplication(minVersion:Int, overwrite:Boolean = false) {
    //ensure that updates.json exists in the file system
    val updateFileName = "updates.json"
    val file = File(context.filesDir, updateFileName)
    val updatesFilePath = assetFilePath(this.context,updateFileName, overwrite);
    //Load the contents of updates.json
    val updateFile = File(updatesFilePath).inputStream();
    val contents = updateFile.bufferedReader().readText()
    //Use a JSONObject to parse out the file's data
    val updateObject = JSONObject(contents)
    //IF the version in the file is below some version, assume that it is
    //an old version left over from a previous version of the application.
    //restart the extraction process with the overwrite flag set
    val assetVersion = updateObject.getInt("version")
    if(assetVersion < minVersion) {
        extractAssetsFromApplication(minVersion,true)
        return
    }
    //Let's start processing the individual asset items.
    val assetList = updateObject.get("assets") as JSONArray
    for(i in 0 until assetList.length()) {
        val currentObject = assetList.get(i) as JSONObject
        val currentFileName = currentObject.getString("name")
        val uri:String? =  currentObject.getString("url")

        if(uri.isNullOrEmpty() || uri == "null") {
            //There is no URL associated with the file. It must be within
            // the application package. Copy it from the application package
            //and write it to the file system
            assetFilePath(this.context, currentFileName, overwrite)
        } else {
            //If there is a URL associated with the asset, then add it to the download
            //queue. It will be downloaded later.
            val downloadRequest = ResourceDownloadRequest(currentFileName, URL(uri))
            downloadQueue.add(downloadRequest)
        }
    }
}
When the application first starts, we may need to address files that are lingering in the staging or completed folder. The completed folder contains files that have successfully been downloaded. But there may be other files for the file set that have yet to be downloaded. If the file set is complete there will be a file named “isComplete” in the folder. If that file is found, then the contents of the folder are copied to the root of the application’s file system and are deleted from the completed folder. Any files that are in the staging folder when the application starts are assumed to be incomplete. They are found and deleted.
fun applyCompleteDownloadSet() {
    val isCompleteFile = File(context.filesDir, COMPLETE_FOLDER + "/isComplete")
    if(!isCompleteFile.exists()) {
        return;
    }
    var downloadFolder = File(context.filesDir, COMPLETE_FOLDER)
    val fileListToMove = downloadFolder.listFiles()
    for(f:File in fileListToMove) {
        val destination = File(context.filesDir, f.name)
        f.copyTo(destination, true)
        f.delete()
    }
}


fun clearPartialDownload() {
    val stagingFolder = File(context.filesDir, STAGING_FOLDER)
    //If we have a staging folder, we need to check it's contents and delete them
    if(stagingFolder.exists())
    {
        val fileList = stagingFolder.listFiles()
        for(f in fileList) {
            f.delete()
        }
    }
}
To check for updates online, the application loads updates.json and reads the version number and the updateURL. The file at the updateURL is another instance of updates.json. Though if it is an update then it will contain a different set of content. The version in the online version of this file is compared to the local version of the file. If the online version has a greater number then it is downloaded. Otherwise no further work is done on the file. Any version of updates.json must have the url properties populated for the assets. If this value is missing, then the file is not valid. The download URLs and intended file names are collected (as the source URL might not contain the file name in it at all).
fun checkForUpdates() {
    thread {
        val updateFile = File(context.filesDir, "updates.json")
        val sourceUpdateText = updateFile.bufferedReader().readText()
        val updateStructure = JSONObject(sourceUpdateText)
        val currentVersion = updateStructure.getInt("version")
        val updateURL = URL(updateStructure.getString("updateURL"))
        val newUpdateText =
            updateURL.openConnection().getInputStream().bufferedReader().readText()
        val newUpdateStructure = JSONObject(newUpdateText)
        val newVersion = newUpdateStructure.getInt("version")
        if (newVersion > currentVersion) {
            val assetsList = newUpdateStructure.getJSONArray("assets")
            for (i: Int in 0 until assetsList.length()) {
                val current = assetsList.get(i) as JSONObject
                val dlRequest = ResourceDownloadRequest(
                    current.getString("name"),
                    URL(current.getString("url"))
                )
                downloadQueue.add(dlRequest)
            }
            downloadFiles();
        }
    }
}
The downloadFiles function starts to get into the real work of what the component does. For any file, this function will make up to three attempts to download the file before it gives up on the file. The file contents are downloaded through the URL object. The URL object provides an outputStream to the resource identified through the URL. I’m arbitrarily downloading the file in 8 kilobyte chunks (8192 bytes). As mentioned before, the chunks are written to a temporary folder. Once a file is completed, it gets moved.
    @WorkerThread
    fun downloadFiles() {
        val MAX_RETRY_COUNT = 3
        val failedQueue = LinkedList<ResourceDownloadRequest>()
        var retryCount = 0;
        while(retryCount<MAX_RETRY_COUNT && downloadQueue.count()>0) {

            while (downloadQueue.count()>0) {
                val current = downloadQueue.pop()
                try {
                    downloadFile(current)
                } catch (exc: IOException) {
                    failedQueue.add(current)
                }
            }
            downloadQueue.clear()
            downloadQueue.addAll(failedQueue)
            ++retryCount;
        }
        if(downloadQueue.count()>0) {
            //we've failed to download a complete set.
        } else {
            //A complete set was downloaded
            //I'll mark a set as complete by creating a file. The presence of this file
            //markets a complete set. An absence would indicate a failure.
            val isCompleteFile = File(context.filesDir, COMPLETE_FOLDER + "/isComplete")
            isCompleteFile.createNewFile()
        }
    }

    fun downloadFile(d:ResourceDownloadRequest) {
        downloadFile(d.name, d.source)
    }

    fun downloadFile(name:String, source: URL) {
        val DOWNLOAD_BUFFER_SIZE = 8192
        val urlConnection:URLConnection = source.openConnection()
        urlConnection.connect();
        val length:Int = urlConnection.contentLength

        val inputStream:InputStream = BufferedInputStream(source.openStream(), DOWNLOAD_BUFFER_SIZE)
        val targetFile = File(context.filesDir, STAGING_FOLDER + "/"+ name)
        targetFile.createNewFile();
        val outputStream = targetFile.outputStream()
        val buffer = ByteArray(DOWNLOAD_BUFFER_SIZE)
        var bytesRead = 0
        var totalBytesRead = 0;
        var percentageComplete = 0.0f
        do {
            bytesRead = inputStream.read(buffer,0,DOWNLOAD_BUFFER_SIZE)
            if(bytesRead>-1) {
                totalBytesRead += bytesRead
                percentageComplete = 100F * totalBytesRead.toFloat() / length.toFloat()
                outputStream.write(buffer, 0, bytesRead)
            }
        } while(bytesRead > -1)
        outputStream.close()
        inputStream.close()
        val destinationFile = File(context.filesDir, COMPLETE_FOLDER + "/"+ name)
        targetFile.copyTo(destinationFile, true, DEFAULT_BUFFER_SIZE)
        targetFile.delete()
    }
That covers all of the more complex functionality in the code. How is it used? Usage starts with the constructor. When the ContentUpdater is extantiated, it will create the folders (if they do not already exists), extract the content from the application (if there is no content present) and clear the partial download folder. It does not automatically apply the new downloaded content to the application.
class ContentUpdater {

    companion object {
        public val TAG = "ContentUpdater"
        val STAGING_FOLDER = "staging"
        val COMPLETE_FOLDER = "completed"
    }
    val context:Context
    val downloadQueue = LinkedList<ResourceDownloadRequest>()

    constructor(context: Context, minVersion:Int) {
        this.context = context

        ensureFoldersExists()
        extractAssetsFromApplication(minVersion);
        this.clearPartialDownload()
    }
}
In theory, I could have the routine do this as soon as a complete download set is preset. But changing the content in the middle of a session within an application could cause problems. The application using the component could ask the component to apply downloaded content at any time through by calling applyCompleteDownloadSet(). I have the application doing this in the onCreate event of the main activity. That way the most recent content is applied before the reset of the application begins to get initialized.
There are a lot of scenarios that I might consider if I ever use something like this in a production application. This includes possibly notifying the user of the progress of the download, giving the user the option to load the new content once it is complete, and some other scenarios on handling having multiple versions of the application in user’s hands at once. I would also move the download code to either a coroutine (instead of a thread) or possibly a service (for larger downloads) and consider limiting the downloads to WiFi. I wouldn’t suggest the code that I’ve presented here to be copied directly into a production application, But it can be a good starting point if you are trying to figure out your own solution.
If you needed to include additional information with your Android application that isn’t already supported by Android Studio and the various functionality natively, one solution is to place the content in the project’s Assets folder. By default, a new projects do not have an Assets folder. You can easily add one through the menu sequence File -> New -> Folder -> Assets Folder. Within this folder. Assets that you add to this folder will now be packaged with you app. They will also be compressed.
You have the option of not compressing the files. You may want to do this if the files are already in a compressed format and thus are not significantly reduced in size by additional compression. If you want a file type exempted for compression, you can direct the compiler to not compress it by making an addition to the build.gradle for the module. If I wanted txt files to be exempted from compression, I would make the following addition.
android {
    aaptOptions {
        noCompress 'txt'
    }
}
Uncompressed files are easy to read. If I placed a files named “readMe.txt” in my assets folder, I can get an InputStream for the file with the following code line.
val myInputStream = context.assets.open("readMe.txt")
You may want to write the files out to the files system for faster access. The following function, when given the name of an asset, will return the absolute path to the location of the file derived from the asset. It first checks to see if the asset has already be extracted to a file. If it has not, then it will take care of extracting it. Accessing the assets this way has an advantage. After an application has been deployed, your application could at runtime check a web location for updated versions of the assets and write them to the file system. Without any further changes in logic, the application could just attempt to read the asset as normal and it will receive the updated version.
    fun assetFilePath(context: Context, assetName: String): String? {
        val file = File(context.filesDir, assetName)
        if (file.exists() && file.length() > 0) {
            return file.absolutePath
        }
        try {
            context.assets.open(assetName).use { inputStream ->
                FileOutputStream(file).use { os ->
                    val buffer = ByteArray(4 * 1024)
                    var read: Int
                    while (inputStream.read(buffer).also { read = it } != -1) {
                        os.write(buffer, 0, read)
                    }
                    os.flush()
                }
                return file.absolutePath
            }
        } catch (e: IOException) {
            Log.e(TAG, "Error process asset $assetName to file path")
        }
        return null
    }
In my next entry, I’ll be using this function to create an application that can also update its content from online content.
Many apps require a network connection. Provided the connection meets bandwidth requirements, the apps don’t typically care how that connection is established. But for applications that engage in controlling home devices the application may specifically want to communicate over WiFi. In Android there are two ways that this has been handled. Some applications will turn on WiFi if it is turned off. Others may prompt the user to turn on WiFi.
Of the two options, the application turning on WiFi is an approach that is not supported on Android Q and later. This is part of the privacy changes in Android Q. For older versions of Android, controlling the WiFi could be performed though the WIFI_SERVICE.
val wifi = getSystemService(WIFI_SERVICE) as WifiManager
if(!wifi.isWifiEnabled)
    wifi.isWifiEnabled = true;
If you try this now, Android Studio will give a deprecation warning. To have the user change the WiFi state the application can open the WiFi control interface for the user. Rather than dump the user into the WiFi control interface, it is generally better to prompt them first. The WiFi control UI can be opened with an intent for ACTION_WIRELESS_SETTINGS.
An easy way to prompt the user is to use the AlertDialogBuilder. A complete solution looks like the following.
    fun checkWifiState() {
        val wifi = getSystemService(WIFI_SERVICE) as WifiManager
        if(!wifi.isWifiEnabled) {

            val dialogClickListener =
                DialogInterface.OnClickListener { dialog, which ->
                    when (which) {
                        DialogInterface.BUTTON_POSITIVE -> {
                            startActivity(Intent(Settings.ACTION_WIRELESS_SETTINGS));
                        }
                        DialogInterface.BUTTON_NEGATIVE -> {
                        }
                    }
                }

            var builder:AlertDialog.Builder = AlertDialog.Builder(this) as AlertDialog.Builder
            builder.setMessage("WiFi must be enabled. Do you want to open the WiFi controls?")
                .setPositiveButton("Yes", dialogClickListener)
                .setNegativeButton("No", dialogClickListener)
                .show()
        }
    }