I took a lot of photographs on a recent visit to the Kenedy Space Center. On a previous visit, I had some challenges in taking photographs that showed the scale of some of the items that were there. This time, I travelled with someone that was able to hold my camera.
Outside the Atlantis Space Shuttle exhibit they have a 1:1 scale representation of the shuttle’s boosters and fuel tank. I had my travel companion while I held the camera and ran up to the booster. I think this gives a better scale. What do you think, does this give an idea of scale?
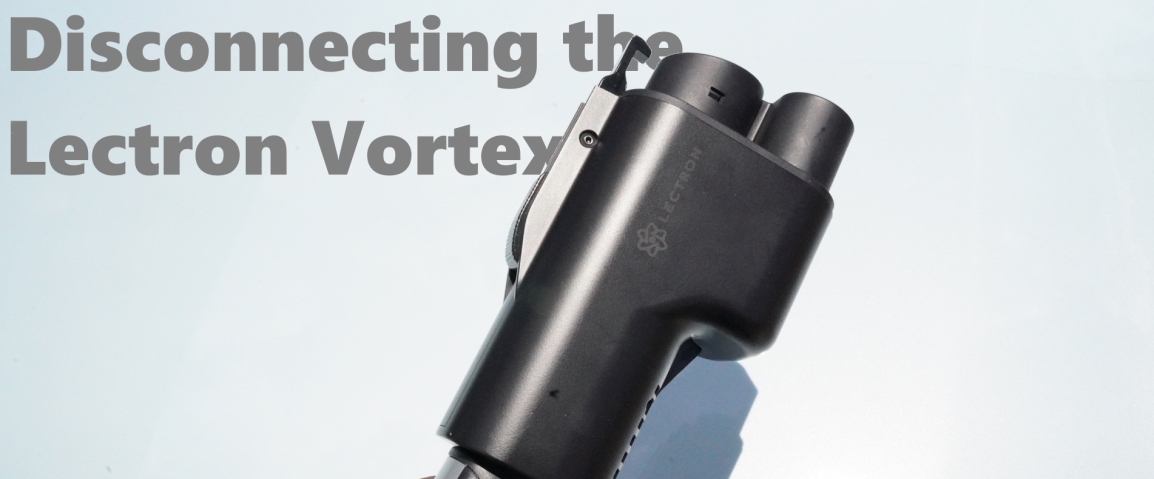
If you are reading this, chances are you were searching for information on disconnecting the Lectron Vortex adapter stuck on that Super Charger. I’ll give the answer to that priority.
Keep the NACS to CCS adapter connected to your car
Grab onto the NACS cable and apply pressure as though you were pushing it into your car
Squeeze the NACS release cable. This will require significant force. You may have to start squeezing with both hands
Pull or work the cable out. I’ve had to use a bit of a rotation moment to work one out
Step 2 is key. If you don’t push the adapter in a little before pressing the disconnect lever, the adapter can prevent the disconnect lever from going down.
Video on Removing the Lectron Vortex from a NACS
What’s Going On Here
Now that I’ve gotten the information for the people that have found themselves in a desperate situation out of the way, I’ve gor more to say on what’s going on here. Tesla has opened their chargers to a wider variety of cars. The Version 4 super chargers have adapters built in so that they can connect to both Teslas (NACS interface) and non-Teslas (CCS interface). For the Version 3 Super Chargers (which are more widely deployed) there is no built in adapter. A driver can buy an adapter to keep in their car and use as needed. However, compared to the demand, those adapters are in short supply. People that have ordered them from Tesla may see deliver dates that are several months out. This can be a significant disadvantage for those that need to take long trips where charging options may be few. Rather than delay a trip, one might decide to get an adapter for upcoming trips to open up their options. However, note that often times the car manufacturer may prohibit the usage of a third party adapter for DC Fast Charging. Tesla also prohibits the user of third party adapters with their chargers. The key advantage that the third party adapters have over the Tesla adapter is that they are available.
What are the Third Party Options
There are a total of 2 third party adapters available in the USA at the time that I am writing this. Those are the Lectron Vortex and the A2Z Typhoon. Neither is approved by Tesla. Tesla has yet to announce a certification program.
Lectron’s first release of the Vortex had an issue where it was possible to disconnect the NACS without terminating the charging or pressing the release levers. This could have dangerous outcomes! Lectron did a recall and released an updated version of their adapter. In the update, I think they may have overcorrected. In the current version that is available, it is difficult to operate the lever and move it far enough to release the charger. While I’ve seen complaints about the need to remember to engage the lock on the A2P Typhoon. I don’t have experience with the Typhoon myself. I do have a Vortex.
Though I didn’t need a charge, I drove to a local super charger to test how the adapter fits with the car and the Super Charger’s NACS interface. When I was disconnecting, I ran into serious problems in trying to disconnect. It took me about 20 minutes to disconnect the cable. Afterward, I contacted Lectron to complain. They gave me the procedure in the begining of this post. I was hesitant to try it at another Super Charger. I did acquire an adapter with a NACS end to connect to my adapter to try the procedure. It was difficult, but it worked. While watching TV, I casually tried the procedure several more times. Later, I noticed after several inserts and disconnects, that the spring for the lever felt less agressively tight in a good way. It may be the case that with enough insert cycles that the device will settle on a reasonable grip level.
If I Get One of These, Can I Use Tesla Chargers?
Getting an adapter might not be sufficient to use a v3 Super Charger. In addition to having capabilities for interfacing (whether through having a NACS interface built in or having an adapter) the vehicle must also be authorized to use the charger. To date, Tesla has only authorized Rivian and Ford electric vehicles to use Tesla chargers. Other manufacturers have announced that they are partnering with Tesla to make charging evailable to their vehicles. But that is a promise that is yet to take usable form. GM was announced to be the next manufacturer with authorization after Ford. They had announced that they would have availability by the end of Spring 2024. Prior to then, Elon Musk laid off the entire Super Charger team. That likely had an impact on the GM integration and authorization of Super Charging. Some have reported that GM had the adapter listed for purchase for owners of their EVs for 35 USD. This is far less than the 200 to 249 USD price on the ohter adapters. But given that Tesla is behind on delivering the charger adapters to ford EV owners, the timeline for the rollout of other brands is more uncertain.
At this point, it is safe to say that GM will not meet its goal of having their cars open to Tesla charging by Spring 2024. The last day of spring astronomically was a few days ago. Q2 ends in a couple of days. In a previous post, I had mentioned that InsideEVs reported the following,
GM’s Supercharger Access Plan Is Still On Schedule, Despite Tesla’s Layoffs
“We plan to stick to the timeline that we previously announced, and that’s kind of all I can say,” Sanaz Marbley, director of global strategic technology communications at GM, told InsideEVs.
I confirmed that the original timeline said that access would open up in spring of 2024.
“I think spring 2024 is accurate,” she said.
GM Authority reported having received the following from General Motors recently.
โThanks so much for reaching out. The Supercharger network is not yet open to GM customers,โ GM Director of Strategic Technology Communications Sanaz Marbley told GM Authority. โWe are working as quickly as possible to open up access to the Supercharger Network for our customers, and delivering a seamless charging experience is our priority. GM continues to expand charging infrastructure throughout North America, with GM drivers currently having access to more than 195,000 chargers. We believe that access to charging is the best way to serve our customers and grow the EV market.โ
I’ve not seen a new timeline announced. That said, I’m declined to be critical of GM. Recent events of Tesla may have had disruptive effects. Musk laid off the entire Super Charger team. I cannot independently verify the results of that action, Brandon Flasche’s report of consequences in the aftermath including those that needed to contact the Super Charger team “getting bounced e-mails with references to reach out to someone else” sound like something that could result in delays for projects.
Ford, which has access to Super Charging, still has demand much larger than supply for the Tesla adapters. Presently, there are a couple of Super Charger adapters on the market that could be used. But I can’t recommend them for a couple of reasons (though I will talk about them in a Future post or two).
Tesla’s charger ToS states that third party adapters are prohibited for use at their chargers. But the odd advantage that the third-party adapters have over the Tesla made ones is that they are available! The two adapters are the A2Z Typhoon and the Lectron Vortex. I have in hand the Vortex and tested the connection on a v3 Super Charger (though no charging session was initiated). It was extremely difficult to remove! It took me about 20 minutes to figure out how to get it off. After some quick searching, I found that this is a common challenge, and came across a few reports of users abandoning their adapters because they could not remove them. I did reach out to Lectron about this and they replied with instructions on removing the adapter. They key parts of that to know are to keep the adapter connected to the car, apply pressure pushing the NACS adapter in the direction of the super charger (as though you were pushing it in further), press the NACS release lever on the adapter, then pull the NACS out. I’ve not gone back to test this procedure for fear of it getting stuck again. But I am going to try it with a “dumb” NACS adapter (If it gets stuck, at least I’ll not have to leave the adapter behind). I may also try out a Typhoon and report on hem later.
Magnetic cards have been around for a while. It feels only recently in the past few years that point of sale systems in the USA primarily switched to NFC and chipped cards for payments. But magnetic cards still have lots of usages, such as gift cards or door entry cards. While cleaning up, I found a magnetic card reader that was used for a project a long time ago. I happen to find this at a time where I’m already writing about NFC cards, just wrote about the Luhn’s Check algorithm used in credit card entry, and looking at how to read smart cards. I think it’s fitting to take a glance at reading information from magnetic cards. There are multiple standards for encoding information onto magnetic cards.
The physical unit I found was purchased for part of the functionality that was used in a demo for a concept in a past NRF Conference. I still have some video from the event.
This particular reader appears as an HID device to the computer. When a card is scanned, it generates keystrokes to the computer. For demonstration, I am using a gift card from “Raising Cane’s.” I’ve selected this card because I believe the card is cancelled and thus has no funds on it. But even if it does have funds on it and someone uses it, I suffer no lost since I am not positioned to suffer a lost. I also found an old American Express gift card whose funds have long been exhausted.
Encoding
The data on track 1 of the cards is encoded in 7 bits; 6 bits are data, 1 bit is for parity. This means that only 64 possible characters could be in the encoding. This isn’t UTF-8 or ASCII like you may be acustomed to. The reader does translate from these encoding to the equivalent keystrokes. Data on tracks 2 and 3 (if they exists) have 5 bits per character. Track 1 can have up to 79 characters, track 2 up to 40, and track 3 up to 107 characters.
I’ve got a tables at the end of this post that shows the actual encodings and their classifications. The reader will translate these to ASCII encodings for you. These are primarily included as a curiosity. There is more than one standard for encoding data on magnetic cards. With some of the hotel key cards that I have, I found some of them don’t work with this reader. This is somewhat expected, as a hotel might want to use a format that isn’t as easy to replicate. The varied gift cards, membership cards, and payment cards I tried generally worked fine.
Error Response
I want to start off talking about the error response since people often overlook those. If you were to use a card that the reader cannot process, it will return the string +E?. If you receive this response, the reading failed, possibly because the card is using an encoding that isn’t understood.
Sample Card Scan
Here’s the data that comes back when I read the “Raising Cane’s” gift card. I will refer to it in the following sections.
When a card is read, the first character in the data will be a %. The last character will be a ?. If you were making something that were reading card data, you could use these characters to let your program know that it is receiving card data or that the data. Fields on the card are separated with the ^. Though not part of the card data, when my specific card reader has finished reading data, it will also send an enter keystroke. All of the data between the % and ? comes from the card. But there are some more delimiters in that block of data.
Track Delimiters and Field Delimiters
A magnetic card could have multiple tracks in parallel. The card reader returns all three tracks in a single stream of data. But the tracks are delimited with a semicolon(;). A single track could have multiple fields of data. Fields are separated with the caret (^) character on track 1 or an equal (=) character on tracks 2 and 3. Parsing out the sample card read I provided above, we end up with the following. The exact purpose of each of these fields could vary by card.
Track 1 Field 1:B6000205500145033524
Track 1 Field 2:GIFT/RAISINGCANES
Track 1 Field 3:4211?
Track 2 Field 1:6000205500145033524
Track 2 Field 2:4211101685485
Card Class
The very first character read on the card indicates the class/type of card being read. For all of the payment cards (both gift cards and credit cards) that I’ve encountered, this character is a ‘B’. From my readings and reading other cards that I have, I have found the following.
Prefix
Association
B
Payment or Gift Card
G
Gift Card
M
Membership Card
GC
Gift Card
Card class based on the first character
Credit Card Format
While I found the way data is structured on a card to be variable, when I tried several credit cards, the construction of the data is consistent. Here is a modified data stream from a gift card.
%B377936453080000^THANK YOU ^2806521190729520 ?;377936453080000=280652119072952000000?
Breaking it out into fields, we have the following.
Field
Purpose
Data
Track 1 Field 1
Primary Account Number
377936453080000
Track 1 Field 2
Name
THANK YOU
Track 2 Field 3
Expiration Date (2028-06) Service code (521) Discretionary Data(190729520)
2806521190729520
Track 2 Field 1
Credit Card Number
377936453080000
Track 2 Field 2
Expiration Date (2028-06) Service code (521) Discretionary Data (190729520)
280652119072952000000
You’ll notice that some of the data is on the card twice. I’m not quite sure of the reason for this. Is that for verifying the integrity of the data? To provide an alternative method of reading data for cheaper devices, allowing them to only read one track? This, I don’t know.
Reading the Data in Code
As I said the post on Luhn’s Check, don’t enter a real credit card number on the site where I have sample code posted. Though the site doesn’t actually communicate any data back to any site, I think it is still better to advise you not to enter data. But the site is there for you to examine the code. Feel free to download it to run in a local sandbox (where you can prohibit Internet communication) or view the source code to see how it works. You can find the code at https://j2inet.github.io/apps/magreader. If you would like to use a magnetic card reader that is similar to what I have, you can find it here (affiliate link):
I’ve got a series of posts on JavaCard development. There is some hardware that is needed if you want to deploy your JavaCard programs to physical hardware. The cards that I’m using are both chip cards and dual-interface cards (meaning that they both have the chip and can communicate over NFC). They also have magnetic strips on the back. If you want to try the same hardware, this is a listing of what I’ve got. Note that the links in the following are affiliate links. If you purchase through these links, I earn a small commission that goes towards supportin gthis site and my activities.
Blank Java Cards
Java 3 Dual Interface Cards
These are the cards on which I’ll be running my programs.
The JR150 cards are dual interface cards. They can interact both through the chip and wirelessly, making them accessible to Android phones. These cards use the smaller 6-contact version of the chip interface and a printable in card printers. The two that I received came with their keys on a sticker enclosed in the device. They key values were the same as what was listed on the Amazon Listing as example keys. I’m reposting here, should you get these cards and the if the same key applies. The cards come with at least 99 KB of storage and supports RSA encryption of up to 4096 bits.
These cards *only* have the chip interface and are suitable for Java Card 2 applications. It has 40 kilobytes of storage and supports RSA encryption up to 2048 bits.
This inexpensive card reader/writer has a wireless-only interface. On Windows, no driver installation is needed. The operating system immediately recognizes it and makes it available to your programs.
This card reader cost a bit more than the wireless-only, but is able to read either type of card. Though it will be listed as two card readers by Windows, only one mode can be active at a time. It will either read a contactless card or a contact card, but not both at the same time. Like the previously mentioned card reader, the drives built into windows already works with this device.
Magnetic Reader/Writers
Text data can be encoded on the magnetic strips on the card. Note that the text data uses an encoding that does not make all ASCII characters available. The encoding for english letters doesn’t distinguish between upper and lower case letters. Card readers tend to return letters in upper case lettering.
Reader/Writer
If you want to also write information to the magnetic strip on the back of the card, you will want a card writer. Though, don’t put anything confidential on the magnetic card. Those contents tend to be stored in plain text and would easily be lifted by someone else.
This magnetic reader has no capability for writing to a strip. To the computer, it appears as a keyboard. Swiping a card through it will result in the computer receiving keystrokes that correlate to the data on the card. You’ll need to parse the data out. I’ve written about the data encoding in another post that you can find here.
Card Skins
I checked out card printers, and even the cheapest among them is too expensive for handling a small volume of cards. So that my cards were not bear white, I decorated them using “card skins.” These are marketed as decorations for payment cards. I did add a few of these to a couple of payment cards too. At this point in time, the only information on the front of a card is a name and the name of a bank. Most of the relevant information is on the back of the card. If you get one, you’ll need to know if you are planning to place the skin on a card with the smaller 6-contact chip or the larger 8-contact. There exists an American Express with a 10-contact chip. I’ve not seen it in person and don’t know it’s size. If you have a 10-contact card, be aware that these skins might not fit. These are the cards that appear in my videos or my posts.
Posts may contain products with affiliate links. When you make purchases using these links, we receive a small commission at no extra cost to you. Thank you for your support.
Various car manufacturer adopted NACS (Tesla charging interface) as their preferred interface for their cars. Those manufacturers have also said that the cars they’ve already sold which use the CCS interface for charging will be able to acquire an adapter for charging at Tesla super chargers when the network opens. Ford vehicles already have access to the Tesla super charging network. GM had stated that they would have access to the Tesla charging network by Spring 2024. At the time that I’m posting this, 2024 June 12, it is only 8 more days until the first day of summer.
There have been concerns about hitting that date, especially since Tela fired the entire supercharger team. But according to InsideEVs, GM said that it was still on schedule to deliver according to its original deadline. With the first day of summer being only a week away, we will see whether they actually hit that mark.
“We plan to stick to the timeline that we previously announced, and that’s kind of all I can say,” Sanaz Marbley,ย director of global strategic technology communications at GM, toldย InsideEVs.ย
As this rollout occurs, some, including myself, have wondered what this will mean for Tesla drivers. Newer Tesla chargers have much longer cables (Version 4 chargers). But many of the chargers already available have much shorter cables. These cables were meant to only power Tesla vehicles, which have their charge port in the back driver’s side tail light (Tesla drivers always back into the space). Many other vehicles have their charge port further away somewhere on the side of the vehicle. From the perspective of a Tesla charger, the port may also be on the wrong side. This results in a driver either needing to double-park for the cable to reach or use the charger on the “wrong side” from where they parked. Either situation results in two chargers now being unavailable to a Tesla driver.
Tesla states that drivers of other EVs may use the charger on the “wrong” side, as this is necessary for charging. But they ask that drivers not park diagnally. Though I can’t use the chargers yet, I drove a Chevrolet EUV Bolt to a local bank of version 3 super chargers and found that I could only reach the cable if I parked diagnally.
Interesting times are ahead at the Tesla charging banks.
I had to park diagnally for the cable to reach my car.
Posts may contain products with affiliate links. When you make purchases using these links, we receive a small commission at no extra cost to you. Thank you for your support.
The concept of transporting the heat produced by an appliance to the outdoors isn’t by any means new. Whether it is the hot air rising out of an oven or the exhaust from the dryer, it’s a concept implemented for generations. Less common in the home environment, however, is the heat from a computer. There are probably people mining cryptocurrency that have already tackled this problem. Though I’m not mining, I found myself faced with it when rendering video or playing a graphically intensive video game. I recently decided to do something about it. On the days I am working from home, it could sometimes become uncomfortably hot in my office though it is cool in the rest of the house. I thought it would be unreasonable to further cool the house just to make it more comfortable in one room; that feels like a waste of energy. Instead, I decided to evacuate the hot air from the computer before it spills out into the room.
I feel like there should be a ready-made solution available somewhere. But my searches turned up next to nothing. I did find an ant-miner adapter made for connecting a 4-inch hose to the antminer. This is a must have for what I’m doing! Four inches is the same diameter as the exhaust hoses used on many residential dryer. The computer in question is near a window. I started off looking for the adapters that are used for portable air conditions. These are usually made to better blend-in with the windows. I wasn’t able to find any that would work for my purposes. I did however find an adapter that was made for venting the air from a drive-through a window. This was perfect! It also used the same 4 inch fitting that the antminer adapter uses. The last major piece I needed was something to help move the air along the hose.
The exhaust fan on a computer is usually blowing air out into an open room. When that same airflow is directed through the dryer hose there may be some back-pressure to overcome. To compensate for this, was I initially was going to for an additional computer fan on the ant-miner adapter. When I tested this out with the 12-volt fan, the air flow was weak. I even tried slightly over-volting the fan to 14 volts to little effect. This was going to be inadequate. I was going to need a stronger solution. With a little more searching I discovered that I could also get 4-inch inline duct fans. This was perfect! There are a variety of duct fans available. For myself, I got a single speed fan. Other options to consider are do you want an inline fan to have a power switch on it, do you want it to be adjustable speed, and what flow rate you want it to have. The flow rate, usually expressed in Cubic Feet per Minute, tells what volume of air it can move over a minute. The higher this number, the more air it moves.
The window adapter with the vent in place.
Before installing anything I fit the pieces together and turned it on. It was working great! when I turned it on I could see the shutters on the exhaust vent open a little. The fan, though audible, didn’t sound much different from the quiet sound of air flowing from an AC unit. For the installation, I had to remove the screen from my Window. The screen was designed to be easily removed and restored.
The exhast vent on the computer with magnets placed around it.
I wanted to be able to quickly attach and disconnect the exhaust vent to my computer. I’ve placed four magnets around the area of the back of the computer that the hot air comes from. I also placed four screws on the antminer adapter. When I line up the adapter with the magnets, it stays in place. There is also weather stripping material that came with the window adapter that I’ve placed on the edges of the ant miner adapter so that it better captures the hot air.
Adapter and hose magnetically atached to the computer.
Drawbacks
Aesthetically, though the adapter was designed to better blend in with the window, it doesn’t completely blend in. Having to remove the screen from my window makes it visually different from my other windows. That’s a drawback. The exhaust duct is warm to the touch. This is expected, since there is warm air flowing through it. But this also means that some of the thermal energy is leaking through it into the room. An insulated duct could prevent this. Not that the current state is awful. Keep in mind previously 100% of the thermal energy was being dumped into the room before. As you might imagine, the window fitting does not block the transfer ot noise to/from the room as well as the double paned glass. If I were in a noisy environment, this could be problematic. I’d like a way to exchange the hot air with the outside without actually pushing air out the window. I’m sure the negative pressure that this solution puts on the room results outside air beign pulled into other areas of the house. An idea solution would perform the heat exchange with the outside without pushing out the air. That would be an air-condition.
Items Purchased or Suggested
Below you will find affiliate links to items that I used or that I would recomend that someone else consider if they decide to implement a similar solution for themselves.
Posts may contain products with affiliate links. When you make purchases using these links, we receive a small commission at no extra cost to you. Thank you for your support.
I was working with hardware that was sequential in coming off a production line. Looking at the hardwares’ serial number, I realized the numbers were mostly sequential, with the exception of the suffix on the serial number. I realized that I was looking at numbers suffixed with a checksum. I tried out a few checksum algorithms to figure out which one fit. This was only being done from curiosity.
One algorithm of special interest was Luhn’s algorithm. This is the algorithm that is used with IMEI, credit card numbers, and Canadian social security numbers. It’s a useful public domain algorithm. I’ve collected a few implementations of it here.
C++
bool pasesLuhnCheck(const string& cardNo)
{
int nDigits = cardNo.length();
int nSum = 0, isSecond = false;
for (int i = nDigits - 1; i >= 0; i--) {
int d = cardNo[i] - '0';
if (isSecond == true)
d = d * 2;
// We add two digits to handle
// cases that make two digits after
// doubling
nSum += d / 10;
nSum += d % 10;
isSecond = !isSecond;
}
return (nSum % 10 == 0);
}
C#
public static bool CheckLuhnParity(string digits)
{
bool isValid = false;
if (!string.IsNullOrEmpty(digits))
{
long sum = 0;
int parity = digits.Length % 2;
for (int i = 0; i < digits.Length; i++)
{
int digit = digits[^(i + 1)] - '0';
sum += (i % 2 == parity) ? Luhn(digit) : digit;
}
isValid = (sum % 10) == 0;
}
return isValid;
}
Kotlin
fun IsValidLuhnString(entry:String): Boolean {
var sum = 0
var isSecond = false
for( i in entry.length-1..0) {
val multiplier = if(isSecond) { 2} else {1}
val digit = entry[i].digitToInt() * multiplier
sum += digit / 10;
sum += digit % 10
isSecond = !isSecond
}
return (sum % 10) == 0
}
You can find a JavaScript/HTML implementation of it at https://j2inet.github.io/apps/luhns. Though this example doesn’t engage in any network communication, while I encourage you to try it out, please don’t use your bank card. Better yet, if you want to examine the code locally, there is also a download link on that page that contains all of the source code.
Posts may contain products with affiliate links. When you make purchases using these links, we receive a small commission at no extra cost to you. Thank you for your support.
Microsoft has made the MS DOS source code available on GitHub. At the time of this writing, the 1.25, 2.0, and 4.0 versions are available. For those that ever ran it, browsing through it shows some interesting attributes. 85% of the source code is x86 assembler and 13.1% is in C. Typically, programs on MS DOS ran in the same memory space (no surprise, since these versions of MS DOS did not support multi-tasking). In modern development the mechanism that a program used for calling an operating system is abstracted away. With a lot of this source code being written in x86 assembler, the communication between a user program and operating system functions is laid bare. Communication and function calls often occurred through dedicated processor interrupts. Though modern processors still use interrupts (especially for hardware events) much of our communication with modern operating systems don’t have to rely on these. Chances are that you don’t have the equipment to write the compiled images to a disk (do you even have a floppy disk?). But I think it is worth looking through if you ever ran it at any point in your life.
Posts may contain products with affiliate links. When you make purchases using these links, we receive a small commission at no extra cost to you. Thank you for your support.
If you try to invoke the Microsoft Storage Emulator (azurite.exe) and you see the following error, the solution is simple.
C:\Program Files\Microsoft Visual Studio\2022\Community\Common7\IDE\Extensions\Microsoft\Azure Storage Emulator>azurite.exe
Azurite Blob service is starting at http://127.0.0.1:10000
Exit due to unhandled error: Error: EPERM: operation not permitted, open 'C:\Program Files\Microsoft Visual Studio\2022\Community\Common7\IDE\Extensions\Microsoft\Azure Storage Emulator\__azurite_db_blob__.json~'
The solution is simple. You will likely see this error if your current directory is the same as the directory where the EXE is store. You don’t want to run the program that way. It will result in the program attempting to place its temporary files in that folder. The better way is to ensure that the program’s folder is included in your path variable so that you can invoke it from any folder. The full path to the folder will depend on your edition of Visual Studio. I’m using the Community version. If you are running the Professional version, then replace the folder name “Community” with “Professional” below.
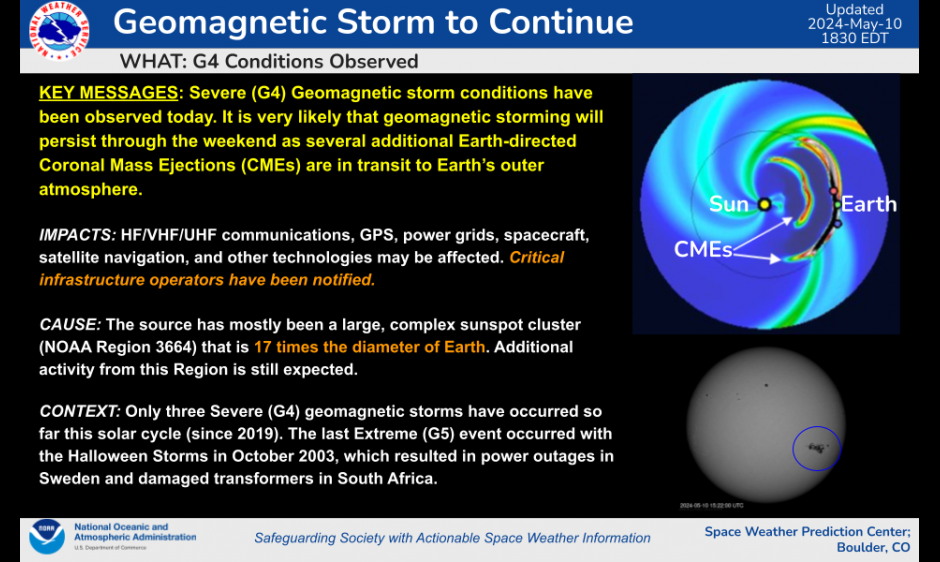
Right now the earth is being hit with a geomagnetic storm from the sun. The technical explanation of what this means, though interesting, will for now take back-seat an opportunity that is coming as a consequence. You might be able to see the Northern Lights as far south as Alabama this weekend!
The solar flares responsible for this opportunity occurred on Wednesday. At least 5 of the solar flares are though to be directed towards earth, according to NOAA. If you are out late this weekend, look north. Even if you can’t see anything with the naked eye, if you have clear weather, try taking a long exposure photo. You might be able to photograph an aurora!
Posts may contain products with affiliate links. When you make purchases using these links, we receive a small commission at no extra cost to you. Thank you for your support.
UPDATE: The launch is now delayed until 17 May to give time to replace O2 pressure regulation valve.
Boing is going to make a second attempt to launch its Starliner manned spacecraft. The first attempt was scrubbed because of a stuck valve. The next attempt is scheduled for Thursday 8 May at about 10:11 PM. Emphasis on “Attempt” because there is no guarantee that it will happen. The craft is capable of holding up to 7 people. But for this test flight there will only be three people. Barry Willmore, 61, is a NASA astronaut and former U.S. Navy Captain that will be in command. Sunita Williams, 58, is a former Navy server member, will be piloting. The flight plan for the Starliner includes a stay at the International Space Station for a week before returning the astronauts. If this launches, this will be Boeing’s first manned space flight.
This won’t be the first flight of the spacecraft itself. It first launched in 2019, but failed to rendezvous with the Space Station because of a software error. It was successful in a launch in May 2022. Though after that flight Boeing decided to change the type of tape used on the electrical cables to a material that was more fire resistant since then.
Someone had an NFC card for which I needed the data. There are a couple of ways I could have gotten it from him. One way was to ask him to install an app and scan the card. From the app, he could export the data and send it to me. I don’t generally like to ask people to install apps though. The other option was to make a web page and have him use the web page to scan the card. Key factors here is that he was using a Samsung Android phone and he uses Chrome as his primary driver. Chrome on Android has NFC support.
I needed to make the page in a hurry. It’s a single file web page. You can find it at this URL: https://j2inet.github.io/nfcreader/. You can view the source code completely through this link. If you are viewing this article from your computer and want to run the code on your phone, here’s a QR Code to that same URL.
The Interface
The interface is just a bit of HTML decorated with CSS attributes. We don’t need to explore the CSS to understand the interface. There are a couple of buttons for enabling and disabling a scanner, and a checkbox that, when checked, will cause the NFC card’s serial number to also be displayed.
At the time of this writing, NFC support is still considered experimental. mozilla.org reports support for Chrome 89, Opera 63, Samsung Internet 15.0, and WebView 89. I only tested this in Samsung Internet, Samsung Internet Beta, and Chrome. I only experienced this working in Chrome. Tho check whether your browser supports this API, see if the window object defines NDEFReader. If it does not, then the device doesn’t support reading NFC. Note that it is possible for a browser to have software support for NFC while the device has no available NFC hardware. That’s not something that you can test for.
if (! ('NDEFReader' in window)) {
//This device doesn't have NFC capabilities.
document.getElementById('scanButton').disabled = true;
document.getElementById('stopScanButton').disabled = true;
document.getElementById('lastError').innerText = "Sorry, this app only works on devices capable of reading NFC"
}
Before attempting to read the from the NFC card, you’ll need to create an object and set some handlers. You’ll need to create a new NDEFReader object. No parameters are required for its constructor. On the newly created object, add handlers for onreading and onreadingerror.
We will talk about the body of the onreading method shortly.
Initiating the Scan
You can initiate a scan just by calling the scan() method on the NDEFReader object with no parameters. I don’t suggest that though. You will probably want to pass an abort object to the method. This gives you a method to deactivate the scanner at will. For this purpose, I’ve created an AbortController instance.
ar abortController = new AbortController();
The scan method returns a promise. We can use this to know if something went wrong or if the application decided to terminate the scanning. The object returned in this promose is defined by us. On the object I return I may have an isError and reasonText object.
The onreading handler is given an event object. That object has a few elements of concern to us. One is serialNumber, which is a string that contains the serial number for that specific NFC card. The other element is message, which contains a NDEFMessage object. That’s where we will find most of the data! The NDEFMessage object has a field called records; that is a list of the NDEF records written to the card. You may typically encounter NFC cards that only have one message on it, but it can have multiple messages. If you iterate through this object on a non-empty list, you will find one or more NDEFRecordobjects. These are the fields from the record that I find to be the most important.
Field
Explination
recordType
The type of record. It could be the strings "empty", "text", "url", "smart-poster", "absolute-url", "mine", or "unknown". It could also be a custom domain name and custom type separated with a colon(:).
mediaType
Returns the mime type of the record.
data
Returns the raw byte data of the record’s payload.
encoding
The encoding used for a text payload. This could be null.
Iterating and Displaying the Records
For displaying the records, I build a few HTML objects and populate their innerText with the values. I optionally include the serial number to the card. I’m only displaying the record type and the text data. For the card that I needed someone to scan, I knew that this would be sufficient for my purposes. I displayed both the text representation of the data and the raw bytes themselves. Displaying the raw bytes was just a matter of converting the byte values to numeric strings. The browser provides a TextDecoder object for this purpose.
utf8decoder = new TextDecoder('utf8');
...
dataTextElement.innerText = utf8decoder.decode(record.data.buffer);
Here is the complete text for what happens when the card is detected.
reader.onreading = (e) => {
var rootResultElement = document.getElementById("scanResult");
rootResultElement.innerText = "";
var showSerialNumberChecked = document.getElementById('showSerialNumber').checked;
if(showSerialNumberChecked) {
var serialNumberElement = document.createElement('div');
serialNumberElement.class = 'serialNumber';
serialNumberElement.innerText = e.serialNumber;
rootResultElement.appendChild(serialNumberElement) ;
}
for(var i=0;i<e.message.records.length;++i)
{
var record = e.message.records[i];
var envelopeElement = document.createElement('div')
envelopeElement.className = 'ndfmessage';
var typeText = document.createElement('div');
typeText.className = 'recordType'
typeText.innerText = record.recordType;
var dataElement = document.createElement('div');
dataElement.className = 'ndefdata'
dataElement.innerText = bufferToString(record.data.buffer);
var dataTextElement = document.createElement('div');
dataTextElement.innerText = utf8decoder.decode(record.data.buffer);
envelopeElement.appendChild(typeText);
envelopeElement.appendChild(dataElement);
envelopeElement.appendChild(dataTextElement);
rootResultElement.appendChild(envelopeElement);
}
}
Posts may contain products with affiliate links. When you make purchases using these links, we receive a small commission at no extra cost to you. Thank you for your support.
I’ve been exploring Samsung Knox. For enrollment on my test devices, I had initiated a hard reset of the phone and used the secret gesture to get the device in enrollment mode (draw a plus on the initial welcoming screen). While reading through Knox documentation, I encountered a support document with a URL I had not seen before. https://me.samsungknox.com.
As it turns out, by going to this site you can enroll a device without performing a hard reset. This initiates Bluetooth Enrollment. You do need to have a device sitting by with Knox Deploy installed to push the profile to the device.
Posts may contain products with affiliate links. When you make purchases using these links, we receive a small commission at no extra cost to you. Thank you for your support.
I came across something that I thought was cool, though not something I would ever use. It was a set of C++ defines for Japanese language coders that let’s them write in C++ using Japanese words in the place of various C++ control statements and key words. The repository for this project can be found at https://gist.github.com/HerringtonDarkholme/2dbb2a1ec748a786f54908320447b3dd. Here are a few lines from the code.
#define ใจในใใฃใผใใฃใผ std
#define ใขใคใชใผในใใชใผใ <iostream>
#define ใฆใผใธใณใฐ using
#define ใคใ if
#define ใคใณใฏใซใผใ #include
#define ใคใณใ int
You can probably guess what is going on here, but I will explain. The Japanese characters here are Katakana. They are commonly used to phonetically spelling out words from other languages. The very first define here is kind of clumsy. It spells out how we would say std. As in ess-tee-dee. The rest of the defines spell out the English pronunciations of the words. I found out about this by way of the following tweet, which showed some C++ written using a substantial amount of Japanese.
While it looks cool, I have a preference of minimizing my use of defines in my C++ code. But I’m also not a native ๆฅๆฌ่ช speaker. I imagine this provides some advantages for someone that is.
Posts may contain products with affiliate links. When you make purchases using these links, we receive a small commission at no extra cost to you. Thank you for your support.