Text Console and ANSI color Codes

Adding a few colors to text in an output console can make it a lot more readable. Preferably my text colours will be white and 2 or 3 other colors for emphasis. Many text-output APIs have functions that one can call to change text color. Generally, I don’t use these. There are specific byte sequences that, when printed to the console, will signal for the console to change text software. These byte sequences were defined long ago. They developed from tele-typewriter control sequences. These sequences started developing in the 1920s or 1930s. But it wasn’t until the 1960s to mid 1980s that we get the ANSI standards for the control codes. The control codes contain a variety of actions that one might want to use in a text console, such as clearing the screen, moving the cursor around, emitting beeps to get attention, and changing text color.

The color codes will start off with printing the escape character (ASCII code 27, or 0x1B) followed by an open square bracket, then the digit 3 (for a foreground color) or 4 (for a background color) and then a digit that identifies a color, terminate the sequence with m.

CodeColor
0Black
1Red
2Green
3Yellow
4Blue
5Magenta
6Cyan
7White

There are codes for changing text styling, such as to make text bold, italicised, or underlined. I avoid these because I don’t find those consistently implemented.

You are not limited to the above 7 colors. There is also an extended color palette from which you can select. To use these extended text colors use the sequence \x1b[38;5;<colour-code>m. You can find the colour codes in the following table.
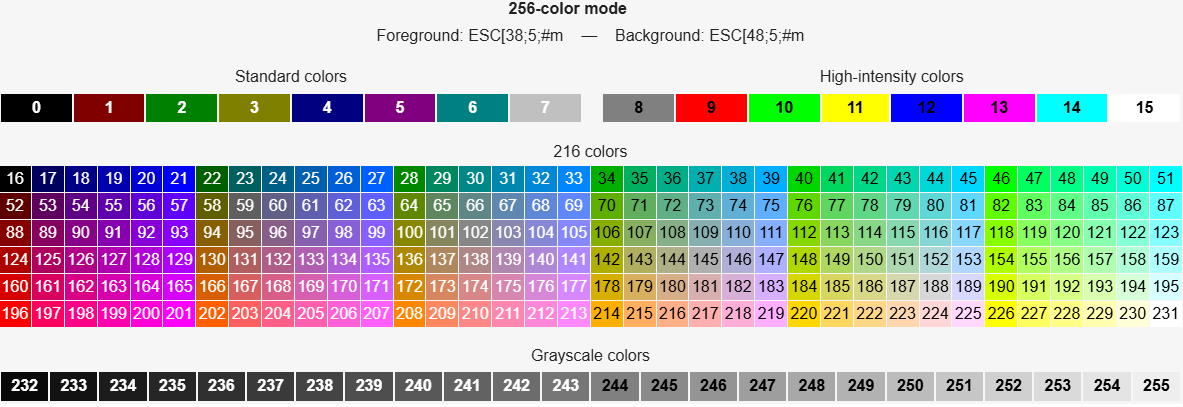
ANSI Text Color Palette, from ANSI escape code – Wikipedia

Alternatively, you can specify an RGB color code. To use the RGB colour codes, output the sequence \x1b[28;2;<r>;<g>;<b>;m.

Enabling Color Code Processing on Windows

Note that on Windows that your terminal may or may not have ANSI color code processing enabled. There is a WinAPI function named SetConsoleMode that can be used to enable it.

HANDLE hOut = GetStdHandle(STD_OUTPUT_HANDLE);
DWORD dwMode = 0;
GetConsoleMode(hOut, &dwMode);
dwMode |= ENABLE_VIRTUAL_TERMINAL_PROCESSING;
SetConsoleMode(hOut, dwMode);

If you want to call this code from a C# application, you’ll need to make a few WinAPI declarations in your code.

[DllImport("kernel32.dll", SetLastError = true)
private static extern IntPtr GetStdHandle(int nStdHandle);
[DllImport("kernel32.dll", SetLastError = true)]
private static extern bool GetConsoleMode(IntPtr hConsoleHandle, out uint lpMode);
[DllImport("kernel32.dll", SetLastError = true)]
private static extern bool SetConsoleMode(IntPtr hConsoleHandle, uint dwMode);

Then these functions would be called as follows.

    private const int STD_OUTPUT_HANDLE = -11;
    private const uint ENABLE_VIRTUAL_TERMINAL_PROCESSING = 0x0004;
public static void EnableVirtualTerminalProcessing()
    {
        IntPtr hOut = GetStdHandle(STD_OUTPUT_HANDLE);
        if (hOut == IntPtr.Zero || hOut == new IntPtr(-1))
            return; // invalid handle, bail out

        if (!GetConsoleMode(hOut, out uint dwMode))
            return; // could throw new Win32Exception(Marshal.GetLastWin32Error()) instead

        dwMode |= ENABLE_VIRTUAL_TERMINAL_PROCESSING;

        if (!SetConsoleMode(hOut, dwMode))
        {
            // could throw new Win32Exception(Marshal.GetLastWin32Error()) instead
        }
    }

In some of the example code that I post, you might come across color sequences being defined in constants.

const std::wstring ANSI_COLOR_RED = L"\033[31m";
const std::wstring ANSI_COLOR_GREEN = L"\033[32m";
const std::wstring ANSI_COLOR_YELLOW = L"\033[33m";
const std::wstring ANSI_COLOR_BLUE = L"\033[34m";
const std::wstring ANSI_COLOR_MAGENTA = L"\033[35m";
const std::wstring ANSI_COLOR_CYAN = L"\033[36m";
const std::wstring ANSI_COLOR_WHITE = L"\033[37m";
const std::wstring ANSI_COLOR_RESET = L"\033[0m";
const std::wstring ANSI_BACKGROUND_RED = L"\033[41m";
const std::wstring ANSI_BACKGROUND_GREEN = L"\033[42m";
const std::wstring ANSI_BACKGROUND_YELLOW = L"\033[43m";
const std::wstring ANSI_BACKGROUND_BLUE = L"\033[44m";
const std::wstring ANSI_BACKGROUND_MAGENTA = L"\033[45m";
const std::wstring ANSI_BACKGROUND_CYAN = L"\033[46m";
const std::wstring ANSI_BACKGROUND_WHITE = L"\033[47m";
const std::wstring ANSI_COLOR_BOLD = L"\033[1m";

Note that if the output of a program is captured and written to a file, the color codes are captured, too. They may look weird. If you intend for the output of your program to be capturable, you might want to use the APIs that your system provides. Alternatively, instead of defining these color codes as constants, define them as default values for variables. Allow the user an option to disable colored text. If they want to disable it, set those variables to empty strings.

ANSI Art

For at least the past 30 years, there have been people that have made art exclusively from text and ANSI color codes. That art isn’t the point of this post. But you might find such art interesting.


Posts may contain products with affiliate links. When you make purchases using these links, we receive a small commission at no extra cost to you. Thank you for your support.

Mastodon: @j2inet@masto.ai
Instagram: @j2inet
Facebook: @j2inet
YouTube: @j2inet
Telegram: j2inet
Bluesky: @j2i.net

Dynamically Playing Audio on Windows::Part 1a – Signalling Status

In the previous posting for this series, I had code that was functional. But there was a blaring short-coming. I was putting the primary thread to sleep for a specific number of seconds while the system rendered the audio. If the audio was made shorter or longer, then this delay would be inappropriate. In this post, I will fix that. I also recycle my buffers in this update. This is a problem in both the Windows and Linux versions of the code. I am only showing the changes for Windows here. I’ll make the functionally equivalent changes to the Linux version later.

Receiving Updates About Playback

The XAudio2 API is able to make callbacks to provide information about the playback. You can get updates on when a buffer has finished playing, when a buffer is started, when the entire stream has finished, when there’s an error, so on. To get this information, the developer must implement an interface named IXAudio2VoiceCallback. Let’s look at the interface definition.

struct IXAudio2VoiceCallback {
    virtual void __stdcall OnVoiceProcessingPassStart(UINT32 BytesRequired) = 0;
    virtual void __stdcall OnVoiceProcessingPassEnd() = 0;
    virtual void __stdcall OnStreamEnd() = 0;
    virtual void __stdcall OnBufferStart(void* pBufferContext) = 0;
    virtual void __stdcall OnBufferEnd(void* pBufferContext) = 0;
    virtual void __stdcall OnLoopEnd(void* pBufferContext) = 0;
    virtual void __stdcall OnVoiceError(void* pBufferContext, HRESULT Error) = 0;
};

The methods all only receive information and don’t require anything be returned. You can have empty implementations for messages that you don’t care about, and provide implementations on what you do care about. In my case, I do not care about the methods OnVoiceError(), OnLoopEnd(), OnVoiceProcessingPassEnd(), and OnVoiceProcessingPassStart(). I found it easier to wrap the variables that I needed for managing my dynamic audio into a class and have that class also implement this interface. I care the most about the OnBufferEnd() method. When I see that a buffer has ended, I can add more audio to the buffer and append it to the end of the list of buffers to be played.

In the previous post for this series, there was a parameter I called in creating my sound-playback resource that had been NULL. This time, I will populate that parameter with a reference to my implementation of the above interface. My implementation of this interface will be named BufferManager. In addition to these methods for monitoring playback status I will have methods to start and stop playing and a method that will block the caller until the end of play is reached. The IXAudio2SourceVoice instance is going to be needed by this class. But I cannot pass it in the constructor. The creation of the IXAudio2SourceVoice reference is dependent on a reference to the BufferManager instance being passed. I create a buffer manager, pass it over to the creation of IXAudio2SourceVoice, and then hand that reference over to the BufferManager instance through BufferManager::SetXAudio2Source().

std::shared_ptr<BufferManager> bufferManager = std::make_shared<BufferManager>();
result = pxAudio->CreateSourceVoice(&pxSourceVoice, &wfx, 0, XAUDIO2_DEFAULT_FREQ_RATIO, bufferManager.get(), nullptr, nullptr);
bufferManager->SetXAudio2Source(pxSourceVoice);

What follows is the interface for my BufferManager class.

class BufferManager : public IXAudio2VoiceCallback {
void setIsPlaying(bool playing);
inline bool getIsPlaying() const ;
public:
static const size_t BUFFER_SIZE = 44100 / 20; // 0.05 second of audio at 44.1kHz
std::shared_ptr<VoiceBase>> voice;
BufferManager();
~BufferManager();
void SetXAudio2Source(IXAudio2SourceVoice* pxSourceVoice);
void WaitForStreamEnd();
void Start();
void Stop();
void FillNextBuffer(bool final = false);
void __stdcall OnVoiceProcessingPassStart(UINT32 BytesRequired) {}
void __stdcall OnVoiceProcessingPassEnd() {}
void __stdcall OnStreamEnd() override;
void __stdcall OnBufferStart(void* pBufferContext) override;
void __stdcall OnBufferEnd(void* pBufferContext) override;
void __stdcall OnLoopEnd(void* pBufferContext) override {}
void __stdcall OnVoiceError(void* pBufferContext, HRESULT Error) override {}
};

Even though I have 4 buffers of 1 second each, On that note, let’s make the buffers smaller. Memory is at a premium these days and I intend to eventually run this on computers that have less resources. Another advantage of smaller buffers is higher responsiveness. If I wanted to interject something into the audio, the maximum amount of time that could pass before my new sound is heard is determined by the buffer size.

static const size_t BUFFER_SIZE = 44100/20; // 0.05 second of audio at 44.1kHz

0.05s should be responsive enough. There are other ways to accomplish this, such as by playing a second sound and leaving the main buffer alone. But for my project, I only wish to use one buffer attached to the sound hardware. A potential disadvantage to smaller buffers is that they can be more subject to interruption. If I am performing other work on the same thread in which I am processing sound buffers and the thread becomes busy with some other work, the sound could stuffer.

Before I start playing audio, I populate the buffers and submit them for play. After they are all filled and submitted, I start playing audio. In the BufferManager class, as I get notifications that a buffer has finished playing, I populate and queue up the buffer that just finished. With most of this work occurring in the BufferManager class, there are only a few lines remaining in the main class.

bufferManager->>Start(); <
br>bufferManager->>WaitForStreamEnd();<
br>bufferManager->>Stop();<
br>bufferManager = nullptr;
pxMasteringVoice->>DestroyVoice();
CoUninitialize();r>return 0;

The code for populating the next buffer is similar to the code that was shown in the previous post, But unlike before, I now optionally set a flag in the structure used to submit a buffer called XAUDIO2_END_OF_STREAM. When this flag is set for a buffer, after the buffer with that flag set plays the IXAudio2VoiceCallback::OnStreamEnd() method will be called. This saves us the need to count buffers.

void BufferManager::FillNextBuffer(bool final) {
if (!availableBufferList.empty()) {
int bufferIndex = availableBufferList.back();
availableBufferList.pop_back();
// Fill the buffer with new audio data
for (size_t sampleIndex = 0; sampleIndex < BUFFER_SIZE; ++sampleIndex) {
float sampleValue = voice->>getSample(currentTime); // Get the sample from the voice
audioBuffers[bufferIndex][sampleIndex] = static_cast<short>>(sampleValue * 32767); // Convert to 16-bit PCM
currentTime += deltaTime;
}
XAUDIO2_BUFFER buf = {};
buf.AudioBytes = BUFFER_SIZE * sizeof(short);
buf.pAudioData = (BYTE*)audioBuffers[bufferIndex].data();
if (final)
{
buf.Flags = XAUDIO2_END_OF_STREAM;
}
pxSourceVoice->>SubmitSourceBuffer(&buf);
}
}

I can now play audio continuously and indefinitely. Before I continue to use this new capability, I need to implement similar functionality for the Linux implementation of my code.


Posts may contain products with affiliate links. When you make purchases using these links, we receive a small commission at no extra cost to you. Thank you for your support.

Mastodon: @j2inet@masto.ai
Instagram: @j2inet
Facebook: @j2inet
YouTube: @j2inet
Telegram: j2inet
Twitter: @j2inet