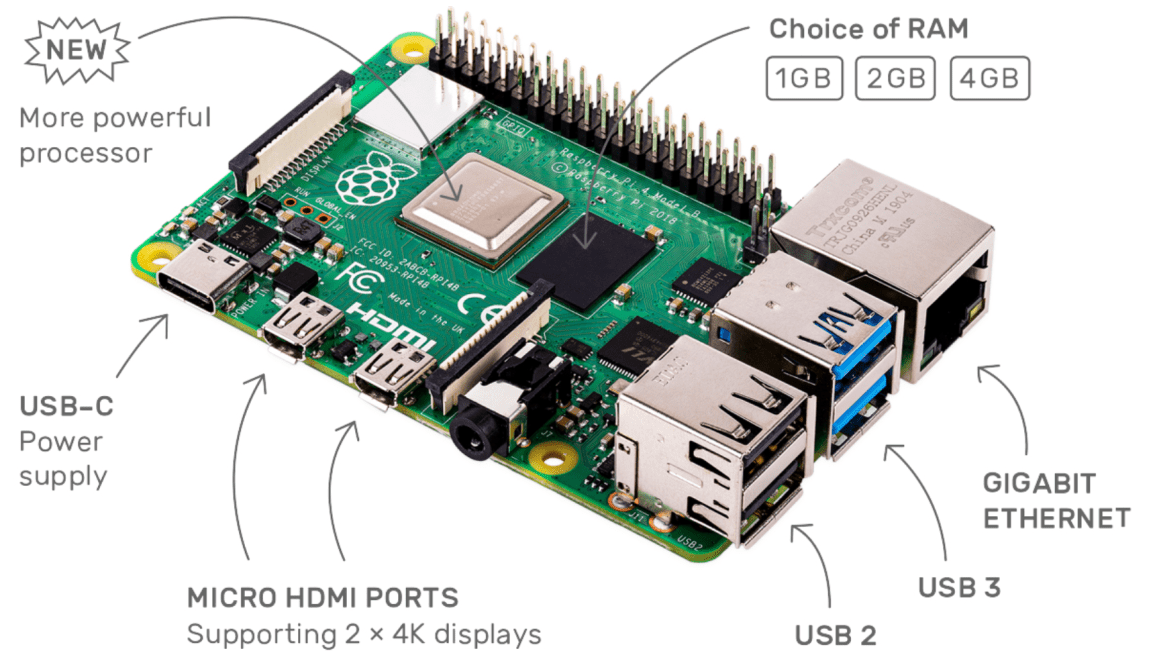
The fourth generation of the Raspberry Pi has been announced. Each generation of the Raspberry Pi is primarily identified by its specifications. (Not including the Raspberry Pi Compute module because it generally is not used by hobbyist). With the Raspberry Pi 4, this isn’t the case. There are three variations available. The new Raspberry Pi 4 comes with a 1.5 GHz ARM Cortex-A72 quad-core processor. With that processor the Raspberry Pi 4 can decode 4K video at 60 FPS or two 4K videos at 30 FPS. The amount of RAM available to the unit depends on the version. The smallest amount of RAM, 1 gig, is available for $35 USD. The next size, 2 gigs, can be purchased for $45 USD. The largest unit, 4 gigs, is $55 USD.
At first glance, the unit will be recognized as a Raspberry PI but a closer look at the ports will show some immediate differences. The Pi has converted from a micro-USB port to USB-C. The full sized HDMI port is gone and has been replaced with two micro-HDMI ports. The unit can drive two displays at once. A couple of the 4 USB ports have been upgraded to USB 3 while the other two are still USB 2. The wireless capabilities are upgraded to use USB 5.0 and dual-band 802.11ac Wi-Fi.
The unit is available for purchase from Raspberry Pi’s site now. A new case for the Pi 4 and a USB-C power supply of appropriate wattage are both available through the site as well.
In previous posts on the NVIDIA Jetson posts I’ve talked about getting the device setup and some additional accessories that you may want to have. The OS image for the NVIDIA Jetson already contains a compiler and other development software. Technically someone can start developing with the OS image as it is when it ships. But it is not desirable to develop this way.
There may be some things that you prefer to do on your primary computer and you’d like to be able to control the Jetson from your primary machine. The OS image for the Jetson already has SSH enabled. If you are using a Windows machine and net an SSH client I suggest using PuTTY for Windows. It’s a great SSH client and also works as a telnet or serial console when needed. It’s available from https://www.putty.org/.
When Putty is opened by default it is ready to connect to a device over SSH. You only need to enter the IP address to start the connection. Once connected enter your account name and password and you’ll have an active terminal available. For copying files over SSHFTP I use WinSCP (available from https://winscp.net/).
For development on the device I’ve chose Visual Studio Code as my IDE. Yes, it runs on ARMs too. There are a number of guides available on how to get Visual Studio Code recompiled and installed for an ARMS system. The one that I used is available from code.headmelted.com. In a nutshell I followed two steps; I entered a super user session with the command
su -s
Then I ran the following (which downloads a script from the head melted site and runs it).
The script only takes a few moments to run. After it’s done you are ready to start development either directly on the board or from another machine.
To make sure that everything works let’s make our first program with the Jetson Nano. This is a “Hello World” program; it is not going to do anything substantial. Let’s also use make to compile the program. make will take care of seeing what needs to be built and issuing the necessary commands. Here it’s use is going to be trivial. But I think starting with simple use of it will give an opportunity for those that are new to it to get oriented with it. Type the following code and save it as helloworld.cu
#include

__global__ void cuda_hello()
{
    printf("Hello World from GPU!\n");
}

using namespace std;

int main()
{
	cout << "Hello world!" << endl;
	cuda_hello<<>>();
	return 0;
}
We also need to make a new file named makefile. The following couple of lines will say that if there is no file named helloworld (or if the file is out of date based on the date stamp on helloworld.cu) the to compile it using the command /usr/local/cuda/bin/nvcc helloworld.cu -o helloworld
Note that there should be a tab on the second line, not a space.
Save this in the same folder as helloworld.cs.
Type make and press enter to build the program. If you type it again nothing will happen. That’s because make sees that the source file hasn’t changed since the executable was build.
Now type ./helloworld and see the program run.
Congratulations, you have a working build environment. Now that we can compile code it’s time to move to something less trivial. In an upcoming post I’ll talk about what CUDA is and how you can use it for calculations with high parallelism.
I had made a video posted to YouTube about the Jetson Nano and the additional items that I purchased for it. This is a complete list of those items and some extras (such as memory cards of some other sizes).
I pre-ordered the NVIDIA Jetson Nano and had the opportunity to have my first experiences with it this week. For those that are considering the Nano I give you the gift of my hindsight so that you can have a smoother experience when you get started. My experience wasn’t bad by any measure. But there were some accessories that I would have ordered at the same time as the Jetson so that I would have everything that I needed at the start. I’ve also made a YouTube video covering this same information. You can view it here.
How does the Nano Compare to Other Jetson Devices?
The Jetson line of devices from NVIDIA can be compared across several dimensions. But where the Jetson Nano stands out is the price. It is priced at about 100 USD making it affordable to hobbiest. Compare this to the Jetson TK1 which is available for about 500 USD or the Jetson Xaviar available for about 1,200 USD. Another dimension of interest is the number of CUDA cores that the units have. CUDA cores are hardware units used for parallel execution.
In addition to the cores the other Jetson kits have support for other interfaces, such as SATA for adding hard drives or a CAN bus for interfacing with automotive systems. For someone getting started with experimentation the Jetson Nano is a good start.
What is In the Box?
Not much. You’ll find the unit, a small paper with the URL of the getting started page, and a cardboard cutout used for supporting the card on the case.
Most of the things on that list you might already have. For an SD card get one at least 8 gigs or larger.
Power Supply
A power supply! It uses a 5 volt power supply like what is used in a phone. Well, kind of. Don’t expect for any of your 5V power supplies to work. I found the hard way that many power supplies don’t deliver the amount of current that is needed. Even if the power supply is capable a USB cable might not allow the needed amount of current to pass. If this happens the device will just cut off. There’s no warning, no error message, nothing. It just cuts off. I only came to realize what was going on after I used a USB power meter on the device. I used a power meter for USB-A, but the board already has contacts for using a USB-C port. Depending on when you get your board it may have a USB-C port on it (possibly, speculatively).
A Raspberry Pi camera will work. But I used a Microsoft LifeCam. There are a number of off-the-shelf webcams that work. You’ll only need a camera if you plan on performing visual processing. If your going to be processing something non-visual or if your visual data is coming from a stream (file, network location) then of course this won’t be necessary.
WiFi
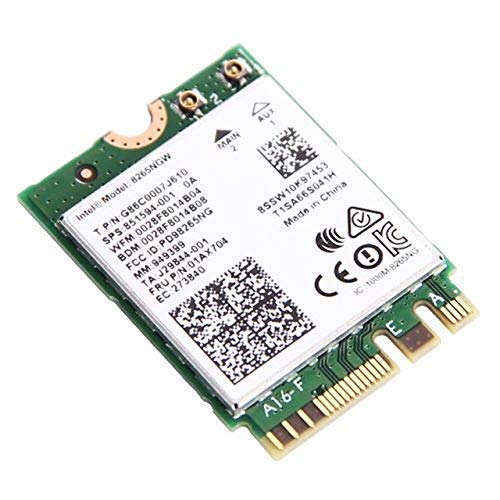
You have two options for WiFi. One option is a USB WiFi dongle. There are a number of them that are compatible with Linux that will also work here. I am using the Edimax EW-7811UN. After being connected to one of the USB ports it just works. Another solution is to install a WiFi card into the M.2 adapter. It might not be apparent at first, but there is a M.2 slot on the case. I chose to use this solution. Like the USB solution there’s not much to be done here; inserting the WiFi adapter into the slot, securing it is most of the work. Note that you’ll also need to connect antennas to the wireless card.
Operating System Image
The instructions for writing a new operating system image are almost identical to that of a Raspberry Pi. The difference is the URL from which the OS image is downloaded. Otherwise you download an image, write it to an SD card, and insert it into the Nano. Everything else will be done on first boot. You’ll want to have a keyboard connected to the device so that you can respond to prompts. When everything is done you’ll have an ARMs build of Ubuntu installed.
For writing the OS image I used balenaEtcher. It is available for OS X and Linux. The usage is simple; select an OS image, select a target drive/memory device, and then let it start writing to the card. The process takes a few minutes. But once it is done put the SD card in the Jetson Nano’s memory card slot.
Case Options
A case may be one of the last things that you need. But if you seriously have interest in having the Jetson Nano I suggest ordering the case at the start. There are no off-the-shelf cases available for purchase for the Nano. But there are a few 3D printable plans for the Jetson Nano. I’ve come across three and have settled on one.
The case is a bit thick, but it isn’t lacking for ventilation. The case height accommodates a fan. While the design doesn’t include any holes for mounting antennas for WiFi drilling them is easy enough.
The NanoBox will envelope the Jetson leaving the heat sink almost flush with the case. I’d suggest this one if you plan don’t plan to use a fan on the Jetson. If you ever change your mind and decide that you want to have a fan it can be added. But it will be on the outside of the case.
There’s not much to say about this case. It fully envelopes the Jetson Nano. But I’ve got questions about the cooling effectiveness of this case.
It’s Assembled and Boots Up. Now What?
Once the Jetson is up and running the next thing to do is to setup a development environment. There is a lot of overlap between targeting the Jetson series and targeting a PC that has an NVIDIA GPU. What I write on this will be applicable to either except for when I state otherwise.
If you try to install the nVidia CUDA SDK and plan to use Visual Studio 2019 there’s an additional manual step that you’ll need to take. The installer available for the current version of CUDA (10.1) doesn’t specifically target the recently released Visual Studio 2019, but it will mostly work with it. I say “mostly” because after installing it you’ll find that the CUDA related project templates are missing and you can’t open the sample projects.
Fixing this is as simple as copying a few files. Copying everything from the following folder
Samsung showed the XR SDK at the 2018 Developers Conference. While Microsoft has generally presented their reality technologies as being along a spectrum (ranging from completely enveloping the user to only placing overlays on the real world) it has always been something that has involved a head mounted device. Samsung presents AR as something that is either viewed through a head mounted device or something that a person views through a portable hand held window into another world. The language used by various companies varies a bit. Microsoft calls the their range of technologies “mixed reality.” Samsung calls theirs SXR which stands for Samsung Extended Reality.
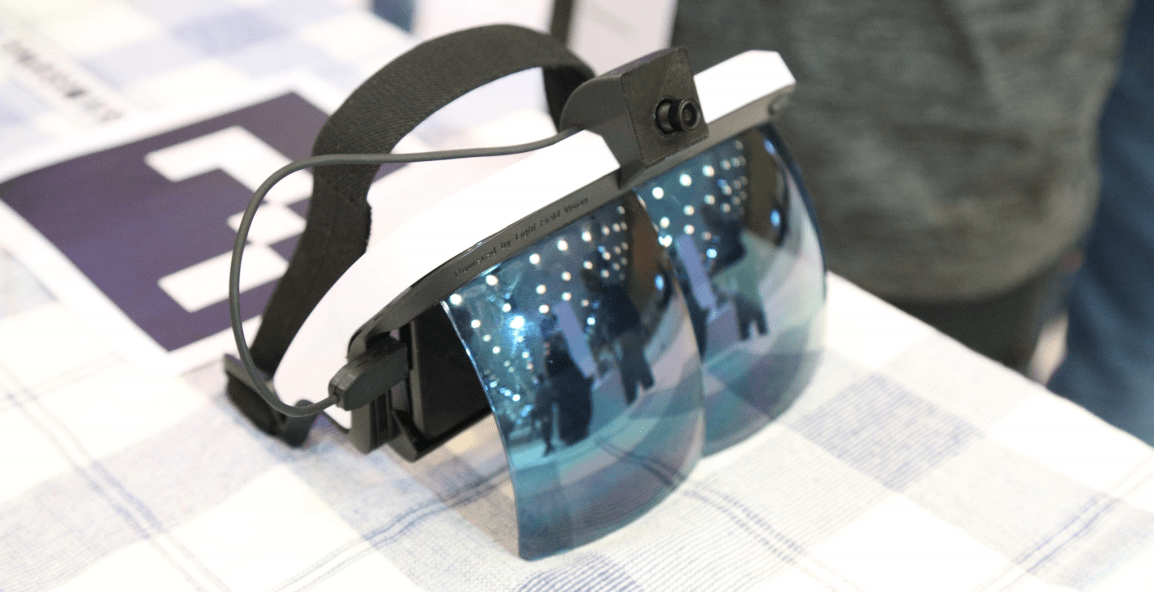
It was several years ago that Samsung first showed it’s take on VR with the release of the Note 4 and the developer’s edition GearVR. The GearVR is now available as a consumer product, but Samsung took an economical approach to initial hardware for head mounted augmented reality. Instead of creating custom hardware they took some off the shelf products and mixed them together to make an economical headset.
Experimental AR Headset using off the shelf parts
Part
Description
Cost
Source
AR Headset
90° FOV “Drop-In” phones 4.5 inches to 5.5 inches, 180g
The Samsung XR SDK is almost a super set of the the GearVR SDK. I say “almost” because with a proper super set you would find all the same class names that you would expect from the GearVR SDK. In the Samsung XR SDK the classes exists within a new namespace and have been renamed. GearVR programs could be ported over with some changes to the class names being invoked.
In development is an API standard for AR/VR experiences named OpenXR. Once the standard is defined and released Samsung plans for their XR SDK to be an implementation of this standard.
While the GearVR SDK was specifically for Samsung devices and the Samsung headset the Samsung XR SDK will run on non-Samsung devices for through-the-window AR but will run on the Oculus GO and Samsung devices for stereoscopic experiences.
I’ve been carrying this equation around forever and a day and thought I would share it. With this equation you can calculate the distance between GPS coordinates. I tend to use SI units, but you should be able to easily adjust it for units of your choosing.
The Beta 2 Mango Windows Phone Tools are available to developers today! Included with the beta is the ability for developers registered with the AppHub to flash their retail devices.
I know there are some non-developers out there that want to also flash their phones and they may wonder how they get get their phones reflashed with the Mango beta. For the time being they cannot. There is an inherent risk in reflashing the phone; you could end up with a bricked phone if something goes bad. If this happens Microsoft has budgeted to take care of repairing up to one phone per developer. But Microsoft doesn’t see this risk as being appropriate for user audiences. [Some] developers on the other hand are willing to risk their device’s life and limb to have early access to something new. If you brick your device today Microsoft won’t be prepared to act on it for another couple of weeks. That’s not the best case scenario. But the alternative was to wait another couple of weeks before releasing the Mango tools. If you don’t feel safe walking the tight rope without a safety net then don’t re-flash your device yet.
According to the Windows Phone Developer site if you are a registered developer you will receive an e-mail inviting you to participate in early access to Mango.
I got a tweet earlier today from some one asking me how to change the pitch of a wave file. The person asking was aware that SoundEffectInstance has a setting to alter pitch but it wasn’t sufficient for his needs. He needed to be able to save the modified WAV to a file. It’s something that is easy to do. So I made a quick example
I used a technique that comes close to matching linear interpolation. It get’s the job done but isn’t the best technique because of the opportunity for certain types of distortion to introduced. Methods with less distortion are available at the cost of potentially more CPU cycles. For the example I made no matter what the original sample rate was I am playing back at 44KHz and adjusting my interpolation accordingly so that no unintentional changes in pitch are introduced.
To do the work I’ve created a class named AdjustedSoundEffect. It has a Play() method that takes as it’s argument the factor by which the pitch should be adjusted where 1 plays the sound at the original pitch, 2 plays it at twice its pitch, and 0.5 plays it at half its pitch.
If you are interested the code I used is below.
using System;
using System.IO;
using System.Net;
using System.Windows;
using System.Windows.Controls;
using System.Windows.Documents;
using System.Windows.Ink;
using System.Windows.Input;
using System.Windows.Media;
using System.Windows.Media.Animation;
using System.Windows.Shapes;
using Microsoft.Xna.Framework.Audio;

namespace J2i.Net.VoiceRecorder.Utility
{
    public class AdjustedSoundEffect
    {
        //I will always playback at 44KHz regardless of the original sample rate.
        //I'm making appropriate adjustments to prevent this from resulting in the
        //pitch being shifted.
        private const int PlaybackSampleRate = 16000;
        private const int BufferSize = PlaybackSampleRate*2;

        private int _channelCount = 1;
        private int _sampleRate;
        private int _bytesPerSample = 16;
        private int _byteCount = 0;
        private float _baseStepRate = 1;
        private float _adjustedStepRate;
        private float _index = 0;
        private int playbackBufferIndex = 0;
        private int _sampleStep = 2;

        private bool _timeToStop = false;

        private byte[][] _playbackBuffers;

        public bool IsPlaying { get; set;  }

        public object SyncRoot = new object();


        private DynamicSoundEffectInstance _dse;

        public static AdjustedSoundEffect FromStream(Stream source)
        {
            var retVal = new AdjustedSoundEffect(source);
            return retVal;
        }

        public AdjustedSoundEffect()
        {
            _playbackBuffers = new byte[3][];
            for (var i = 0; i < _playbackBuffers.Length;++i )
            {
                _playbackBuffers[i] = new byte[BufferSize];
            }
                _dse = new DynamicSoundEffectInstance(PlaybackSampleRate, AudioChannels.Stereo);
            _dse.BufferNeeded += new EventHandler<EventArgs>(_dse_BufferNeeded);
        }

        void SubmitNextBuffer()
        {
            if(_timeToStop)
            {
                Stop();
            }
            lock (SyncRoot)
            {
                byte[] nextBuffer = _playbackBuffers[playbackBufferIndex];
                playbackBufferIndex = (playbackBufferIndex + 1)%_playbackBuffers.Length;
                int i_step = 0;
                int i = 0;

                int endOfBufferMargin = 2*_channelCount;
                for (;
                    i < (nextBuffer.Length / 4) && (_index < (_sourceBuffer.Length - endOfBufferMargin));
                    ++i, i_step += 4)
                {

                    int k = _sampleStep*(int) _index;
                    if (k > _sourceBuffer.Length - endOfBufferMargin)
                        k = _sourceBuffer.Length -endOfBufferMargin ;
                    nextBuffer[i_step + 0] = _sourceBuffer[k + 0];
                    nextBuffer[i_step + 1] = _sourceBuffer[k + 1];
                    if (_channelCount == 2)
                    {
                        nextBuffer[i_step + 2] = _sourceBuffer[k + 2];
                        nextBuffer[i_step + 3] = _sourceBuffer[k + 3];
                    }
                    else
                    {
                        nextBuffer[i_step + 2] = _sourceBuffer[k + 0];
                        nextBuffer[i_step + 3] = _sourceBuffer[k + 1];

                    }
                    _index += _adjustedStepRate;
                }

                if ((_index >= _sourceBuffer.Length - endOfBufferMargin))
                    _timeToStop = true;
                for (; i < (nextBuffer.Length/4); ++i, i_step += 4)
                {
                    nextBuffer[i_step + 0] = 0;
                    nextBuffer[i_step + 1] = 0;
                    if (_channelCount == 2)
                    {
                        nextBuffer[i_step + 2] = 0;
                        nextBuffer[i_step + 3] = 0;
                    }
                }
                _dse.SubmitBuffer(nextBuffer);
            }
        }

        void _dse_BufferNeeded(object sender, EventArgs e)
        {
            SubmitNextBuffer();
        }

        private byte[] _sourceBuffer;


        public AdjustedSoundEffect(Stream source): this()
        {
            byte[] header = new byte[44];
            source.Read(header, 0, 44);

            // I'm assuming you passed a proper wave file so I won't bother
            // verifying  that  the  header  is properly formatted and will
            // accept it on faith :-)

            _channelCount = header[22] + (header[23] << 8);
            _sampleRate = header[24] | (header[25] << 8) | (header[26] << 16) | (header[27] << 24);
            _bytesPerSample = header[34]/8;
            _byteCount = header[40] | (header[41] << 8) | (header[42] << 16) | (header[43] << 24);
            _sampleStep = _bytesPerSample*_channelCount;
            _sourceBuffer = new byte[_byteCount];
            source.Read(_sourceBuffer, 0, _sourceBuffer.Length);


            _baseStepRate = ((float)_sampleRate) / PlaybackSampleRate;
        }

        /// <summary>
        ///
        /// </summary>
        /// <param name="pitchFactor">Factor by which pitch will be adjusted. 2 doubles the frequency,
        /// // 1 is normal speed, 0.5 halfs the frequency</param>
        public void Play(float pitchFactor)
        {
            _timeToStop = false;

            _index = 0;
            lock (SyncRoot)
            {
                _adjustedStepRate = _baseStepRate * pitchFactor;
                _index = 0;
                playbackBufferIndex = 0;
            }
            if(!IsPlaying)
            {
                SubmitNextBuffer();
                SubmitNextBuffer();
                SubmitNextBuffer();
                _dse.Play();
                IsPlaying = true;
            }
        }

        public void Stop()
        {
            if(IsPlaying)
            {
                _dse.Stop();
            }
        }
    }
}
For one reason or another you may find that you want to add a real e-mail account to the Windows Phone emulator. Unfortunately the emulator doesn’t directly expose a way for you to do this; the settings area on the phone doesn’t display the tile to access the e-mail settings. You can get to the settings application indirectly though. This path is convoluted, but it works.
You’ll need to make a simple application that does nothing more than show a phone call task. Once the task is displayed accept the phone call then select the option to add another caller. This takes you to the People Hub. Swipe through the People Hub to the "What’s New" and you will be prompted to add a Facebook or Twitter account. Select the option to do this (even though you are not really adding an account of that type) and when you asked what type of account you want to add you can select one of the e-mail account types.
One of the new features coming with the next update to Windows Phone 7 is the ability to set custom ring tones. From within code you can make a ring tone available to a user (it’s up to the user to accept the ring tone, so user settings won’t ever be changed without user permission). I was looking at the new API for doing this, the SaveRingtonTask()
To use the API you first need to get the ringtone of interest into isolated storage. It can be either an MP3 file or a WMA file up to 30 seconds in length. If the file is a part of your application. Just set it’s build type to "Resource".
Getting the file from being packed in the application to isolated storage is a matter of reading from a resource stream and writing to isolated storage.
var
s =
    Application.GetResourceStream(new Uri("/MyApplicationName;component/1up.mp3",
                                            UriKind.Relative));
{
    using (var f = IsolatedStorageFile.GetUserStoreForApplication().CreateFile("1up.mp3"))
    {

        var buffer = new byte[2048];
        int bytesRead = 0;

        do
        {
            bytesRead = s.Stream.Read(buffer, 0, 1024);
            f.Write(buffer, 0, bytesRead);
        } while (bytesRead > 0);

        f.Close();
    }
}
Once the file is in isolated storage you must pass the URL to the SaveRingtoneTask(). URIs to isolated storage are preceded with "isostore:" (there is also an "appdata:" prefix, but we won’t be using it here). Give the ringtone a display name and call the show method to present the user with the option to save it. If you don’t set the
SaveRingtoneTask srt = new SaveRingtoneTask();
srt.DisplayName = "1up";
srt.IsoStore= new Uri("isostore:/1up.mp3", UriKind.Absolute);
srt.IsShareable = true;
srt.Show();
One of the new things that we get with Windows Phone 7 is socket support. While I expected to be able to open sockets to other machines with servers running on them one thing caught me by surprised; that you can also send communication from phone to phone using UDP. I’ve got to give credit to Ricky_T for pointint out the presence of this feature and posting a code sample. I wanted to try this out myself. So I made a version of the code sample that would run on both Windows Phone and on the desktop (Silverlight 4 in Out of Browser mode). I was pleasantly surprised to that I was able to open up peer communication between the desktop and phone without a problem. This capability provides a number of solutions for other problems that I’ve been considering, such as automatic discovery and configuration for communicating with services hosted on a user’s local network.
Most of the code used in the desktop and phone version of this example are identical; I’ve shared some of the same files between projects. From the files that are not shared the counterparts in the phone and desktop version are still similar. The core of the code is in a class called Peer. Let’s take a look at part of the body of that class.
//Define the port and multicast address to be used for communication
private string _channelAddress = "224.0.0.1";
private int _channelPort = 3007;

//The event to be raised when a message comes in
public event EventHandler<MessageReceivedEventArgs> MessageReceived;

//the UDP channel over which communication will occur.
private UdpAnySourceMulticastClient _channel;

//Create tje cjamme;
public void Initialize()
{
    _channel = new UdpAnySourceMulticastClient(IPAddress.Parse(_channelAddress), _channelPort);
}

//Open the channel and start listening
public void Open()
//The receive method is recursive. At the end of a call to receive it calls itself
//so that the class can continue listening for incoming requests.
void Receive()
{
    byte[] _receiveBuffer = new byte[1024];

    _channel.BeginReceiveFromGroup(_receiveBuffer, 0, _receiveBuffer.Length, (r) =>
    {
        if(ClientState!=ClientStatesEnum.Closing)
        {
            try
            {
            IPEndPoint source;
            int size= _channel.EndReceiveFromGroup(r, out source);
            OnMessageReceived(_receiveBuffer, size,  source);
            }
            catch (Exception )
            {
            }
            finally
            {
                this.Receive();
            }
        }
    }, null);
}
public void Send(byte[] data)
{
    if(ClientState==ClientStatesEnum.Opened)
    {
        _channel.BeginSendToGroup(data, 0, data.Length, (r) => _channel.EndSendToGroup(r),null);
    }
}
This class only sends and receives byte arrays. My only goal here was to see the code work so there are other considerations that I have decided to overlook for now. I made a client to use this code too. The client sends and receives plain text. Before sending a block of text it is necessary to convert the text to a byte array. The encoding classes in .Net will take care of this for me. When a message comes in I can also use an encoder to convert the byte array back to a string.
For this program I am adding the incoming message to a list along with the IP address from which it came
When the code is run on any combination of multiply phones or computers a message types on any one of the devices appears on all of them. Nice! Now to start making use of it.
The Game of Life is a refinement of an idea from John von Newman in the 1940’s. The refinement was done by John Conway and appeared in Scientific America in October 1970. I’ll skip over the details of why such a program is of interest. But the program produces some interesting patterns.
The typical version of the game is composed of a grid of cells where some number of cells are initially marked as having life. The grid of cells is evaluated and cells get marked as alive or dead based on a small set of rules based on it’s neighbors. Two cells are neighbors with each other if they touch diagonally or side-by-side.
Any live cell with fewer than two live neighbours dies, as if caused by under-population.
Any live cell with two or three live neighbours lives on to the next generation.
Any live cell with more than three live neighbours dies, as if by overcrowding.
Any dead cell with exactly three live neighbours becomes a live cell, as if by reproduction.
The above algorithm enough and the program is easy to implement. The challenge is more in creating a decent user interface for the program. I decided to make this program myself. The first step in making the program was to implement the algorithm. I wanted to make sure the algorithm worked so I created a simple XNA program that would allow me to see the algorithm work. It’s non-interactive so you can only see the program run but not impact the outcome.
Theres a small amount of data that needs to be tracked for each cell. I need to know if a cell is alive and whether or not it should be alive during the next cycle. The cell will also need to interact with other cells in the community. Some time in the future I plan to allow the cells to express something about the parent from which it came. Though I won’t be doing that for this first version.
public class Cell
{
     public CellCommunity  Community   { get; set; }
     public bool           IsAlive     { get; set; }
     public bool           WillSurvive { get; set; }
     public Gene           GeneList { get; set; }
}
The community of cells themselves will be saved in a two dimensional array. The cell community class has two methods that will do the work of calculating whether or not a cell should be alive the next cycle and another for applying the results of those calculations.
public void EvaluateNewGeneration()
{
    ++GenerationCount;

    for (var cx = 0; cx < CellGrid.GetUpperBound(0); ++cx)
    {
        for (var cy = 0; cy  MAX_NEIGHBOR_COUNT) || (neighborsneighborList.Length < MIN_NEIGHBOR_COUNT))
                    KillCell(cx, cy);
                else
                    KeepCellAlive(cx, cy);
            }
            else
            {
                if ((neighborsneighborList.Length ==3))
                {
                    KeepCellAlive(cx, cy);
                }
            }
        }
    }
}

public void ApplySurvival()
{
    for (var cx = 0; cx < CellGrid.GetUpperBound(0); ++cx)
    {
        for (var cy = 0; cy < CellGrid.GetUpperBound(1); ++cy)
        {
            var cell = CellGrid[cx, cy];
            if (cell != null)
            {
                cell.IsAlive = cell.WillSurvive;
            }
        }
    }
}
I decided to make the UI in XNA. I have an idea on how to visualize a cell changing state and I can more easily implement it using a 3D API. Since the "world" of the Game of Life is in a grid I’m going to represent the state of a cell with a square that is either black (if the cell is not alive) or some other color (if the cell is alive). I’m drawing the squares by rendering vertices instead of writing sprites. This give me greater liberty in changing the color or shape of a cell. The following will draw one of the squares.
const int _squareWidth = 5;
const int _squareHeight = 5;
private const int _offsetX = -_squareWidth*30;
private const int _offsetY = -_squareHeight*18;

void DrawSquare(int x, int y, Color c)
{
    _vertices[0].Color = c;
    _vertices[1].Color = c;
    _vertices[2].Color = c;
    _vertices[3].Color = c;

    _vertices[0].Position.X = _offsetX + _squareWidth * x + _squareWidth;
    _vertices[0].Position.Y = _offsetY + _squareHeight * y;

    _vertices[1].Position.X = _offsetX + _squareWidth*x;
    _vertices[1].Position.Y = _offsetY + _squareHeight*y;

    _vertices[2].Position.X = _offsetX + _squareWidth * x + _squareWidth;
    _vertices[2].Position.Y = _offsetY + _squareHeight * y + _squareHeight;

    _vertices[3].Position.X = _offsetX + _squareWidth * x;
    _vertices[3].Position.Y = _offsetY + _squareHeight * y +_squareHeight;

    graphics.GraphicsDevice.DrawUserPrimitives(PrimitiveType.TriangleStrip, _vertices, 0, _vertices.Length-2);
}
With the ability to draw the square completed it’s easy to iterate through the collection of cells and render them to the screen according to whether or not they are alive.
With more that 13,000 applications in their Marketplace Microsoft came out on stage today to make some new announcements about what’s coming to Windows Phone 7. We’ll see a major upgrade on all Windows Phone devices by the end of the year and developers are getting access to a lot of new APIs enabling new application scenarios.
Here is a summary list of the new features.
Multitasking – in addition to faster application switching multitasking will allow applications to continue processing in the background.
Live Tile Functionality Enhancements –
Sensor Library Enhancements – You’ll have enhanced access to the sensor library and
Access to the camera and compass-! Reality augmentation is possible!
Sockets – This needs no explanation
Database –
IE9 – with hardware acceleration
Silverlight+XNA – you can use Silverlight and XNA in the same application
Twitter in the People Hub
Background Transfers
Profile
Silverlight 4 Runtime
Several new countries are being added to the Marketplace. This brings up the total count from 17 to 35. The new countries are listed below with *.