Rotation Notations

I was writing some code to perform some celestial calculations.  A lot of it handled changes in positions from certain rotations (orbits, revolutions).  There are also instances where time is treated as a rotation (ex: 1 hour of rotation is 15 degrees).  The best notation for the rotation depends on what is being done.  Here are the rotation notations that might be used.

  • Radians
  • Degrees
    • Decimal Degrees
    • Degrees, Minutes, Seconds
  • Hours
    • Decimal Hours
    • Hours, Minutes, Seconds

Conversion from one to another is easy.  What I did find challenging is ensuring that the right conversion had been performed before working with it.  The trig functions expect to always receive radians.  More than once I made the mistake of converting to the wrong unit before performing a calculation.  Rather then continue forward on a path that has many opportunities for mistakes I made a single class to represent rotations that can be used in various scenarios.  It will always internally represent rotations in degrees.  If I want to explicitly convert the class to a specific type there are methods to explicitly convert to any of the other rotation types.

Instances of this custom type also can be assigned a preferred notation. This preferred notation is used when printing it to the output stream. This allows a preferred format to be assigned without risking making any conversion mistakes.

The interface for the class and the support class follows.

#include <stdio.h>
#include <cmath>
#include <iostream>

typedef double Degree;
typedef double  Hour;
typedef double Minute;
typedef double Second;
typedef double Radian;

enum RotationNotation {
    NOTATION_DEGREES, 
    NOTATION_DMS, 
    NOTATION_HOURS, 
    NOTATION_HMS, 
    NOTATION_RADIANS
};

class Rotation;

struct HMS {
    Hour H;
    Minute M;
    Second S;
};


struct DMS {
    Degree D;
    Minute M;
    Second S;
} ;

std::ostream& operator << (std::ostream& o, const HMS& h);
std::ostream& operator << (std::ostream& o, const DMS& d);
std::ostream& operator << (std::ostream& o, const Rotation a);


double sin(const Rotation& source);
double cos(const Rotation& source);

Hour RadToHour(const Radian );
Hour HMSToHour(const HMS& hms);
Hour DMSToHour(const DMS&);
Hour DegToHour(const Degree degrees);

DMS RadToDMS(const Radian);
DMS DegToDMS(const Degree degrees);
DMS HourToDMS(const Hour hour);
DMS HMSToDMS(const HMS&);

HMS RadToHMS(const Radian);
HMS DegToHMS(const Degree degrees);
HMS DMSToHMS(const DMS&);
HMS HourToHMS(const Hour);

Degree RadToDeg(const Radian);
Degree DMSToDeg(const DMS& );
Degree HMSToDeg(const HMS&);
Degree HourToDeg(const Hour hour);

Radian HourToRad(const Hour);
Radian HMSToRad(const HMS& );
Radian DMSToRad(const DMS& );
Radian DegToRad(const Degree);


class Rotation { 
    private:
        Degree _degrees;
        RotationNotation _notation;
    public:
        Rotation();
        Rotation(const Rotation& source);
        
        RotationNotation getNotation() const;
        void setNotation(RotationNotation);

        const Degree getDegrees() const;
        const Hour getHours() const ;
        const Minute getRadians() const ;
        const DMS getDMS() const ;
        const HMS getHMS() const ;


        void setDegrees(const Degree degree) ;
        void setHours(const Hour hour)  ;
        void setRadians(const Radian rad)  ;
        void setDMS(const DMS& dms)  ;
        void setHMS(const HMS& hms)  ;
};

Download Code 2.0 KB

-30-

Future of Microsoft Edge

Faster Updates, Cross Platform, 4 Channels

Edge


Microsoft had made an announcement some time ago stating that they were adopting Chromium as the foundation of the Edge browser. They are making more information available about their plans. A computer will be able to have up to 4 Edge. In addition to the general release version there will be a beta , development, and canary channel where canary is the most experimental channel.

Microsoft is going to make a web view control available. This is a feature I wish had been available a couple of years ago. I worked on a project in which it was necessary to insert a Chromium based web view and that required making modifications to the Chromium source. Compiling Chromium can take hours!

Microsoft Edge is the only browser that has achieved a 100% score in accessibility evaluation. Microsoft is planning to make contributions to Chromium which should help improve the scores of Chromium based browsers across the board.  One example of a change coming from Microsoft is a media query for detecting when a user has turned on high contrast in either their computer or browser. The web developer can choose to change the appearance of a page accordingly.

Windows Biometric sign in is also going to be available to web sites (see navigator.credentials.get). This allows for a more secure way of logging in that doesn’t require a password. Edge also has a hardware backed feature named “Play Ready” that allows for secure playback of premium media.

The user agent-string for Edge Chromium will be Edg (that’s not a type, there is no E on the end). Note that the non-chromium version of edge uses the user token Edge instead. But it is recommended that instead of using the user agent string for enabling or disabling functionality in a web page it is better to use feature detection; new features are being added to browsers all the time and relying on the user agent alone can lead to a page not using a feature that was actually available within a browser.  Edge gets supports for module import and much better much better speech synthesis.

What’s In My Bag? Windows To Go: Windows on USB

When I’m travelling for work there are a number of items that I make sure are in my travel bag.  These include a USB-C charger (almost all of my electronics can charge over USB-C now); a copy of any recent projects I’ve worked on (sometimes I need to hop in to help a team member); and a computer.

The operating system on that computer may vary.  Sometimes I travel with a Windows machine, sometimes a Linux machine, and other times a Mac.  Regardless of the operating system, I usually always have a Windows To Go drive.

The last item is something that is probably a little more obscure.  Since Windows 8, there have been a special type of USB drives that are different in one aspect: they appear as a fixed drive to the computer, even though they are connected to a USB port.  These drives were specifically made for making a portable Windows experience on a USB drive.

It is possible to make bootable Windows environments on other USB drive, but there are some differences.  If you have a Windows ISO you can make a bootable Windows USB drive with a number of tools.  I recommend using Rufus to make the drive.  Though there are other options (including one that is a part of Windows Enterprise Edition), Rufus doesn’t care much about the drive properties.  It will just write the data to the drive in a bootable format.

With any type of USB drive you’ll be able to boot up with little to no trouble and do initial setup on the drive.  The difference will show up when you start installing programs.  Some programs will only install to a fixed drive.  Visual Studio is one such program.  If you have a USB drive that isn’t Windows To Go certified, then chances are that it will appear as a removable drive to the computer.  Visual Studio will not install to a removable drive.

With a non-certified drive it will generally refuse to install.  If you know that the programs of interest to you don’t care about the drive type, there’s a couple of other reasons why you still may want to consider a Windows To Go certified drive.  One is performance. There was a minimum performance requirement that these drives had to achieve as a part of their certification.  However, now there are other solid state drives available that are much faster than the available Windows To Go drive (such as the Thunderbolt 3 only Samsung X5 drives).  Another consideration is security.  Some of the Windows To Go drives have hardware implemented encryption and include the option of voiding the contents of the drive under some conditions that you can define (such as the wrong password being entered at bootup too many times).

The best practice, if you plan to work with any sensitive data, is to not store it on a portable drive, if possible. But if you must, then encryption is an uncompromising need. Whether or not a Windows To Go drive is necessary for you may only be known after you review your needs.

One significant drawback of Windows To Go drives is you cannot perform a major Windows Update on it. The installation can receive Windows security updates though.  When there is a major Windows Update if you want to install it, it’s necessary to format the entire drive and start from scratch.

For my needs, I have a Super Talent 128 GB USB 3.0 drive (for speed) and a Western Digital 500 GB mechanical drive (much slower, but I can work with larger projects using it).  If you choose to do this with a certified drive, make sure you read the drive’s instructions, before you begin writing your Windows Image to it.  Some drives come with their own software that must be used for making the image and if you start off formatting the drive then you’ve already destroyed the software that you need (and it may not be readily available for download from the company’s website).

If your project needs call for a Windows To Go certified drive, I’ve found 4 available on Amazon.  Here are the links to them (affiliate links).

//ws-na.amazon-adsystem.com/widgets/q?ServiceVersion=20070822&OneJS=1&Operation=GetAdHtml&MarketPlace=US&source=ac&ref=qf_sp_asin_til&ad_type=product_link&tracking_id=j2inet-20&marketplace=amazon&region=US&placement=B00CFI402O&asins=B00CFI402O&linkId=bc4f9901d4fa29a7092cb52f6eb0ea41&show_border=false&link_opens_in_new_window=false&price_color=333333&title_color=0066C0&bg_color=FFFFFF //ws-na.amazon-adsystem.com/widgets/q?ServiceVersion=20070822&OneJS=1&Operation=GetAdHtml&MarketPlace=US&source=ac&ref=tf_til&ad_type=product_link&tracking_id=j2inet-20&marketplace=amazon&region=US&placement=B00A48LB6K&asins=B00A48LB6K&linkId=669d2905a2a87f408df07b5c89e7cfec&show_border=false&link_opens_in_new_window=false&price_color=333333&title_color=0066c0&bg_color=ffffff //ws-na.amazon-adsystem.com/widgets/q?ServiceVersion=20070822&OneJS=1&Operation=GetAdHtml&MarketPlace=US&source=ac&ref=tf_til&ad_type=product_link&tracking_id=j2inet-20&marketplace=amazon&region=US&placement=B00DWCPDHS&asins=B00DWCPDHS&linkId=0e21eefd6195691755311fa96a5ddc4c&show_border=false&link_opens_in_new_window=false&price_color=333333&title_color=0066c0&bg_color=ffffff //ws-na.amazon-adsystem.com/widgets/q?ServiceVersion=20070822&OneJS=1&Operation=GetAdHtml&MarketPlace=US&source=ac&ref=tf_til&ad_type=product_link&tracking_id=j2inet-20&marketplace=amazon&region=US&placement=B015GGR14A&asins=B015GGR14A&linkId=9f8fb3d7f7a3bb009fda0934eaf181e1&show_border=false&link_opens_in_new_window=false&price_color=333333&title_color=0066c0&bg_color=ffffff

-30-

SignageLive + BrightSign

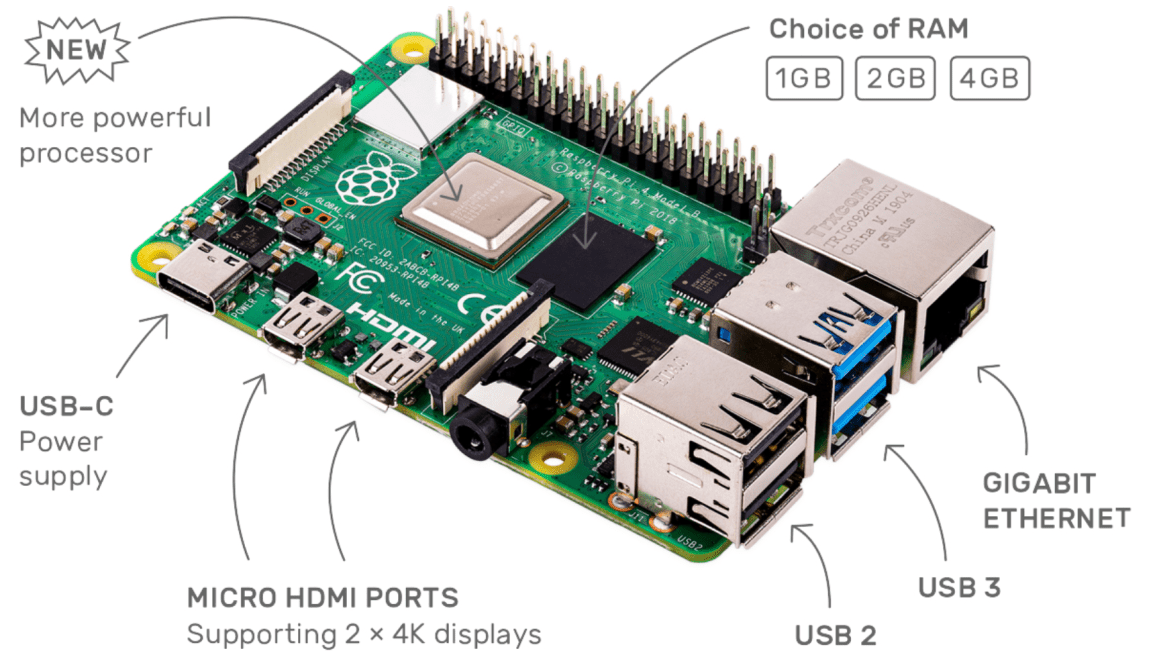
Signangelive is a platform for managing content on digital signage.  It works on a variety of devices, including BrightSign, Chrome OS, LG webOS, Samsung Tizen TVs, and Windows.  I recently used evaluated Signagelive for use with a BrightSign project.

One of the units of deployent on Signangelive is an HTML Widget.  An HTML Widget is a zip file of HTML assets with a manifest and a .wgt file extension.  Prior to now, the only place I’ve really seen Widgets used is on Samsung’s Tizen based platforms.  The Samsung smart watches, TVs, and the Tizen powered phones support HTML applications through Widgets.  The Widgets and other presentation items (such as videos, pictures, or other displayable elements) can be scheduled to run on a device and the platform will take care of the rest.

For the solution I am working on, I packaged it as a widget.  The only additional file that I had to make to do this was a config.xml along with a PNG image to use as an icon.  I updated the WGT into the signage live system, scheduled it, and sometime later the widget was running on the BrightSign.  This deployment process would work great for a production environment, but it doesn’t work as well for development where you might want to make a quick change and refresh.  I found two solutions for this.

IFRAME

One solution was to deploy an IFRAME whose address pointed back to my development machine.  With this solution, if I want to make a quick change, I can make the change on my local file system and then refresh my view on the device.  Refreshing the video on the device could be done by pressing the reset button, but that takes too long.  If you have Chrome installed, you can connect to port 2999 of the BrightSign unit; connect to the browser instance; and then press the refresh menu option on your local browser.  It results in the BrightSign refreshing too.

Remote File System Browsing

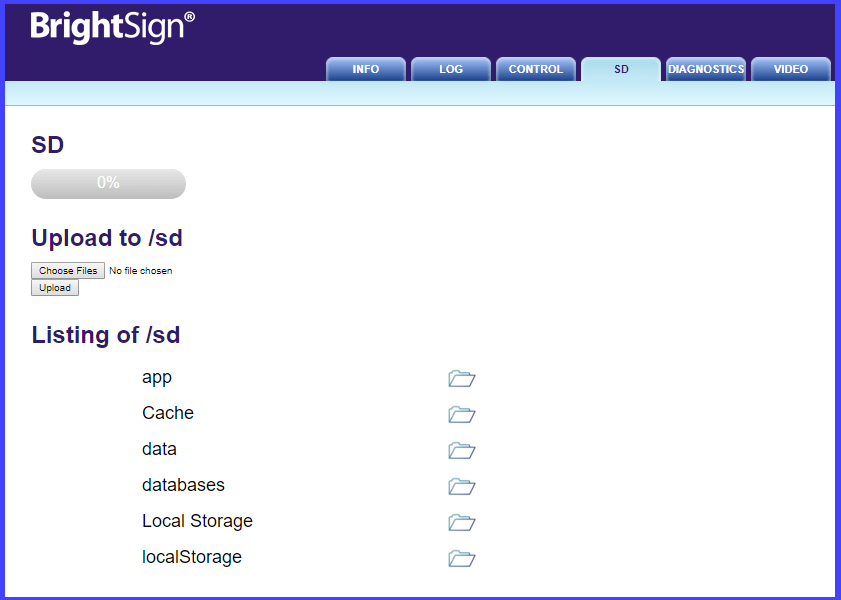
You can also upload files directly to the BrightSign. Connect to the BrightSign’s IP address (without the port specified).  There’s a tab labeled “SD” (for the SD card). From there you can upload content to any place on the file system.  After your files are copied, you can either reset the device (which in my opinion takes too long) or connect to the devices IP and refresh the view as described in the IFRAME section.

bscardlisting

Accessing Node

I initially ran into another problem with running my code in a widget.  I mentioned in another blog posts that BrightSign does not support the HTML5 APIs for persistent storage.  The solution that I suggest for this is using NodeJS within BrightSign.  Signagelive runs the code that was packaged inside of a widget in an IFRAME.  As it turns out IFRAMES on BrightSign does not support NodeJS functionality, but that is easily overcome.  The IFRAME that contains the widget has access to the parent window.  The child window cannot call NodeJS functions directly, but it can grab a reference to its parent and invoke the parent’s NodeJS functionality.  To minimize the difference between code run within and outside of the WGT and IFRAME we can coalesce the possible locations of a needed function. To get access to the required function, I used the following.

window.require = window.require || window.parent.require;

File System Access

My attempts to access the file system would initially fail while hosted in Signagelive. To fix this it was necessary to modify AutoRun.brs. When the BrightSign version of Signagelive creates its HTML window (of type roHtmlWidget in BrightScript) it does not configure the window for file system access. To fix this the WebWindowHTML function in Autorun.brs needs a couple of items added, storage_path and storage_quota.

Function WebWindowHTML(index% as integer, url$ as string, RectX as integer, RectY as integer, RecWidth as integer, RecHeight as integer) as Object
	
	webRect=CreateObject("roRectangle", RectX, RectY, RecWidth, RecHeight)
    is = {
        port: 3000
    }
    webPageConfig = {
        nodejs_enabled: true,
        storage_path: "SD:"
        storage_quota: 1073741824        
        inspector_server: is,
        brightsign_js_objects_enabled: false,
        javascript_enabled: true,
        mouse_enabled: true,
        scrollbar_enabled: false,
        storage_path: "SD:",
        storage_quota: 1073741824,   
		port: m.msgPort,
        security_params: {
            websecurity: false,
            camera_enabled: true,
            insecure_https_enabled: false
        },
		url: url$
    }
	
    webhtmlWidget = CreateObject("roHtmlWidget", webRect, webPageConfig)
    webhtmlWidget.Show()

	return webhtmlWidget
	
End Function


I talked to an engineer at Signagelive about addressing this issue.  I do not know how frequently Signagelive makes updates., but this change may appear in future versions of the software making it unnecessary.  If you happen to read this close to the time that the post was made, the change might not have rolled out yet.  You can make the change yourself but beware of a possible risk.  There is a possibility that an update will be made and pushed out to your device that does not yet contain this change. If that happens you would want your code to fail gracefully instead of simply crashing.

-30-

Simplified Sidereal Time

While preparing for a full moon / blue moon, I was looking at an algorithm for calculating sidereal time and had a mini epiphany. The algorithm is basically an elaborate modulo operation. Modulo is generally applied to integer values, but it can be used with decimal numbers and even fractions.

For the algorithm that I have generally used, a lot of the calculations are only for converting the date to some linear expression of time. The calendar that is usually used does not express time linearly.

The amount of time from the beginning of one month to the beginning of another month could be 28 to 31 days. With linear representations of dates, a subtraction operation is all that is needed to know the amount of time between two moments in time.

In JavaScript, this linear representation of time is shown by calling getTime() on a date object. The time value for 2019 January 10 @16:40:20 UTC  is 1547138420000. This value is the number of milliseconds since another date and time. This time and date is also 00:00:00 Sidereal time. The number of milliseconds in a sidereal day (23 hours 56 minutes 4.1 seconds) is 86164100. For any date after 2019-01-10T16:40:20 we could get the Sidereal time by doing the following:

  • Acquire the getTime() value for the date in question.
  • Subtract 1547138420000 from that value.
  • Get the modulo 86164100 for the resulting value.
  • Multiply the result by 24/86164100.

The result of these operations is the sidereal time in decimal. If you want to convert it to hour:minute:second format do the following:

var hour = Math.floor(result);
var minute = (result % 1) * 60;
var second = (minute % 1) * 60;
minute = Math.floor(minute)

solstice

-30-

NodeJS on BrightSign

When I left off I was trying to achieve data persistence on a BrightSign  (model XT1144) using the typical APIs that one would expect to be available in an HTML application. To summarize the results, I found that using typical methods of checking localStorage and indexedDB show as being available; but indexedDB isn’t actually available; and localStorage appears to work, but doesn’t survive a device reset.

The next method to try is NodeJS.  The BrightSign devices support NodeJS, but the entry point is different than a standard entry point of a NodeJS project. A typical NodeJS project will have its entry point defined in a JavaScript file. For BrightSign, the entry point is an HTML file. NodeJS is disabled on the BrightSign by default. There is nothing in BrightAuthor that will enable it. There is a file written to the memory card (that one might otherwise ignore when using BrightAuthor) that must be manually modified. For your future deployments using BrightAuthor, take note that you will want to have the file modification described in this article saved to a back-up device so that it can be restored if a mistake is made.

The file, AUTORUN.BRS, is the first point of execution on the memory card. You can look at the usual function of this file as being like a boot loader; it will get your BrightSign project loaded and transfer execution to it. For BrightSign projects that use an HTML window the HTML window is actually created by the execution of this file. I am not going to cover the BrightScript language. For those that were ever familiar with the language, it looks very much like a variant of the B.A.S.I.C. language. When an HTML window is being created it is done with a call to the CreateObject method with “roHtmlWidget” as the first parameter to the function. The second parameter to this call is a “rectangle” object that indicates the coordinates at which the HTML window will be created. The third (optional) parameter is the one that is of interest. The third parameter is an object that defines options that can be applied to the HTML window.  The options that we want to specify are those that enable NodeJS, set a storage quota, and define the root of the file system that we will be accessing.

The exact layout of your Autorun.js may differ, but in the one that I am currently working with, I have modified the “config” object by adding the necessary parameters. It is possible that in your AutoRun.brs that the third parameter is not being passed at all. If this is the case, you can create your own “config” object to be passed as a third parameter. The additions I have made are in bold in the following.

is = {
    port: 3999
}    
security = {
        websecurity: false,
        camera_enabled: true
}
    
config = {
    nodejs_enabled: true,
    inspector_server: is,
    brightsign_js_objects_enabled: true,
    javascript_enabled: true,
    mouse_enabled: true,
    port: m.msgPort,
    storage_path: "SD:"
    storage_quota: 1073741824            
    security_params: {
        websecurity: false,
        camera_enabled: true
    },
    url: nodeUrl$
}
    
htmlWidget = CreateObject("roHtmlWidget", rect, config)

Once node is enabled the JavaScript for your page will run with the capabilities that you would generally expect to have in a NodeJS project. For my scenario, this means that I now have acces to the FS object for reading and writing to the file system.

fs = require('fs');
var writer = fs.createWriteStream('/storage/sd/myFile.mp4',{defaultEncoding:'utf16le'});
writer.write("Hello World!\r\n");
writer.end()

I put this code in an HTML page and ran it on a BrightSign. After inspecting the SD card after the device booted up and was on for a few moments I saw that my file was still there (Success!).  Now I have a direction in which to move for file persistence.

One of the nice things about using the ServiceWorker object for caching files is that you can treat a file as either successfully cached or failed. When using a file system writer there are other states that I will have to consider. A file could have partially downloaded, but not finished (due to a power outage; network outage; timeout; or someone pressing the reset button; etc.). I’m inclined to be pessimistic when it comes to guaging the reliability of external factors to a system. I find it necessary to plan with the anticipation of them failing.

With that pessimism in mind, there are a couple of approaches that I can immediately think to apply to downloading and caching files.  One is to download files with a temporary name and change the name of the file from its temporary to permanent name only after the download is successful. The other (which is a variation of that solution) is to download the file structure to a temporary location. Once all of the files are downloaded, I could move the folder to its final place (or simply change the path at which the HTML project looks to load its files). Both methods could work.

I am going to try some variations of the solutions I have in mind and will write back with the results of one of the solutions.

-30-

Chrome 74: What is New for Developers

chrome

Chrome  74 has been released. The most notable user facing feature is dark mode. It has a number of API updates for developers too. Some of those updates include the following (but there are more)

    • Private class Fields
    • Reduced Motion Experience
    • CSS Transition Event
    • Feature Policies
    • KV Storeage API
    • Buffering of client.postMessage()

Private Class Fields

Fields on classes can now be declared as private by prefixing them with #. Consider the # to be part of the members name. Members marked with this character are not accessible outside of the class.

Reduced Motion Experience

There are people that might experience motion sickness from web pages with lots of scrolling and parallax. A new media query was added so that an experience with less motion can be provided to users that are sensitive to it.

@media(prefers-reduced-motion:reduce)

CSS Transition Event

Other browsers have supported CSS transition events. Until now Chrome hasn’t been one of them. With the release of Chrome 74 transition events are now supported. The names of the events are

  • transitionrun
  • transitionstart
  • transitionended
  • transitioncancel

Feature Policies

Some APIs can be selectively enabled or disabled through a Feature-Policy header or through an allow attribute on an iframe. The list of features allowed can be queried with document.featurePolicy.allowedFeatures()

KV Storage API

Storage through localStorage is slow (it’s synchronous). While IndexedDB is asynchronous it’s a more complex API.  To provide a faster API that is easier to use Google has added support for the Key Values Storage API.  There is also a KV polyfill for browsers that do not support KV Storage.

Buffering of client.postMessage()

Messages sent via client.postMessage() are now buffered until a document is ready. a call to postMessage doesn’t dispatch until either DOMContentLoaded is fired, onmessage is set, or startMessages() is called.

NVIDIA Jetson Development Environment Setup

In previous posts on the NVIDIA Jetson posts I’ve talked about getting the device setup and some additional accessories that you may want to have. The OS image for the NVIDIA Jetson already contains a compiler and other development software. Technically someone can start developing with the OS image as it is when it ships.  But it is not desirable to develop this way.

There may be some things that you prefer to do on your primary computer and you’d like to be able to control the Jetson from your primary machine. The OS image for the Jetson already has SSH enabled. If you are using a Windows machine and net an SSH client I suggest using PuTTY for Windows. It’s a great SSH client and also works as a telnet or serial console when needed. It’s available from https://www.putty.org/.

When Putty is opened by default it is ready to connect to a device over SSH. You only need to enter the IP address to start the connection. Once connected enter your account name and password and you’ll have an active terminal available. For copying files over SSHFTP I use WinSCP (available from https://winscp.net/).

For development on the device I’ve chose Visual Studio Code as my IDE. Yes, it runs on ARMs too.  There are a number of guides available on how to get Visual Studio Code recompiled and installed for an ARMS system. The one that I used is available from code.headmelted.com. In a nutshell I followed two steps; I entered a super user session with the command

su -s

Then I ran the following (which downloads a script from the head melted site and runs it).

sudo apt-key adv --keyserver keyserver.ubuntu.com --recv-keys 0CC3FD642696BFC8^C
. <( wget -O - https://code.headmelted.com/installers/apt.sh )

The script only takes a few moments to run. After it’s done you are ready to start development either directly on the board or from another machine.

To make sure that everything works let’s make our first program with the Jetson Nano. This is a “Hello World” program; it is not going to do anything substantial. Let’s also use make to compile the program. make will take care of seeing what needs to be built and issuing the necessary commands. Here it’s use is going to be trivial. But I think starting with simple use of it will give an opportunity for those that are new to it to get oriented with it. Type the following code and save it as helloworld.cu

#include 

__global__ void cuda_hello()
{
    printf("Hello World from GPU!\n");
}

using namespace std;

int main()
{
	cout << "Hello world!" << endl;
	cuda_hello<<>>();
	return 0;
}

We also need to make a new file named makefile. The following couple of lines will say that if there is no file named helloworld (or if the file is out of date based on the date stamp on helloworld.cu) the to compile it using the command /usr/local/cuda/bin/nvcc helloworld.cu -o helloworld

helloworld: helloworld.cu
   usr/local/cuda/bin/nvcc helloworld.cu -o helloworld

Note that there should be a tab on the second line, not a space.
Save this in the same folder as helloworld.cs.

Type make and press enter to build the program. If you type it again nothing will happen. That’s because make sees that the source file hasn’t changed since the executable was build.

Now type ./helloworld and see the program run.

Congratulations, you have a working build environment. Now that we can compile code it’s time to move to something less trivial. In an upcoming post I’ll talk about what CUDA is and how you can use it for calculations with high parallelism.

NEWS:Linux on Dex Coming to More Devices

LoD

Samsung has announced that Linux on Dex is coming to more devices. Previously it was only available on non-LTE models of the Galaxy Tab S4 and on the Galaxy Note 9. Per an email that Samsung sent on Monday support is coming to the Android Pie builds of the  S9, S9+, S10e, S10+, Tab S4, and Tab S5e.

Based on interaction with others (and also being my own personal story) there are owners of the TAB S4 that haven’t yet received Linux on Dex support that wait with anticipation for support to come. I’ve not been able to confirm compatibility yet as the Pie build of Android isn’t yet available for my device. The Linux on Dex page had previously stated that none of the LTE Tab S4 models were supported. The page now only states that the Verizon LTE tablets are not supported.  I hope that this means that support for my device is coming. For now the only option is to wait.

Update (2019-April 30): Today I received the Android Pie update for the Galaxy Tab S4. It does indeed have support for Linux on Dex (finally!).

NVIDIA Jetson Nano Shopping List

Jetson Nano Packaging

I had made a video posted to YouTube about the Jetson Nano and the additional items that I purchased for it. This is a complete list of those items and some extras (such as memory cards of some other sizes).


General Items

Memory Cards


Items I Found Helpful

Unboxing and Setting Up the NVIDIA Jetson Nano

I pre-ordered the NVIDIA Jetson Nano and had the opportunity to have my first experiences with it this week. For those that are considering the Nano I give you the gift of my hindsight so that you can have a smoother experience when you get started. My experience wasn’t bad by any measure. But there were some accessories that I would have ordered at the same time as the Jetson so that I would have everything that I needed at the start. I’ve also made a YouTube video covering this same information. You can view it here.

How does the Nano Compare to Other Jetson Devices?

The Jetson line of devices from NVIDIA can be compared across several dimensions. But where the Jetson Nano stands out is the price. It is priced at about 100 USD making it affordable to hobbiest. Compare this to the Jetson TK1 which is available for about 500 USD or the Jetson Xaviar available for about 1,200 USD. Another dimension of interest is the number of CUDA cores that the units have. CUDA cores are hardware units used for parallel execution.

  • TK1 – 192 CUDA Cores
  • TK2 – 256 CUDA cores
  • Nano – 128 CUDA Cores
  • Xavier – 512 CUDA Cores

In addition to the cores the other Jetson kits have support for other interfaces, such as SATA for adding hard drives or a CAN bus for interfacing with automotive systems. For someone getting started with experimentation the Jetson Nano is a good start.

What is In the Box?

Not much. You’ll find the unit, a small paper with the URL of the getting started page, and a cardboard cutout used for supporting the card on the case.

What Else Do I Need

  • SD Card
  • Power Supply
  • Keyboard
  • Mouse
  • Monitor (HDMI or Display Port)
  • 40mmx40mm Cooling Fan (optional)
  • WebCam (optional)
  • WiFi adapter or Ethernet cable to router

Most of the things on that list you might already have. For an SD card get one at least 8 gigs or larger.

Power Supply

A power supply! It uses a 5 volt power supply like what is used in a phone. Well, kind of. Don’t expect for any of your 5V power supplies to work. I found the hard way that many power supplies don’t deliver the amount of current that is needed. Even if the power supply is capable a USB cable might not allow the needed amount of current to pass. If this happens the device will just cut off. There’s no warning, no error message, nothing. It just cuts off. I only came to realize what was going on after I used a USB power meter on the device. I used a power meter for USB-A, but the board already has contacts for using a USB-C port. Depending on when you get your board it may have a USB-C port on it (possibly, speculatively).

Web Cam

A Raspberry Pi camera will work. But I used a Microsoft LifeCam. There are a number of off-the-shelf webcams that work. You’ll only need a camera if you plan on performing visual processing. If your going to be processing something non-visual or if your visual data is coming from a stream (file, network location) then of course this won’t be necessary.

WiFi

You have two options for WiFi. One option is a USB WiFi dongle. There are a number of them that are compatible with Linux that will also work here. I am using  the Edimax EW-7811UN. After being connected to one of the USB ports it just works. Another solution is to install a WiFi card into the M.2 adapter. It might not be apparent at first, but there is a M.2 slot on the case. I chose to use this solution. Like the USB solution there’s not much to be done here; inserting the WiFi adapter into the slot, securing it is most of the work. Note that you’ll also need to connect antennas to the wireless card.

Operating System Image

The instructions for writing a new operating system image are almost identical to that of a Raspberry Pi. The difference is the URL from which the OS image is downloaded. Otherwise you download an image, write it to an SD card, and insert it into the Nano. Everything else will be done on first boot. You’ll want to have a keyboard connected to the device so that you can respond to prompts. When everything is done you’ll have an ARMs build of Ubuntu installed.

For writing the OS image I used balenaEtcher. It is available for OS X and Linux. The usage is simple; select an OS image, select a target drive/memory device, and then let it start writing to the card.  The process takes a few minutes. But once it is done put the SD card in the Jetson Nano’s memory card slot.

Case Options

A case may be one of the last things that you need. But if you seriously have interest in having the Jetson Nano I suggest ordering the case at the start. There are no off-the-shelf cases available for purchase for the Nano. But there are a few 3D printable plans for the Jetson Nano. I’ve come across three and have settled on one.

First Place: Nano Mesh

NanoMesh case Image
NanoMesh 3D Printable Case

The case is a bit thick, but it isn’t lacking for ventilation. The case height accommodates a fan. While the design doesn’t include any holes for mounting antennas for WiFi drilling them is easy enough.

Second Place: Nano Box

NanoBox
Nanobox Case for nVidia Jetson Nano

The NanoBox will envelope the Jetson leaving the heat sink almost flush with the case. I’d suggest this one if you plan don’t plan to use a fan on the Jetson.  If you ever change your mind and decide that you want to have a fan it can be added. But it will be on the outside of the case.

Third Place: Nano-Pac

Nano-Pac 3D printable case
Nano-Pac case

There’s not much to say about this case. It fully envelopes the Jetson Nano. But I’ve got questions about the cooling effectiveness of this case.

It’s Assembled and Boots Up. Now What?

Once the Jetson is up and running the next thing to do is to setup a development environment. There is a lot of overlap between targeting the Jetson series and targeting a PC that has an NVIDIA GPU. What I write on this will be applicable to either except for when I state otherwise.


Current Bright Sign Models

There are 4 main units in the BrightSign product line (there are a few others available for hardware integrators, but I’m ignoring these for now and am only looking that the units in their own cases).

LS Line

The LS line of the bright sign players is compact. It is idea when working with a single HD stream at up to 60 frames per second. It also offers a single USB port for connecting to other peripherals.

Models

slide

HD Line

The HD line can decode a single 4K video stream. With the HD line of players a GPIO port is also added to allowing additional hardware to be connected to the player for other forms of interaction.

Models

slide

XD Line

These units are set apart from the HD line in being capable of decoding up to 2 4K video streams and have an improved HTML rendering capabilities.

Models

slide

XT Line

These are the most capable Brightsign units, able to decode two 4K video streams at once. Some of the units in this family also feature an HDMI in allowing them to mix in video from another source with content. These units have 2 USB ports (USB-A and USB-C). They can also be powered via PoE.

Models


slide


TIP: Creating a New CUDA Project with Visual Studio 2019

If you’ve installed Visual Studio 2019 and are trying to work with CUDA there are a couple of problems that you’ll encounter. The first is going to be an error that you receiving when trying to opan any CUDA project about missing properties. This is from the CUDA installer placing some of the files in the wrong place. It places the files based on what was in Visual Studio 2019 Preview. It was only recently that the full release of 2019 was made available (and for the full release theses files need to go into a different place). To work around that see this post for where to move the missing files to.

Once that is resolved the next problem is that the CUDA project templates are missing. An NVidia representative in the NVidia developer forums acknowledged the problem and says a fix will come in an upcoming release. Until then the current solution is to grab an existing CUDA project and rename it. If you need an existing CUDA project you can find them in the folder for the NVidia CUDA samples or download one from here:

https://devtalk.nvidia.com/cmd/default/download-comment-attachment/78613/


Tip: Installing CUDA SDK on Visual Studio 2019

If you try to install the nVidia CUDA SDK and plan to use Visual Studio 2019 there’s an additional manual step that you’ll need to take. The installer available for the current version of CUDA (10.1) doesn’t specifically target the recently released Visual Studio 2019, but it will mostly work with it. I say “mostly” because after installing it you’ll find that the CUDA related project templates are missing and you can’t open the sample projects.

Fixing this is as simple as copying a few files.  Copying everything from the following folder

C:\Program Files\NVIDIA GPU Computing Toolkit\CUDA\v10.1\extras\visual_studio_integration\MSBuildExtensions

Place it into this folder

C:\Program Files (x86)\Microsoft Visual Studio\2019\Enterprise\MSBuild\Microsoft\VC\v160\BuildCustomizations

You may have to reply to administrative prompts. But once those files are copied you should have access to the project templates and the samples.